I have a lot of text objects that I need to punch up the outline - basically white text with a black outline. I’ve tried and failed repeatedly to do this. I tried Youtube examples that show a few methods but none seem to work for me. The only solution I found that looked promising was to convert the text to curves and apply a bezier circle as a bevel object… only problem is the text is no longer editable after its converted. Is there any easy solution out there to do this…?
I’m desperate… I’m to the point of duplicating all the text and bevelling an edge under the white text… but I can’t even get that to work (see previous post about unlinking text objects)
Thanks for any tips!
What is your setup? Share some pics or blend file
Personally, I tend to retopo text. There aren’t very many letters, and you can keep the font forever when you’re done. This allows tons of creative typography/sfx/blending.
If you’re really just in a hurry, put a “bevel” on the text and then convert it to a mesh. The bevel will give you a clean outline for sure (in the automatically topologized one)
Sorry… what do you mean by ‘retopo’ the text?
The bevel alone doesn’t allow me to set a fill color in the text it just creates an outline… I need both…
What do you mean?
In the mesh, you simply select the faces you want, create a new material, and click “assign”
or did you mean you want to add freestyle lines?
Retopologizing means you take an existing mesh and create a new, similar mesh on top of it with better edge flow.
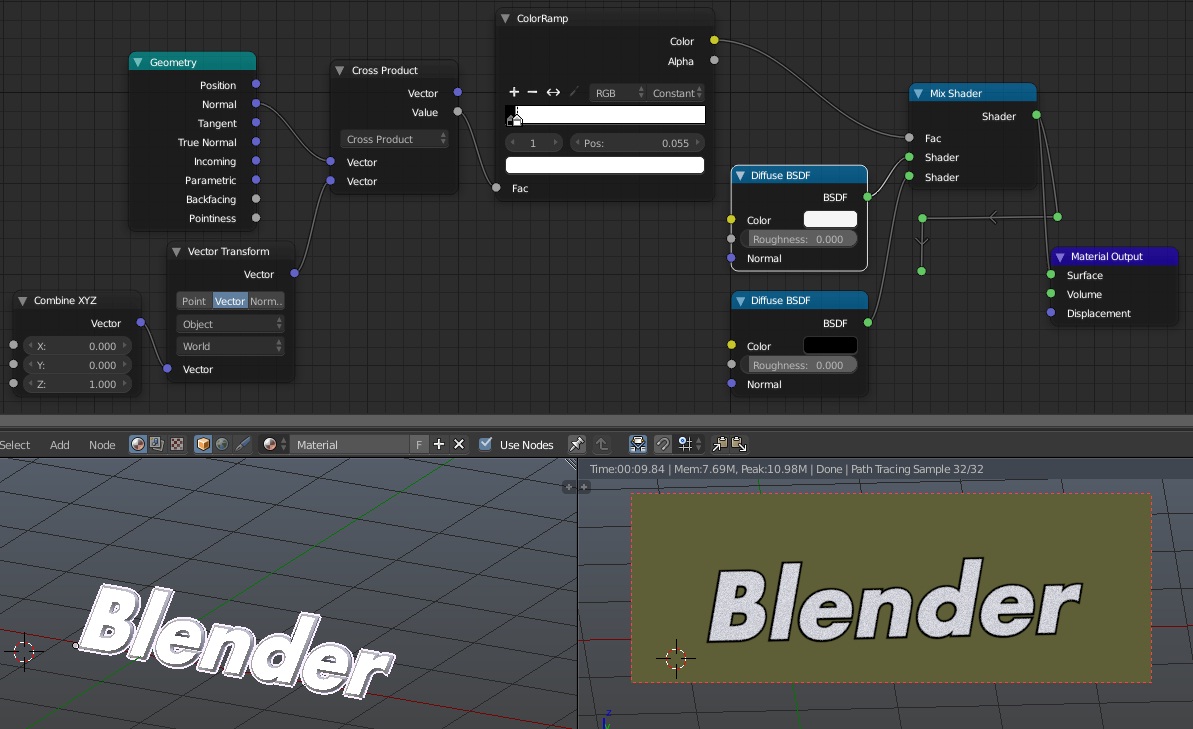
If I understand correctly you want to have text object with black outline on its margins rendered while ideally having that text editable.
One possible solution is to add bevel to the text which will imitate margins of black color and then use material node setup which will check if a face is flat or if it’s tilted in the 3D space (bevelled margin).
Here’s the node setup:

True Normal provides normal of the given face of the object. Then with Vector Math node it is compared to vector 0,0,1 (oriented upwards, in the Z axis, so to exclude all flat faces from the mask). The output is edited with ColorRamp set to Constant to sharpen the black border. Then this output is used as a factor for mixing shaders you’d like to use.
This solution technically doesn’t depend on camera angle since orientation of the given normal is compared to static vector; so if you rotate the view you will see black material all over the sides of the text (if it is extruded).
I just want to create editable text (not meshes) that has a solid white fill with a black edge outline on the text. The solution below is exactly what I was looking for… something that has a fairly simple workflow. I have a lot of text objects to apply this to. In any case thanks!
Thanks so much - this is exactly what I was looking for.If this works I’m off to the races -thanks a lot!
is this working with Font text or need to convert to mesh first ?
thanks
happy bl
I just tried it and it works really well… one issue I’m seeing is when the text animates and rotates into different angles , the fill gets lost due to the directionality of the ‘vector math’ converter… but as long as it’s pointing in the direction it does the trick.
The offset helps with the bevel to control the amount of edge vs. font weight.
UPDATE: It keeps the fill and edge if you are looking from the camera view and spin the view around in the 3D editor … but when the object itself is rotated over a number of frames, the white fill turns black like the edges. Not sure how to get around that…
I meant to add - it’s font text not mesh.
I tried nodes set up but don’t get the effect
is it possible to upload sample file
thanks
happy bl
@3Dvolumetric right so converting wasn’t so complex. Create vector in the CombineXYZ node, then convert it to the world space with Vector Transform.
File this time if anyone really needs it
text-black-outline.blend (543.5 KB)
Edit for clarifying
First time it wasn’t working as expected if object was rotated - the mask was changed since comparison in Vector Math node was performed with static vector oriented upwards (0,0,1). As once object rotated, its flat faces aren’t oriented along Z axis, and this no longer worked.
With edited nodes, the vector is the same but it is converted with Vector Transform node and isn’t dependent on object rotation anymore.
I thought of something like that 1st thing this morning! Brilliant solution!
This is really useful for popping text over busy backgrounds like labels on maps for example…
Thanks so much!