Simple Usage Questions.

I am hoping that someone can simply address the following here. I have been through the tutorial example material and am a little bit lost as to how to achieve the following:

-How can I add a 3D point, and specify its (x,y,z) values?

-I know how to shift select multiple points. How do I join a straight line between two points? Or a bezier curve which will proceed through a number of shift select points in order?

-How may I alter a straight line into a bezier curve to include a 3rd or more points later? I have seen how the bezier editing includes the relative base straight lines.

-I know how to move a 1D,2D,3D object by holding down the scroll button on my mouse. Is there another way to do this?

-Is it possible to twist a 2D or 3D object relative to some axis line running along in a direction? Or a surface about a point?

-It a 3D object proceeds through a surface, how may I cut off one end or the other? Does this process introduce needed points for the object at the surface bisect locations?

-If I have two 2D and or 3D objects which are to touch one another, how may I automatically combine them to one object at the point, line or surface of contact? Will this system eliminate spurious points and add new ones as required?

-Using Blender, how is it possible to fully rotate an entire 3D object (and not just one surface) about some specified?

-In Blender, how does one specify, numerically, the editing point of view (not the camera), in terms of position and angle (relative above, and directly down over, some 3D object?

-How is it possible to convert a .lw3d Lightwave 3d file to a .blend file, and vice versa?

-Can the equivalent be done for one or a series of objects selected in order (using successive application of the right mouse button) into one, or more wavefront .obj files? Can you save a number of objects in an obj?

-What does File\External Data… do?

-How is it possible to export a full list of necessary (relevant) points for one or more world objects, certainly including descriptive points for curves and bezier curves? In terms of Point(x,y,z)? Can this also be done by also including line linking relevant information? Does this happen in .lw3d and .obj files anyway?

-Can this information be visually discerned by a human reader by opening either of those file formats in a text editor?

Wow thats a lot of questions, I will do my best to answer them

  1. The way I would do it: Add a plane, go into edit mode and delete the other three vertices, select the last vert and specify its position in the properties tab on the right (press ‘n’ if its not there)

  2. select two verts, press ‘f’

  3. not sure

  4. Holding the scroll will rotate the camera right? to move the object, either left click and drag the red/blue/green arrow, to move along an axis. Or press ‘g’ to grab and move with the mouse. You can use the axis views (numberpad 1,3,7) to limit movement to a particular plane e.g. press 7, then g to move your object - it wont move on the z axis, just x and y.

  5. You can rotate useing ‘r’, and set the origin at the bottom of the 3D view (if you hover over the icon it says “pivot centre for rotation/ scaling”)

  6. You could use the knife tool ‘k’ to add verts, but would be better to model the objects so they don’t intersect.

7.ctrl j will join two objects, but keep seperate meshes

  1. put the 3D cursor on the point you want to pivot around. Set the origin of the object to 3D cursor, then use ‘r’ to rotate.

9.Use numberpads 1,3,7, also their opposites ctrl 1, ctrl 3, ctrl 7

no idea about the rest, hope this helped.
Rich

Looks like rich beat me to it (had a lot of typing to do) but here’s my take:

-How can I add a 3D point, and specify its (x,y,z) values?

Create a plane, tab into edit mode, select all points, Alt-M, At Center, tab out of edit mode. In the Transform panel, type the coordinates into the Location section.

-I know how to shift select multiple points. How do I join a straight line between two points? Or a bezier curve which will proceed through a number of shift select points in order?
Select the two points and press F. If you do this with a number of points, you can then convert the resulting line into a bezier by (in object mode) typing Alt-C, Curve from Mesh/Text.

-How may I alter a straight line into a bezier curve to include a 3rd or more points later? I have seen how the bezier editing includes the relative base straight lines.
See above.

-I know how to move a 1D,2D,3D object by holding down the scroll button on my mouse. Is there another way to do this?
Not sure what you mean by “holding down the scroll button”. What you’re probably actually doing is rotating the view, not the objects.

-Is it possible to twist a 2D or 3D object relative to some axis line running along in a direction? Or a surface about a point?
Select the thing (vertex, edge, poly) that you wish to twist, Shift-S, Cursor to Selected, press the period key (this will allow you to manipulate things around the 3d cursor), do want you want to do.

-It a 3D object proceeds through a surface, how may I cut off one end or the other? Does this process introduce needed points for the object at the surface bisect locations?
Play around with the Boolean modifier: Select the target object, in the properties panel, select the little wrench icon, select Add Modifier, Boolean, play around with the settings to get the desired result. You can also select the other object and add a Boolean Modifier to it to get some results that may be to your liking.

-If I have two 2D and or 3D objects which are to touch one another, how may I automatically combine them to one object at the point, line or surface of contact? Will this system eliminate spurious points and add new ones as required?
To combine 2 objects into one, shift-select them then press Control-J. If they have any points in common after joining, you can get rid of them by pressing the Remove Doubles button in the T-Panel (the panel on the left of the screen.

-Using Blender, how is it possible to fully rotate an entire 3D object (and not just one surface) about some specified?
See above.

-In Blender, how does one specify, numerically, the editing point of view (not the camera), in terms of position and angle (relative above, and directly down over, some 3D object?
Not sure you would want to do this without using the camera. You could create an empty, place it where you like, with the transform panel, press the period key on the NUMERIC keypad, which will zoom your view to the empty. Then you can work from that point of view.

-How is it possible to convert a .lw3d Lightwave 3d file to a .blend file, and vice versa?
Blender can import .LWO files directly. Make sure you have the feature turned on by opening the User Preferences window (Control-Alt-U), under the Addons tab, Import-Export, put a check by Import-Export:Import Lightwave Objects.

-Can the equivalent be done for one or a series of objects selected in order (using successive application of the right mouse button) into one, or more wavefront .obj files? Can you save a number of objects in an obj?
If you mean exporting each object as a separate file, yes, select one object, export to obj with the “Selection Only” checkbox checked, or you can export each frame of an animation as an .obj sequence.

-What does File\External Data… do?
If you’ve imported textures from various places on you HD, you can pack them all into one .blend file for easier packaging of objects/scenes.

-How is it possible to export a full list of necessary (relevant) points for one or more world objects, certainly including descriptive points for curves and bezier curves? In terms of Point(x,y,z)? Can this also be done by also including line linking relevant information? Does this happen in .lw3d and .obj files anyway?
Obj files are basically just text, so if you export a .blend file to that format you should be good to go. Lightwave Scene files (.lws) are also just text files if I’m not mistaken, but you’ll have to have Lightwave to make one of those since Blender can’t export to .lws.

-Can this information be visually discerned by a human reader by opening either of those file formats in a text editor?
Can’t answer that for you. You’ll have to open one and study it yourself. If you’re familiar with those formats you can probably understand what’s going on, especially an .obj which is just a bunch of point coordinates. An .lwo file is different and will probably look like gobble-d-gook.
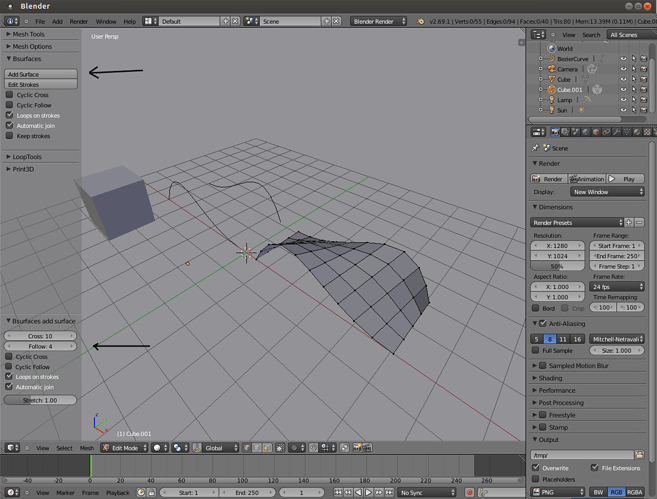
I’d like to add a couple of comments:

The reason why you have to add a plane and then delete all but one vertex is that Blender can’t have a vertex without a containing object.

Also, once you’ve got an object (any object, whether you’ve deleted any or all vertices or not) you can add individual vertices by:

  • holding down Ctrl and LMB,
  • click the RMB,
  • move the mouse and repeat.

Note: The above may be reversed if you have RMB set to select (instead of LMB which I’ve changed in preferences).

-How do I initiate a Knife action? Once I’ve made an enclosing Polytype, which is strictly a plain, with 3 or 4 points, and this Polytype passed through a 3D object by this Polytope (Entirely), which this cut the former Object into two objects through the specified Polytype Surface?

-How do I start doing a Knife action cutting surface? Can I still use the <<n>> menu to alter it as per a regular enclosed surface? What do I click, once the cut surface is positioned correctly, do do the cut (slicing)?

-Can one do curved surface cutting?

-Instead of just altering one bezier curve by guidance lines on two end points, what do I do to simply alter one bezier curve from descriptive peak points instead? How do I switch between both such modes here? Is this even possible in Blender?

-Is it possible to add a nurbs surface, across two (dual point) bezier curves, using shift select to start, such that the surface is extrapolated between the two bezier curves’ shortest betwixt linear distance lines, to facilitate a thus defined curvature surface? Such that the produced surface can be edited by the surface stricture editor frame afterwards, normally? I wish to numerically define the two bezier curves separately from the <<n>> menu first, and create and edit the surface betwixt as described.

-How may I break up a quadrilateral nurbs surface into two, separate bezier curves, as a deconstruction of the net result from the previous question (In the case of a curved, nurbs surface and not a flat planar one)?

-Instead of editing a new bezier curve by means of its end points, is it possible to edit it by terms
of its one or more peak description curves instead? How do I switch between either mode?

-Is it possible to add a new nurbs surface between two bezier curves, such that the result curvaded
surface is defined by deviations from the shortest planar “distance” between the four endpoints of the two bezier curves? Can the result curved surface be edited by the same curved surface frame? Is it possible
to automatically decompose the surface into two opposite bezier curves again?

A nurbs surface can be seen as a construction between two bezier curves. Since such a surface will have 4 borders, is it possible to proceed from the other pair? Is this all just a question of the order one does <<shift + select>> in?

How do I commence a knife action? I can defined a flat surface with 3 or 4 points minimum, or a curved
one. How do I position this knife surface through an object I want to cut? What do
I click to perform the cut action, separating the former object into two or more, resulting
in new, composite objects with new border points automatically computed? Does the knifing surface
need to pass all relevant borders of the 3D object(s) it bisects, or, it it is smaller and within borders, will
it consistently extrapolate outwards consistently and accordingly?

  1. Create an object. Go into ‘Edit’ mode. Make sure all ‘A’ faces are selected. Go to the Tool Shelf, hit ‘Bisect’. Go back to the
    3D window and click-drag your bisection line.

  2. For a surface, go into ‘Edit’ mode. Type ‘K’. Click on any spot in 3D space, go to another spot that crosses your surface, click again, hit ‘return’ to create the cut.

  3. Yes. Same way.

  4. Create Bezier curve, switch to ‘Edit’ mode, hit ‘W’ and select ‘divide’. Now on the tool shelf, select how many divisions.

  5. Not that I’m aware of. But you can transform two beziers (or more or less) to a mesh curve, then bridge the two curves.

  6. In the previous step, it was converted to a mesh, so mesh rules for cutting apply here.

Hope this helps.

Many thanks so far, all these answers are accurate. I only have the following left:

-How do I turn any subdivision segment part of a plane 2D or 3D object, from a straight line, into a bezier curve?

-How do I un-dock a 2D face segment from the rest of its 3D object after k cutting? Two 3D objects after k cutting? Is it possible to undock from one line, and not others? Are two coincident lines always docked, or not? If not, how do I dock or undock?

-I can use Extrude from a bezier curve to help create a surface with the bezier as one side. How may a corelatively extrude (bridge) between two different bezier curves in 3D?

Is there someone who may offer specific answers for the three dash questions in my most recent post square here?

-How do I turn any subdivision segment part of a plane 2D or 3D object, from a straight line, into a bezier curve?

-How do I un-dock a 2D face segment from the rest of its 3D object after k cutting? Two 3D objects after k cutting? Is it possible to undock from one line, and not others? Are two coincident lines always docked, or not? If not, how do I dock or undock?

-I can use Extrude from a bezier curve to help create a surface with the bezier as one side. How may a corelatively extrude (bridge) between two different bezier curves in 3D?

  • select the segment then shift-D to duplicate, press P to separate that duplicate into its own object. TAB out from edit mode, select the object you just created(can ALT-rightclick to select it if it is overlapping, or simply select it from the outliner). Press ALT-C and then select ‘curve from mesh’.

  • press P to separate any component(vertices, edges or polygon) into a separate object.

  • blenders curves are quite limiting, in the way that you cannot do spline patching. You have to convert the curves to meshes (alt-C), and then apply bridge, extrude, etc).

-I know that I can convert a bezier curve to a mesh and vice versa by selecting it with <Alt + C>. I know that I can select two bezier curves in succession using the mouse and the <Shift> key. However where is the button I click to bridge between the two beziers, I presume called ‘bridge’, to create a co relative curved planar surface between and respective between the two? Extruding will only give me the most direct plane. If I do extrude, how do I convert two vertices, being an edge of a plane, into a bezier later? Is it the fact that only one of these two is possible? Can I have the key combos and actions for the possible one(s)?

-If I have a straight or curved (perhaps prismatic edge), between two surfaces, how do I convert it to a bevel? What are the actions and key combinations for this here?

-If I have two 3D objects, curved surfaces or lines (and combinations thereof) intersection, how may I have blender automatically generate point items for 1,2 (and more even) intersection points produced thereof? What do I do, with what key combos [again, please]? I am learning here.

Does someone have some time to reply, please?

Can someone please reply to my previous 3 dash questions here?

I think the term you’re looking for is ‘loft’. Can’t do that with two bézier curves but you can generate a mesh between them. Check bsurfaces addon.

Duplicate, separate to its own object, convert to curve, set spline type from the tool shelf.

Blender is focused on polygonal modeling and there aren’t many CAD or solids modeling tools in it, since it’s not one. There are some addons (tinycad vtx, edgetools) that you could try.

I’m having a small amount of bother successfully following this advice.
Having used shift two co-select two separate bezier curves, and having checked
the tickbox to enable bsurfaces, what do I now click to create a co relative curved
planar surface between and respective between the two? I believe that loft is the term?

Bsurfaces is a mesh modeling tool and you need a mesh.
If you start with nothing but two bézier curves, add a mesh object (cube for example, doesn’t matter), join the two curves together (select, ctrl+J), select the curve object, then the cube, tab to edit mode, select all vertices and delete them (X -> vertices). Then click add surface on the tool shelf, under bsurfaces tools. After that you can make adjustments on the operator panel.


-BSurface will show up when you select an object and are in <tab> mode.
Under 2.86a, the BSurface version that is already included in the installation
may be enough.

-If you use K mode and the <n> shelf, you can adjust values for parrallelism.
You can use the measure addon to get triangulation rational values if that helps.
-There is also an addon that helps with something called “fracturing”, which may be the same.

-Can someone explain what the fracturing addon actually does to me here please?

-Instead of adding a curve to begin with, I am having trouble, say, converting one edge (selected between two points in <tab> mode) into a bezier, by means of converting to a curve and then a spline.

-With the 2 points on a cube edge selected, what may I do? I must I start from a spline, and may not
work backwards like this with Blender?

-I am having trouble getting bsurfaces to go. I click “add surface”, and the error message only tells me
“there aren’t any strokes”. What and how do I need to alter my two bezier curves so that
the add surface button will interpolate and draw, in terms of precisely what to do and where to click?

-Having finished my knife action using the <k> key, I find that I have spurious points left.
I go to delete the vertex only, but find myself loosing edges and surfaces in the process.
There is a function called “dissolve”, which I in fact don’t want happening by all this.
If I don’t want surfaces eliminated, how do I get rid of the old surface internal points
and lines only (when in <tab> mode)?

Was just thinking…
How you come up with weird new questions after previous ones get answered, instead of “thanks”?

You request precise answers but to actually give you those, it would be easier if you told what and why you are doing something (with pics). Perhaps then people can also tell whether or not you’re running ahead fast but completely to the wrong direction, which would be quite important.

Also where are you getting those weird instructions that will confuse you even more?
There is no <tab> mode, it’s edit mode and the hotkey to toggle it is tab.
“-If you use K mode and the <n> shelf, you can adjust values for parrallelism.”
There’s no K mode, it’s the knife tool and the hotkey is K. Also no <n> shelf - there is tool shelf (hotkey T) and properties panel (N), you can see those panels if you look in the view menu on the 3D view header.

Bsurfaces work with grease pencil and curves. You can point directions and starting points with grease pencil and can also convert those strokes into curves for further editing. If it says there are no strokes, it tells you it didn’t find required strokes/curves to draw the surface, depending on what you have there and what kind of surface you want.
You would need to find a proper tutorial on how to use it. There might be a problem with the tool you have, but no one can help you with that until others know what you did and can verify the problem.

Well, first of all thank everyone very much for the input that they have provided. I have struggled with certain aspects of tutorials for Blender, and have almost finished building up the practical abilities I want to have for the program. I thank the community very very much. :slight_smile:

I am using the key commands to mention shelves and areas because I’m memorising the key shortcuts as I go, which I do confess might be offputting to purists and experts who know all the official sub menu names.

I have divided the only things that I want to do that I don’t understand quite yet, despite previous responses covering things, into tasks, and I have just been asking questions about then, particularly if I have struggled to correctly interpret and act from responses that have gone before on this thread. What I have left is the following:

-How do I alter the 3D angle of the edit window to which freehand grease pencil lines are relatively planar parallel?

-Apart from using extrapolate <e> when doing lines or curves, is there any other way to add points, ie separate points, one at a time, by not converting a plane, line, or cube?

-One may shift (x,y,z) points one at a time. How do I alter the relative axes [X,Y,Z] away
from the default locations (and default back to the default again) when doing this?

-How do I convert edges and bezier curves to Grease pencil, when constructing things by virtue of the add menu?

-I can click convert under the <n> menu to give me anchors and red reference lines
for what I have drawn with a grease pencil. Is there a way to make all the guidance red lines

look the same as when going add bezier? After using <e> to extrapolate and continue more curves end to beginning, how do I lock one control point end to join with another beginning point from a line, so that they join and engage my curves continuously? Is changing the (x,y,z) value of the end and beginning point in the <n> area enough for full continuity?

-It is stated here that BSurfaces works with grease pencil curves. What is the keyboard shortcut key the for convert button in the <n> area, if there is one? How do I convert an edge between two vertices, in a 3D solid, into a bezier curve, and then the curve required for BSurfaces, from a 3D or 2D item to start? How do I do BSurface extrapolate my new surface between two separate grease pencil lines? What are the keyboard and click steps involved?

-Having finished my knife action using the <k> key, I find that I have spurious points left. I go to delete the vertex only, but find myself loosing edges and surfaces in the process. There is a behaviour called “dissolve”, which I in fact don’t want happening. If I don’t want surfaces eliminated, how do I get rid of the old surface internal points and lines only (when in <tab> mode)?

-By the by, is there a way to disable the recording and frame position menu entirely that appears at the bottom of the screen, so that I can have the extra space if I only want to create static 3D objects in the edit area?

Bsurfaces is a difficult tool to use. If you are starting out in Blender you will find the learning curve very steep. I recommend that you get some familiarity with using curves in Blender before jumping into Bsurfaces. If you don’t understand what retopology is for example some of the purpose of BSurf is going to be harder to grasp. There are two video tutorials on Vimeo that are really the best way to learn about it. They go fast so expect to watch them more than once to pick up all the info and what is being done. That’s an hour and a half each time total. It looks very easy but at first it will not be, and that’s for people quite familiar with Blender. Like I said it’s not a simple tool at all.