My first post please correct if I’m making a mistake about what/where I ask this question.
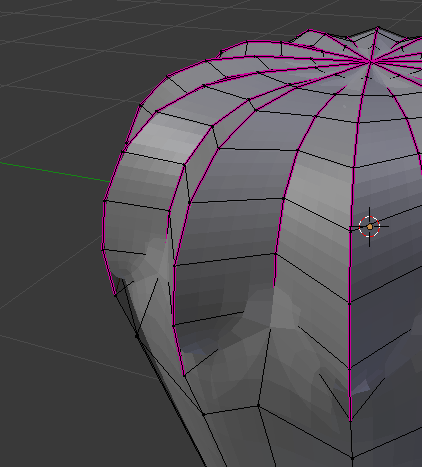
I’m modeling a semi-organic shape, and having a problem modeling the joining area between the complicated pumpkin-y part and the cylinder below. The messy crevice will be easy enough to fix by hand, but I can’t figure out how to get rid of the lip between the outer edge of the lobe and the cylinder. If you look at the wire frame, it has a smooth edge, but because of the heavy manipulation to the subsurf (I think), it has pulled in toward the center where I would like it to have a continuous line all the way down the object. Please help!
Looks like you have marked creases only partway down each edgeloop - why? That’s what’s creating your problem, Blender is trying to keep part of that edge creased and the other part smooth.
Your screenshot is very modest bt conceals too much. Don’t be afraid to show all of your mesh - no one’s going to steal your ideas.
Omg, thank you, that fixed the lip problem beautifully! When I creased the next edge down, however, it had the side effect, of pulling in the walls of the cylinder to create some serious lobes… any idea how to eliminate that? I ended up with the same problem at the pole, though I’ve no explanation for how.
Thank you so much, extending the crease worked! Unfortunately, I think extending the crease pulled the subsurf down from my cylinder to create a very scalloped edge and I’ve no idea how to fix this. Any suggestions for that?
Do you have an edge-split modifier as well as a subsurf modifier ? If so check their order
Are all vertices merged (select all vertices and W / remove doubles, increase merge distance in toolshelf or F6)
Are you using an arrray modifier ? if so ensure you have merged the array parts
So many questions ? Again you’ve been too conservative in showing us what you have. You have cropped your screenshot ! Show EVERYTHING because EVERYTHING is IMPORTANT
Upload your blend file to http://www.pasteall.org/blend/ and tell us the download link so we can see everything you can see
There’s some geometry problems without a doubt that I can see and for every one that I can see I bet Richard sees two more… So trying to fix this without a file is going to be like exploratory surgery over the phone - I can’t see it, and you don’t know what to look at…
Post the file, and also could you tell us what you are modelling, as in do you have a reference picture or a sketch or an object in mind? There might be a very simple and accurate way to model it that we could suggest once we have an idea of what it’s supposed to be. Maybe…
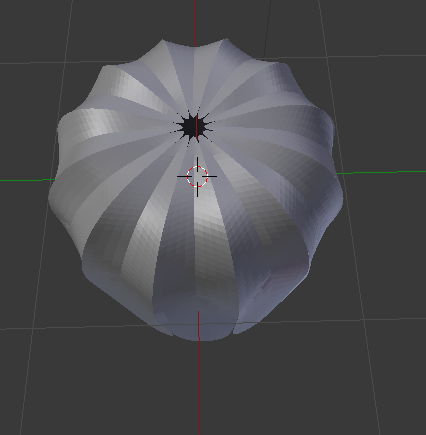
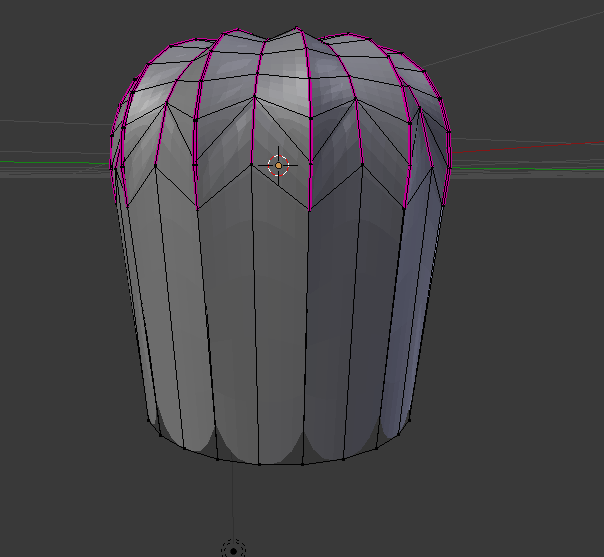
Sorry about the slow response, and thank you for being so helpful. I managed to fix the problem by starting over and modeling differently, but that posed a whole different set of problems. The first file is the older one, from which the above screen shots are taken, and I was trying to model a single lobe, then spin it 12 times. I ended up with major geometry problems - one being that my subsurf deformed in petal-like patterns around the rim, and the second being that I ended up with edges all the way down the cylinder when I wanted it to be smooth.
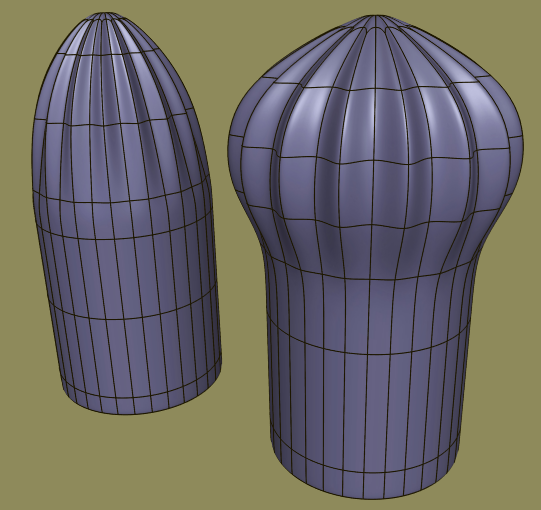
To solve that problem, I tried modeling a new cup from scratch (see the second file below), molding the whole thing at once. The overall visual effect is closer to my goal, but I’m sure I accidentally applied some non-symmetrical scaling and grabbing which completely defeats the point of me making a perfect 3D model in the first place.
It’s a cup, sorry I wasn’t trying to be secretive, and next I’m working on the handle (I’m going to post a separate thread for my problem there…)
I unfortunately don’t have a reference picture, but the second file (titled lily cup lobes 2) is very close visually to my final goal, except I’m going to model and apply a handle.
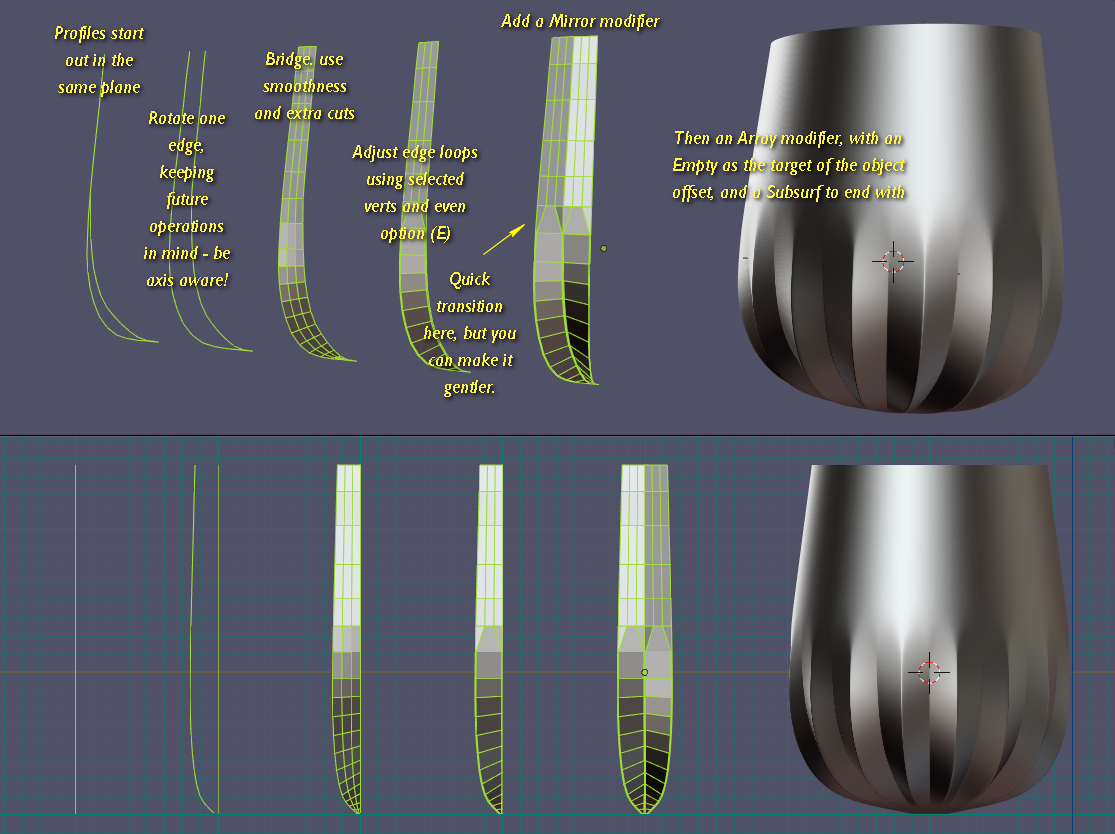
So the major problem here is using crease. They’re very useful but unfortunately I don’t know of any way to automatically blend them across several edges except manually. I hope if anyone knows of a way to paint with crease weight for example they’ll chime in here, because that would be very cool. In the absence of any such shortcut the only thing to do is to select each EDGERING (ctrl alt) and taper off the crease so it doesn’t go from 1.0 to 0.0 so abruptly.
The attached file solves the problem using this method.
The other option is not to use crease at all, and model in the extra loops by hand. This is a bit tedious but on the other hand it exports, which crease does not, and IMO is a better way to dit giving you much more control over the form. It’s not as easy as creasing though but if you want to do it that way I can step you through, however if you’re moving on and don’t want to spend more time in this phase you should.
I tapered the crease off on one of my models and the effect worked pretty well. Yeah, doing it by hand is a pain, but my mesh is simple enough that it doesn’t take that long. Most of modeling on this cup is a matter of modifying each edge ring and face until it’s where I want it, anyway.
The crease not exporting is a serious concern - what does that mean? That my lobes will round off if I export into any other file format? I’m planning to 3D print this, so I definitely need to be modeling in a way that will translate to sculpteo or shapeways.
Also, what do you mean by “model in the extra loops by hand”? What does that look like and how would I do it?
As you can tell I like to let the program do as much of the work as possible - this way I only have to model a very small section. Doing it this way also means that Ican go back and change something like the transition area by editing just 4 vertices.
Edit: Oh BTW you probably realized this, but the point was that no creases were used.
Holy crap that is amazing! I will follow the instructions from that graphic and see where it gets me, then I’ll report back. Thank you a million times.
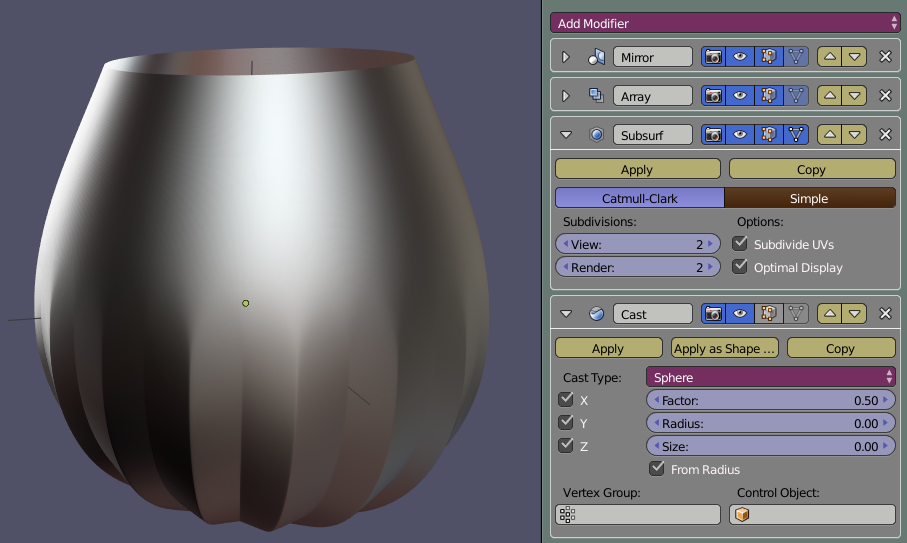
I followed your instructions and everything worked until I got to the array modifier at the end. I couldn’t figure out how to spin the array instead of having it go in a straight line, so just spun the lobe once it was mirrored and that worked fine. I also had some problems applying the subsurface (had to use simple, since catmull-clark did the same petal-edge thing as my original model) and solidifying the cup (it seemed to extrude along the normals, leaving me with gaps between each lobe) but I can worry about finishing techniques later on.
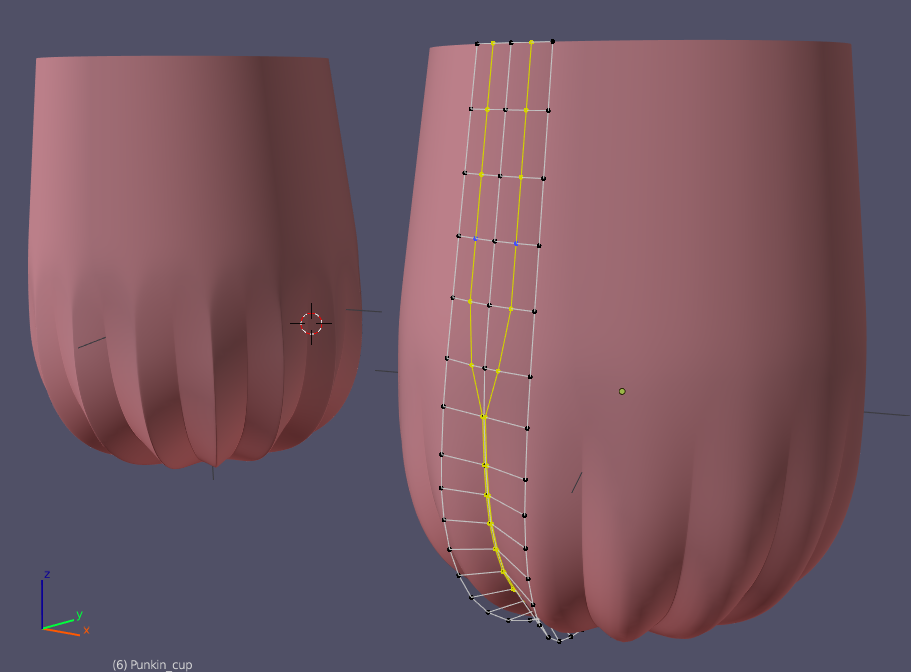
Modeling from scratch was a great solution considering I needed each lobe to be precisely the same, but now I’m having a similar problem as before in terms of needing to sculpt my model: I would like each lobe to have an arced cross section. That is, something more like a pumpkin. I experimented with scaling/grabbing vertices in all sorts of combinations (proportional editing/pivot points/transform orientation/influence area) which is essentially what I resorted to with my first model, and what you were showing me how to avoid. It proved pretty impossible to do this with any sort of regularity, but it seems like it would be equally impossible to apply some kind of profile along the surface.
Any ideas how to arch the lobes without hand-modeling?
Separately, should I move this conversation over to the project thread, since it’s gotten past the subject of the original post?
Sorry, Yophie. I always assume that people who post here know about the manual, but it’s not a safe assumption.
On this page it tells you how to use another object as the offset for the array modifier. I used an empty, placed at the desired axis of rotation, and rotated the correct amount in one axis (pi/8r or 22.5d).
There is also a merge option for the array modifier that joins each copy to the previous one if the vertices are within a certain threshold. Not enabling it of course means that your slices are separated which causes the subsurf to round the corners of each.
Completely unsure what you mean by ‘arch’. All this complication was to create sharp edges, but now you want those edges to be smooth? If so go back to the step above where it says ‘adjust edge loops’ and just don’t add the one to he side that you want to be smooth. The reason to keep it all in modifier form is that you only have to edit one small thing to make a large change. If you have been apllying the modifiers you are just making a lot of work for yourself and should be using some different methods.
we’re looking at the bottom of the cup here, at a single lobe. The straight V is what I have now. The curved V that looks more like a bird in flight is what I’d like, but every time I try to modify those intermediate edge loops (the ones on the z-axis) to get a curved profile, I end up moving the edges too.
I use the manual all the time! I just hadn’t spent enough time researching the array modifier to figure it out. Sorry about my laziness there :\
How many verts are we talking about? 7 or 8? It’s easier to move each one than to try to set up an automatic method.
Enable proportional editing (O)
Turn on the manipulator
Switch to normal transform orientation,
Set pivot point to individual origins
Select from the middle row the verts you want to move (ie don’t select the whole edge loop)
Scroll your wheel to make the circle of proportional influence just large enough to cover the verts to either side
press G Z Z and move them in a little.
Ok! That’s what I was doing - I just wanted to check and see if there was a more efficient method. Thank you for clarifying! I’ll post the results when I get somewhere.
 please correct if I’m making a mistake about what/where I ask this question.