Hi. I’ve built a character surface and I’m using the Solidify Modifier to give that surface thickness and turn the surface into a shell for 3D printing. The shell must be divided into sections to be rejoined after the 3D printing, much as you would build a hobbyist’s plastic model to be rebuilt by the hobbyist. The modifier can create the interior normals in addition to the exterior ones, but what to do about the generated rim surface, which after the modifier, evidently has no normals or selectable surface at all? My fear is those will create problems for the 3D printer. Does anyone here have experience creating assemblable plastic models? Thanks.
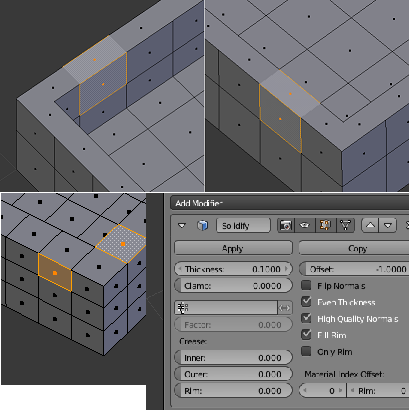
After further experiment, I can create the shell with faces along the exterior, interior and rim, if I apply the solidify modifier with these options active: Even Thickness, High Quality Normals, Fill Rim, Adjust Edge Cage to Modifier Result, Display Modifier in Edit Result and Display Modifier in Viewport (lower right image)
The result is that all surfaces appear to have an individual normal face. But note the absence of rim face edges in the top two images. Selecting any given face (if adjacent to the rim) selects three faces (the exterior, rim and interior). If not adjacent, only the exterior and interior faces are selected. I think that qualifies as a closed-manifold mesh, as I understand those. But it’s not exactly how a normal solid would be like that built entirely by extrusions (lower left image). Any way to achieve that with the solidify modifier or steps afterwards?
well these looks like cubes
so they got faces on all sides
so for the rim I don’t think this is needed
you would have to modify your model to use only what is needed
and we don’t see the whole model so hard to tell how to proceed!
or can you upload small sample file if possible
happy bl
Hi Ricky, I uploaded an image and more notes. Thanks for your reply.
And here’s a blend file containing two objects. One is extrusion built and the other is solidify modifier built.
so you want to cut this in different parts ?
you could use the solidity apply it and then use the Bisec tool
with faces on the cross section
to make parts
the other model does not have any bottom !
is it what you want ?
happy bl
1 Like
Oh, I see what you mean. Don’t worry bout that one. That’s the extrusion built model anyway that I just whipped together to illustrate the difference.
As far as the solidify, I just checked this video that DOES have edges on the rim face, and looking closely, he’s using only the ‘Only Rim’ option, which doesn’t produce the same result at all. So, clearly something has changed since Blender version 2.68.
so many things have change over time !
is there anything else to help you ?
happy bl
Actually I cut the surface with an edge loop up and down the sides of the body including arms and legs, then apply the solidify to each surface. Not sure how to apply the bisect. The edge loop is irregular, so a bisect plane wouldn’t really do. I tried it with my simplified samples anyway. It just removes the top blocks and leaves more unedged faces underneath.
I went ahead and submitted the issue as a bug to Blender devel. Thanks for your input!