http://www.pasteall.org/pic/72143
Hi, anybody knows would/when it be targeted ?
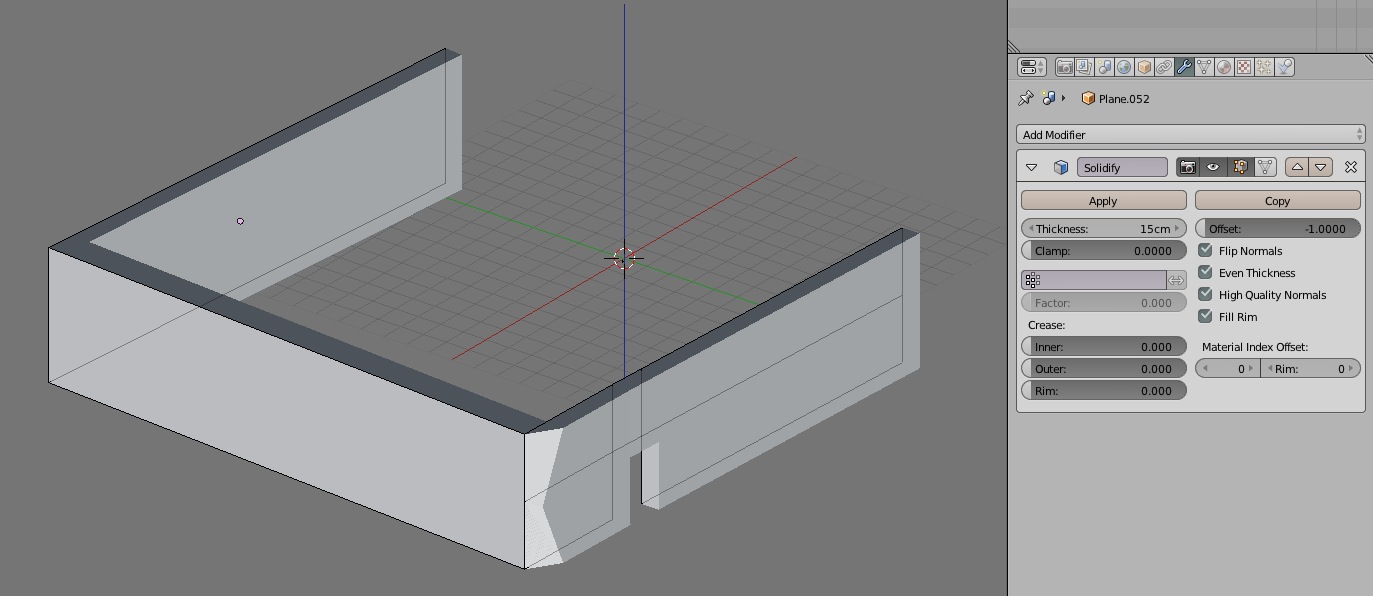
So far -for me - Solidify Modifier is hardly unusable (((
(uneven wall, weird phenomenas on the corners)
http://www.pasteall.org/pic/72143
Hi, anybody knows would/when it be targeted ?
So far -for me - Solidify Modifier is hardly unusable (((
(uneven wall, weird phenomenas on the corners)
You could upload a blend file instead.
However,
Well, when it comes to 1 wall its OK but if you try to construct ‘polyline’ wall w/ Solidify Mod. strange things happen.
Tried all the option (as seen on picture), also flipping normals - no change.
The file: http://www.pasteall.org/blend/29573
Btw: some PURGE command(to remove unused data) would be good also…
There are three issues with you model:
a) The normals are not consistent (pointing inside on the wall with the door and outside on all others)
b) nasty n-gon (the loopcut for the door does not go “around”)
c) inconsistent scaling (hit CTRL-A > Scale to fix that)
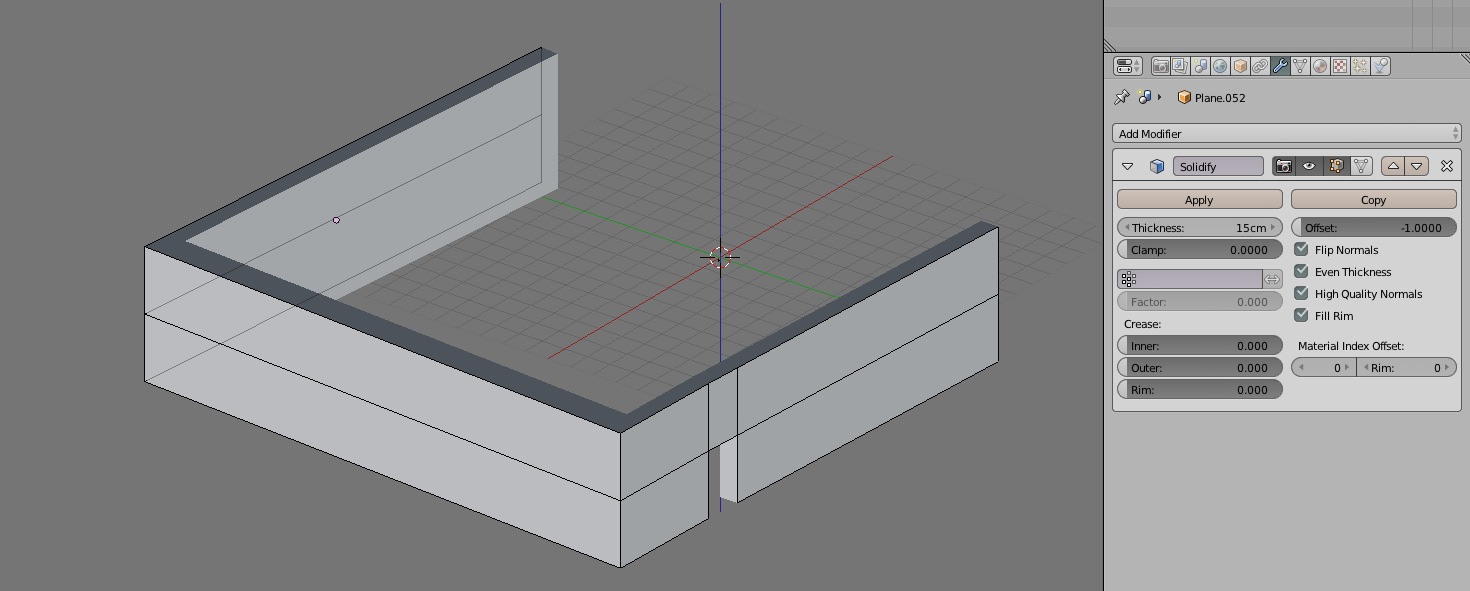
I took a screenshot too, showing the problems IkariShinji mentioned and the fixed result. So not a bug, the mesh is crap.
I am mostly CAD user so making loopcut on the wall where its useless its not my habit.
How should I proceed to model the walls w/ Solidify Mod. properly ?
Should I start w/ Plane, leave only 1 line ,then extrude everything else or what?
If only above fixes uneven (corners are obvious) thickness - Id be happy.
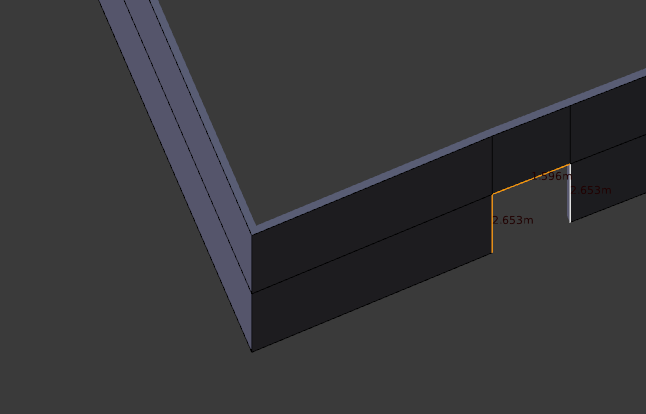
Aha and switch LENGTH on Mesh Display and check around the door: every side shows anomalies (18cm vs 1.1m).
It does:
This is your mesh after a, b and c. Maybe you should try following that three steps again before complaining?
Its about ‘Blender steep learning curve’ rather than complaining ))
But thanx anyway.
Btw: this issue w/applying CTRL+A and uniform scaling is completely unclear to me: why have I do so when no transformation had been done?
You have scaled the object (in object mode). Object scale is visual, while the mesh stays the same. Tools and modifiers work in object data (mesh) level and their result doesn’t come from what you see when the object scale is someting else than 1,1,1. By applying the object scale you’re transferring the scale to mesh dimensions and resetting object scale back to 1,1,1.
Default cube is 2x2x2 blender units. When you scale it by 0.5, it then appears to be 1x1x1 in the viewport. The mesh is still 2x2x2 until you apply the object scale. Non-uniform object scale is worse because you’re viewing a distorted result and not just result that is the wrong size.
I know your feelings when coming from Cad background. You can avoid vertices/edges hassling by using booleans, keeping walls (planes) untouched.
Selected object is cutter, door and windows all in the same mesh. Use Bevel modifier after boolean modifier.
And you dont have to apply boolean or any modifier.
Is this sth like ‘resetting’ the mesh to state 0 for the time being (very poetic hehehe) ?
Ya know, actually-everything on UI is VISUAL, should user bother what behind the scenes ?? In which circumstances such ‘schisofrenia’ would be usefull? )))
No. It’s the difference between edit and object mode. Mesh editing is done in edit mode, and object manipulation in object mode.
That separation is useful with parenting, procedural duplication, linked instances, linked duplicates, constraining (modeling/rigging/animation). Basically everywhere where relative scale is needed. You can have 100 objects with different scales while you only have to edit one, or even have automation controlling the scale. Blender exposes this to the user and so you also have the control over it.
The only thing related to mental illness here is your ignorance, many new users have that. Having CAD/technical modeling background partially explains it, because many with such background don’t realize that polygonal modeling is completely different modeling paradigm from what they’ve used to. It was developed for on-screen purposes, like rendering, animation, games. Modeling in Blender is mainly polygonal modeling, so yes, visual.
Blender has a learning curve like any other software. There is an occasional bug that needs to be found, reported and fixed. But you still have to understand your way around most things.
In blender mode, select all faces, duplicate, use inset tool.
This is far superior to any solidify modifier, so far. Sorry. Much more interesting parameters. One particularly. “OffsetRelative”
Why not in solidify modifier? I wonder.
Thanx again, guys.
I will memorize and excercise all above hints.
Hi Michalis…
I’m having trouble with the Solidify modifier my self, and I would be very interesseted in your method, if it gives clean results… But can’t find any parameters to the Inset Tool, apart from sliding your cursor after you hit the I key…
And what do you mean, ‘duplicate’?.. Why would you do that? ![]()
Your Ngon would be fine, however that not even an Ngon. The real problem is that your walls are not joined. The vertice in the middle of the corner is not joined to the other wall.
Join that properly and recalculate normals then your mesh will work fine. It needs no more edges or changes, just make it joined correctly and then recalculate the normals.
Your topology does not need to be perfect to some hidden rule, make the topology to work with your needs as the modeller. However if you want your solidify wall to go properly around the corner - the corner needs to be continuous.