SpaceX Starship & Rocket Shipyard [3D Printing / Renders / Modelling]

Starting this thread to post progress and get feedback on my ongoing SpaceX rocket modelling & 3D printing projects.

Mk1 Starship


Before we get to the MK1 pictured above, some background:
I started out mid 2019 building the prototype SpaceX Starship ‘Starhopper’, which is something I was following very closely as it was being built by SpaceX and eventually tested. This is the prototype and first step for an in-development rocket SpaceX is developing to take us to Mars, so its something Ive been following very closely for quite a while now.
Additionally I’d recently also gotten my hands on a 3D printer, so this was one of the larger 3D printing undertakings Id had in mind for a while, and it was time to make a start!


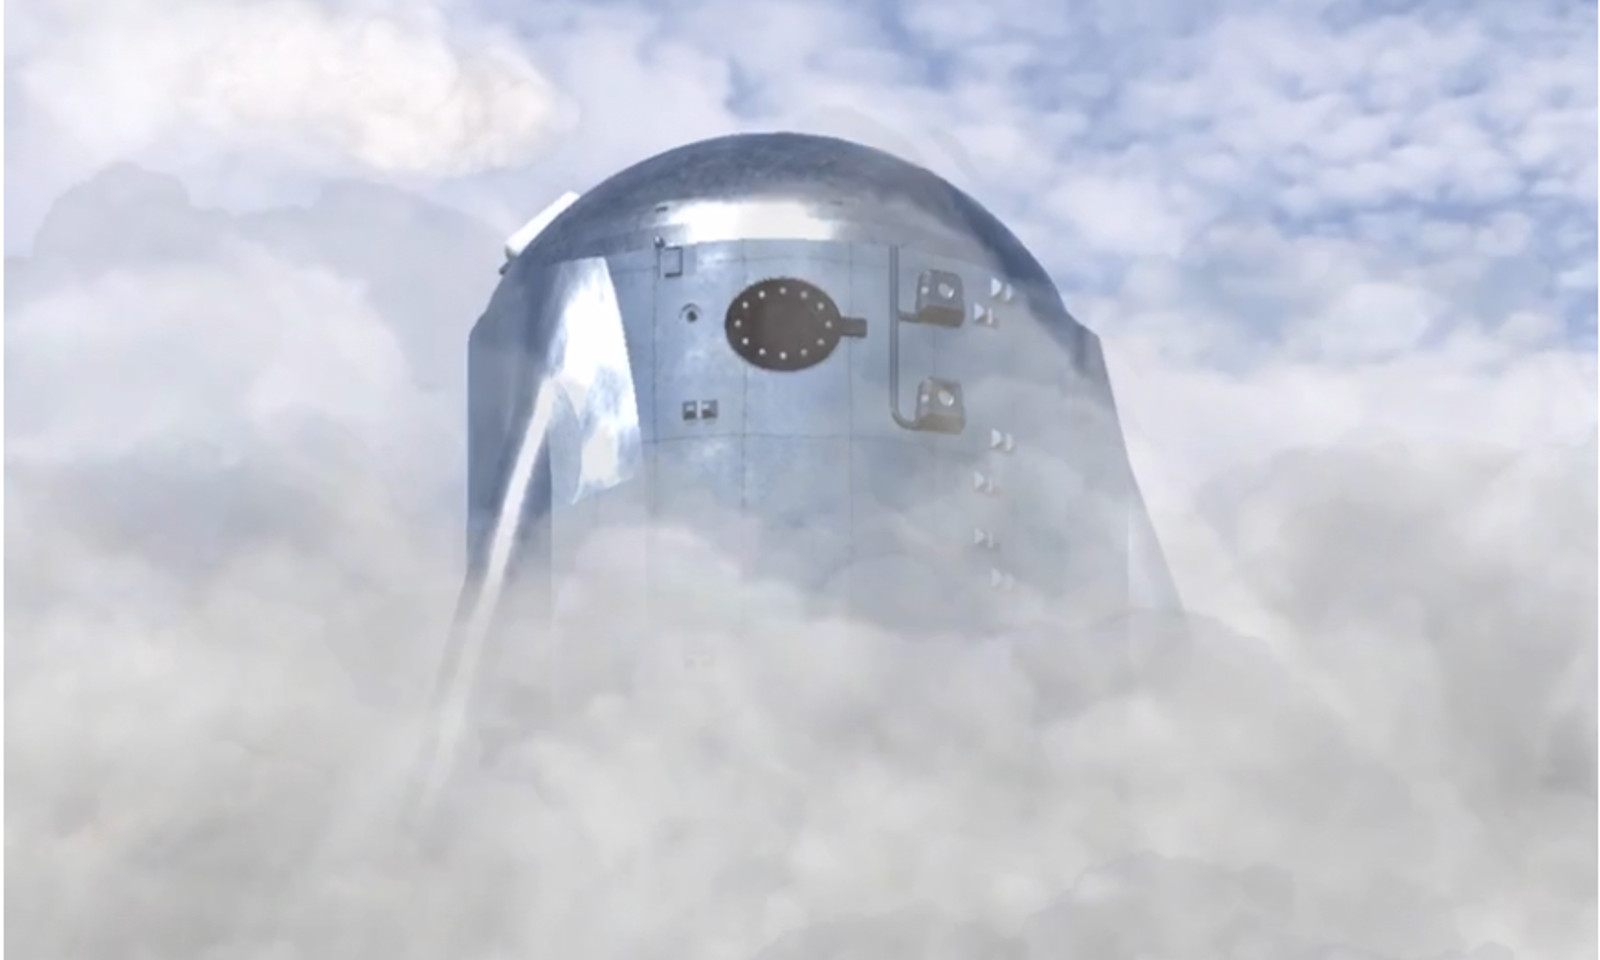
This was one of many reference pictures, back when SpaceX had just finished the main components for Starhopper, and was connecting its nosecone section (the nosecone later got blown over in high winds and was destroyed, leaving the lower and thankfully most important section behind)

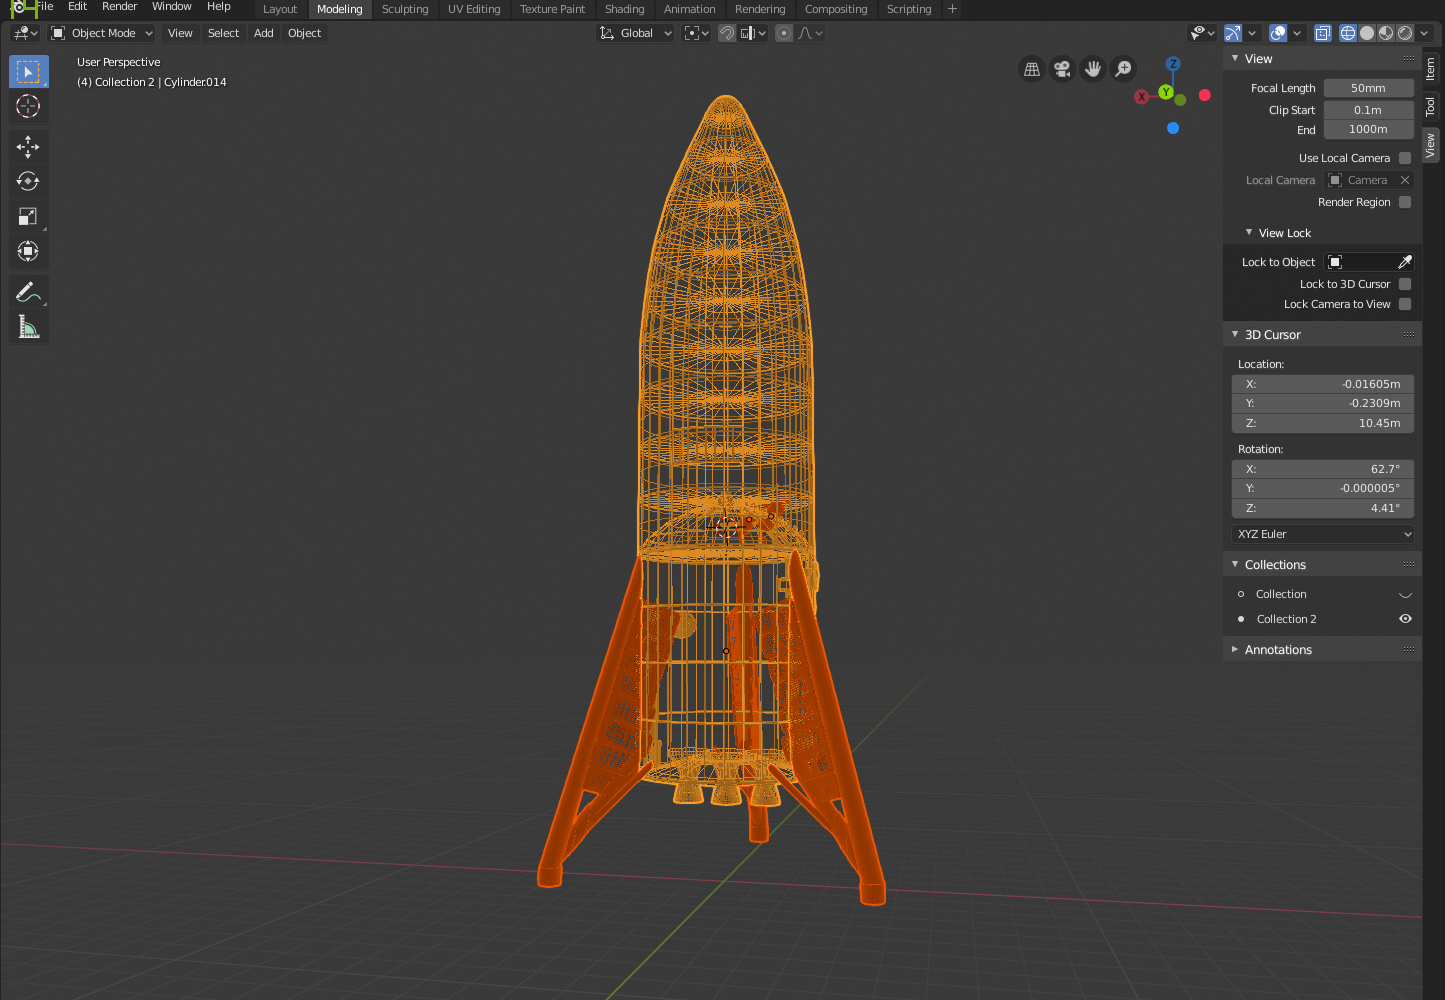
Ahead of the first test firings of the IRL Starhopper I took the plunge into Blender 2.8, which was very new to me. I think at this point I was still using 2.79 from back in 2017, so with 2.8 just being released it was time for an update.

A few tutorials later and I had the basics of my own Starhopper model:

Starhopper!

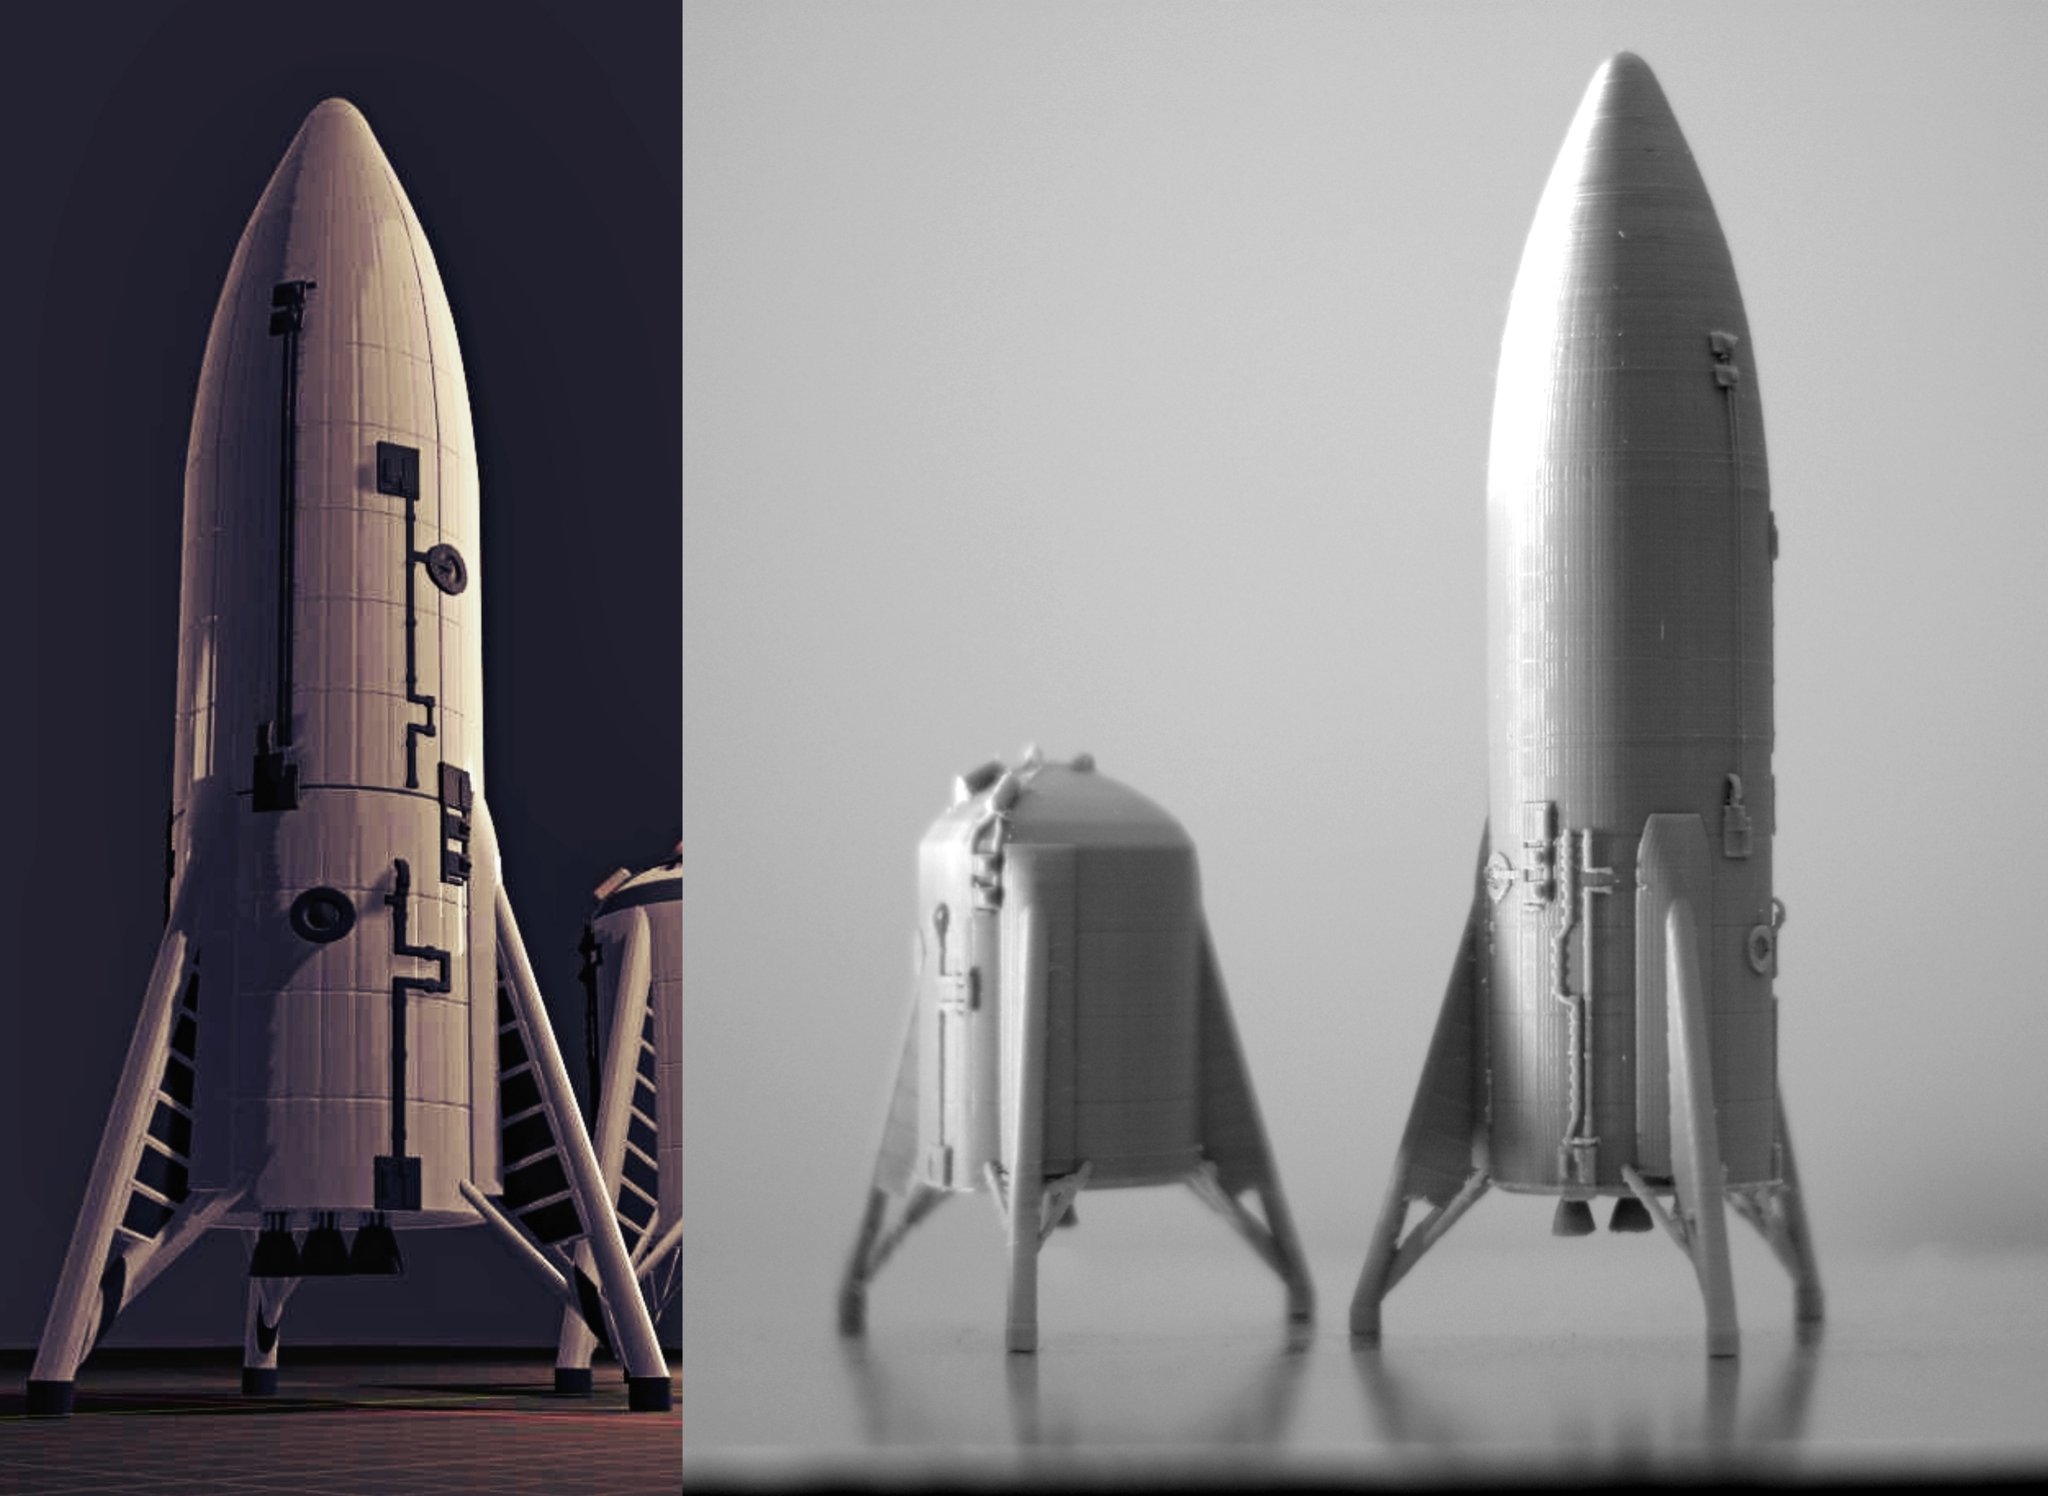
Initial Model (now in gif form)

Starhopper Modelling Improvements

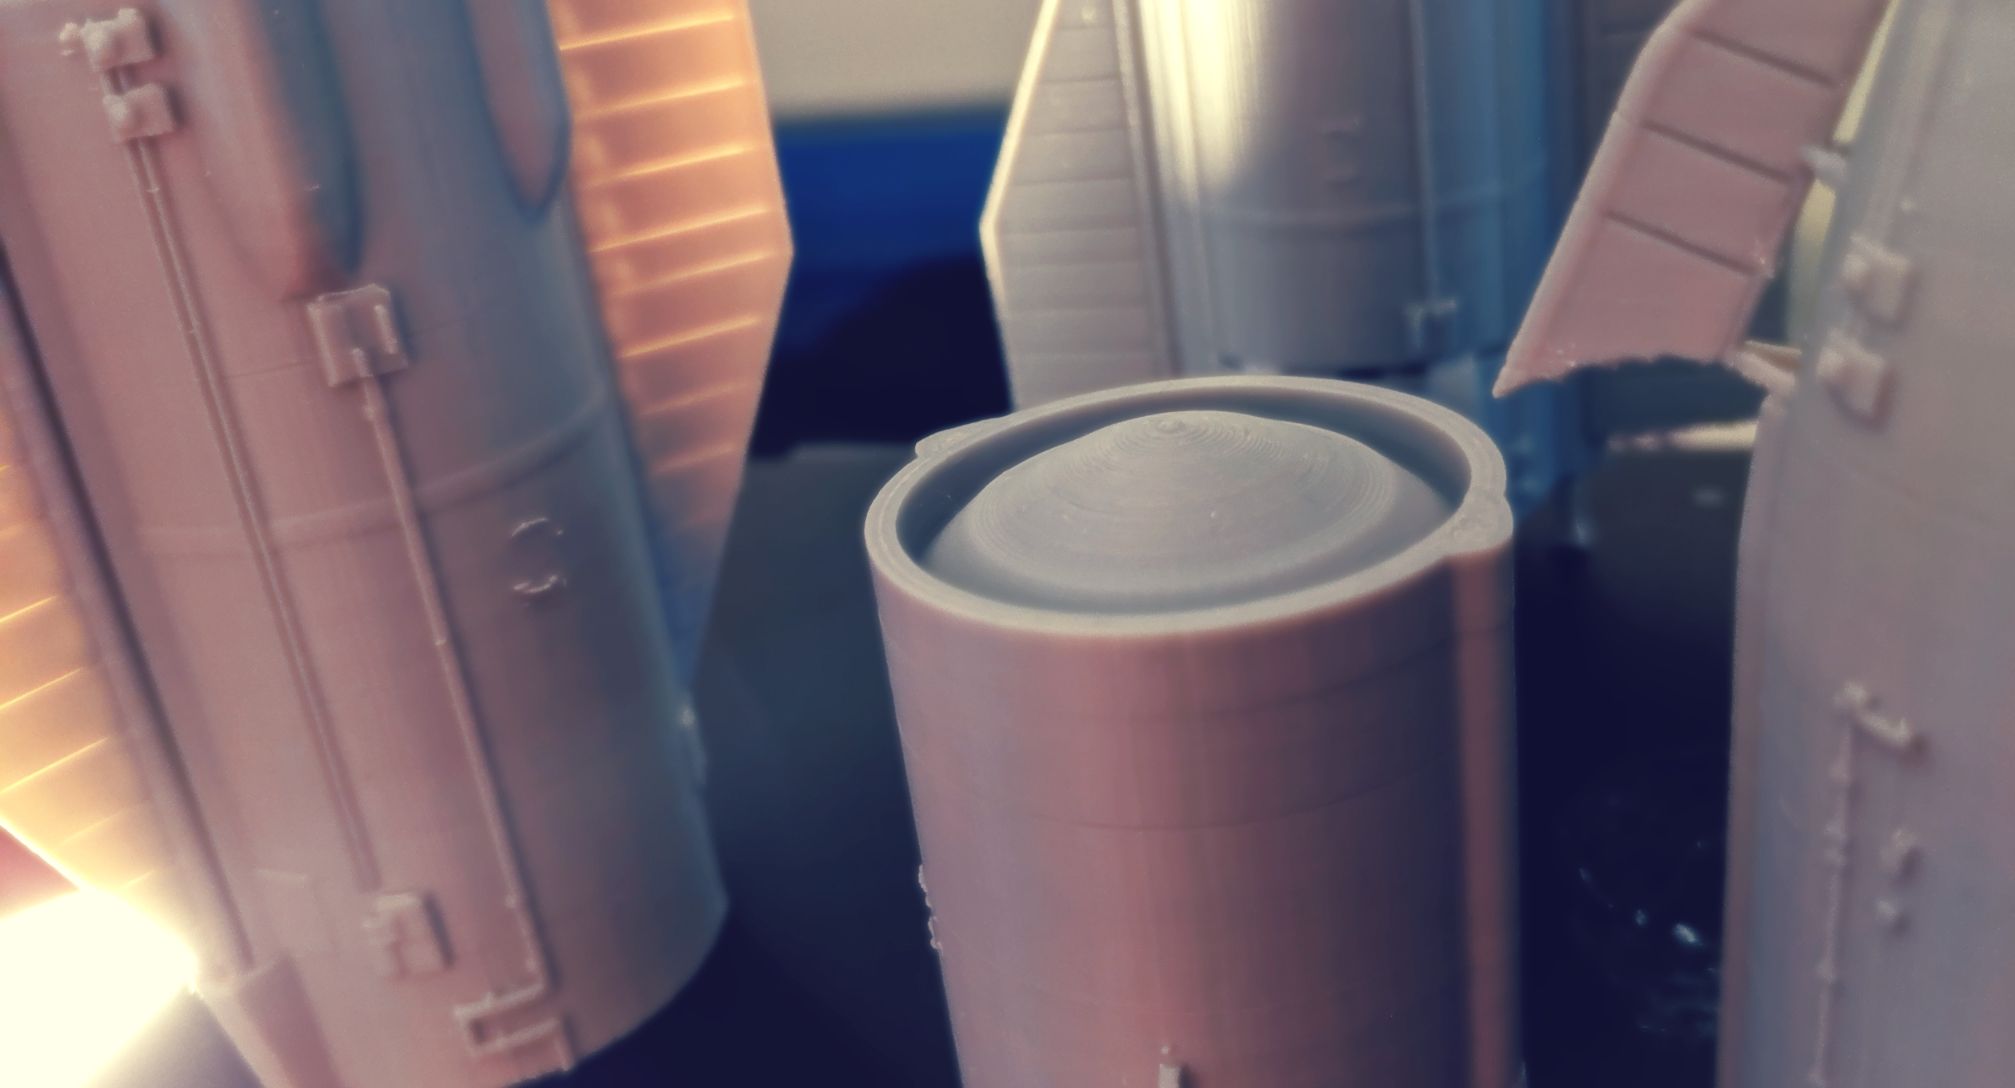
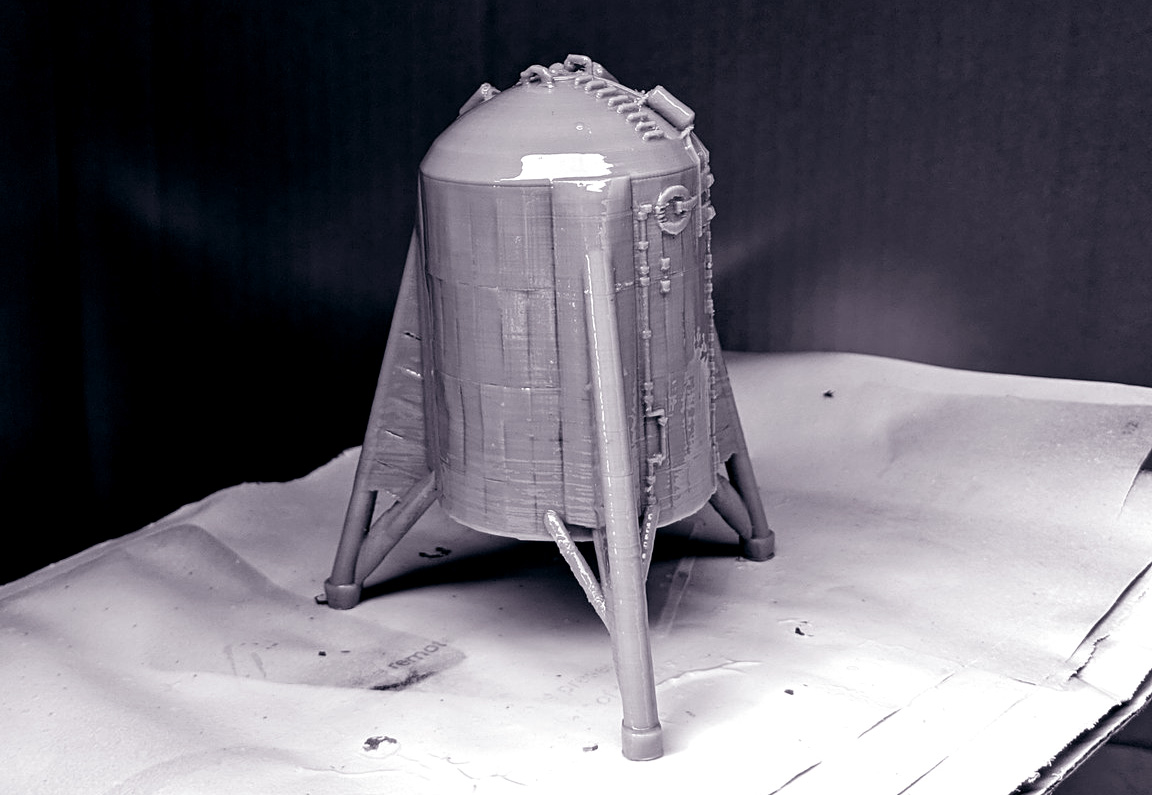
And with that, it was time to fire up the 3D printer for some test prints!

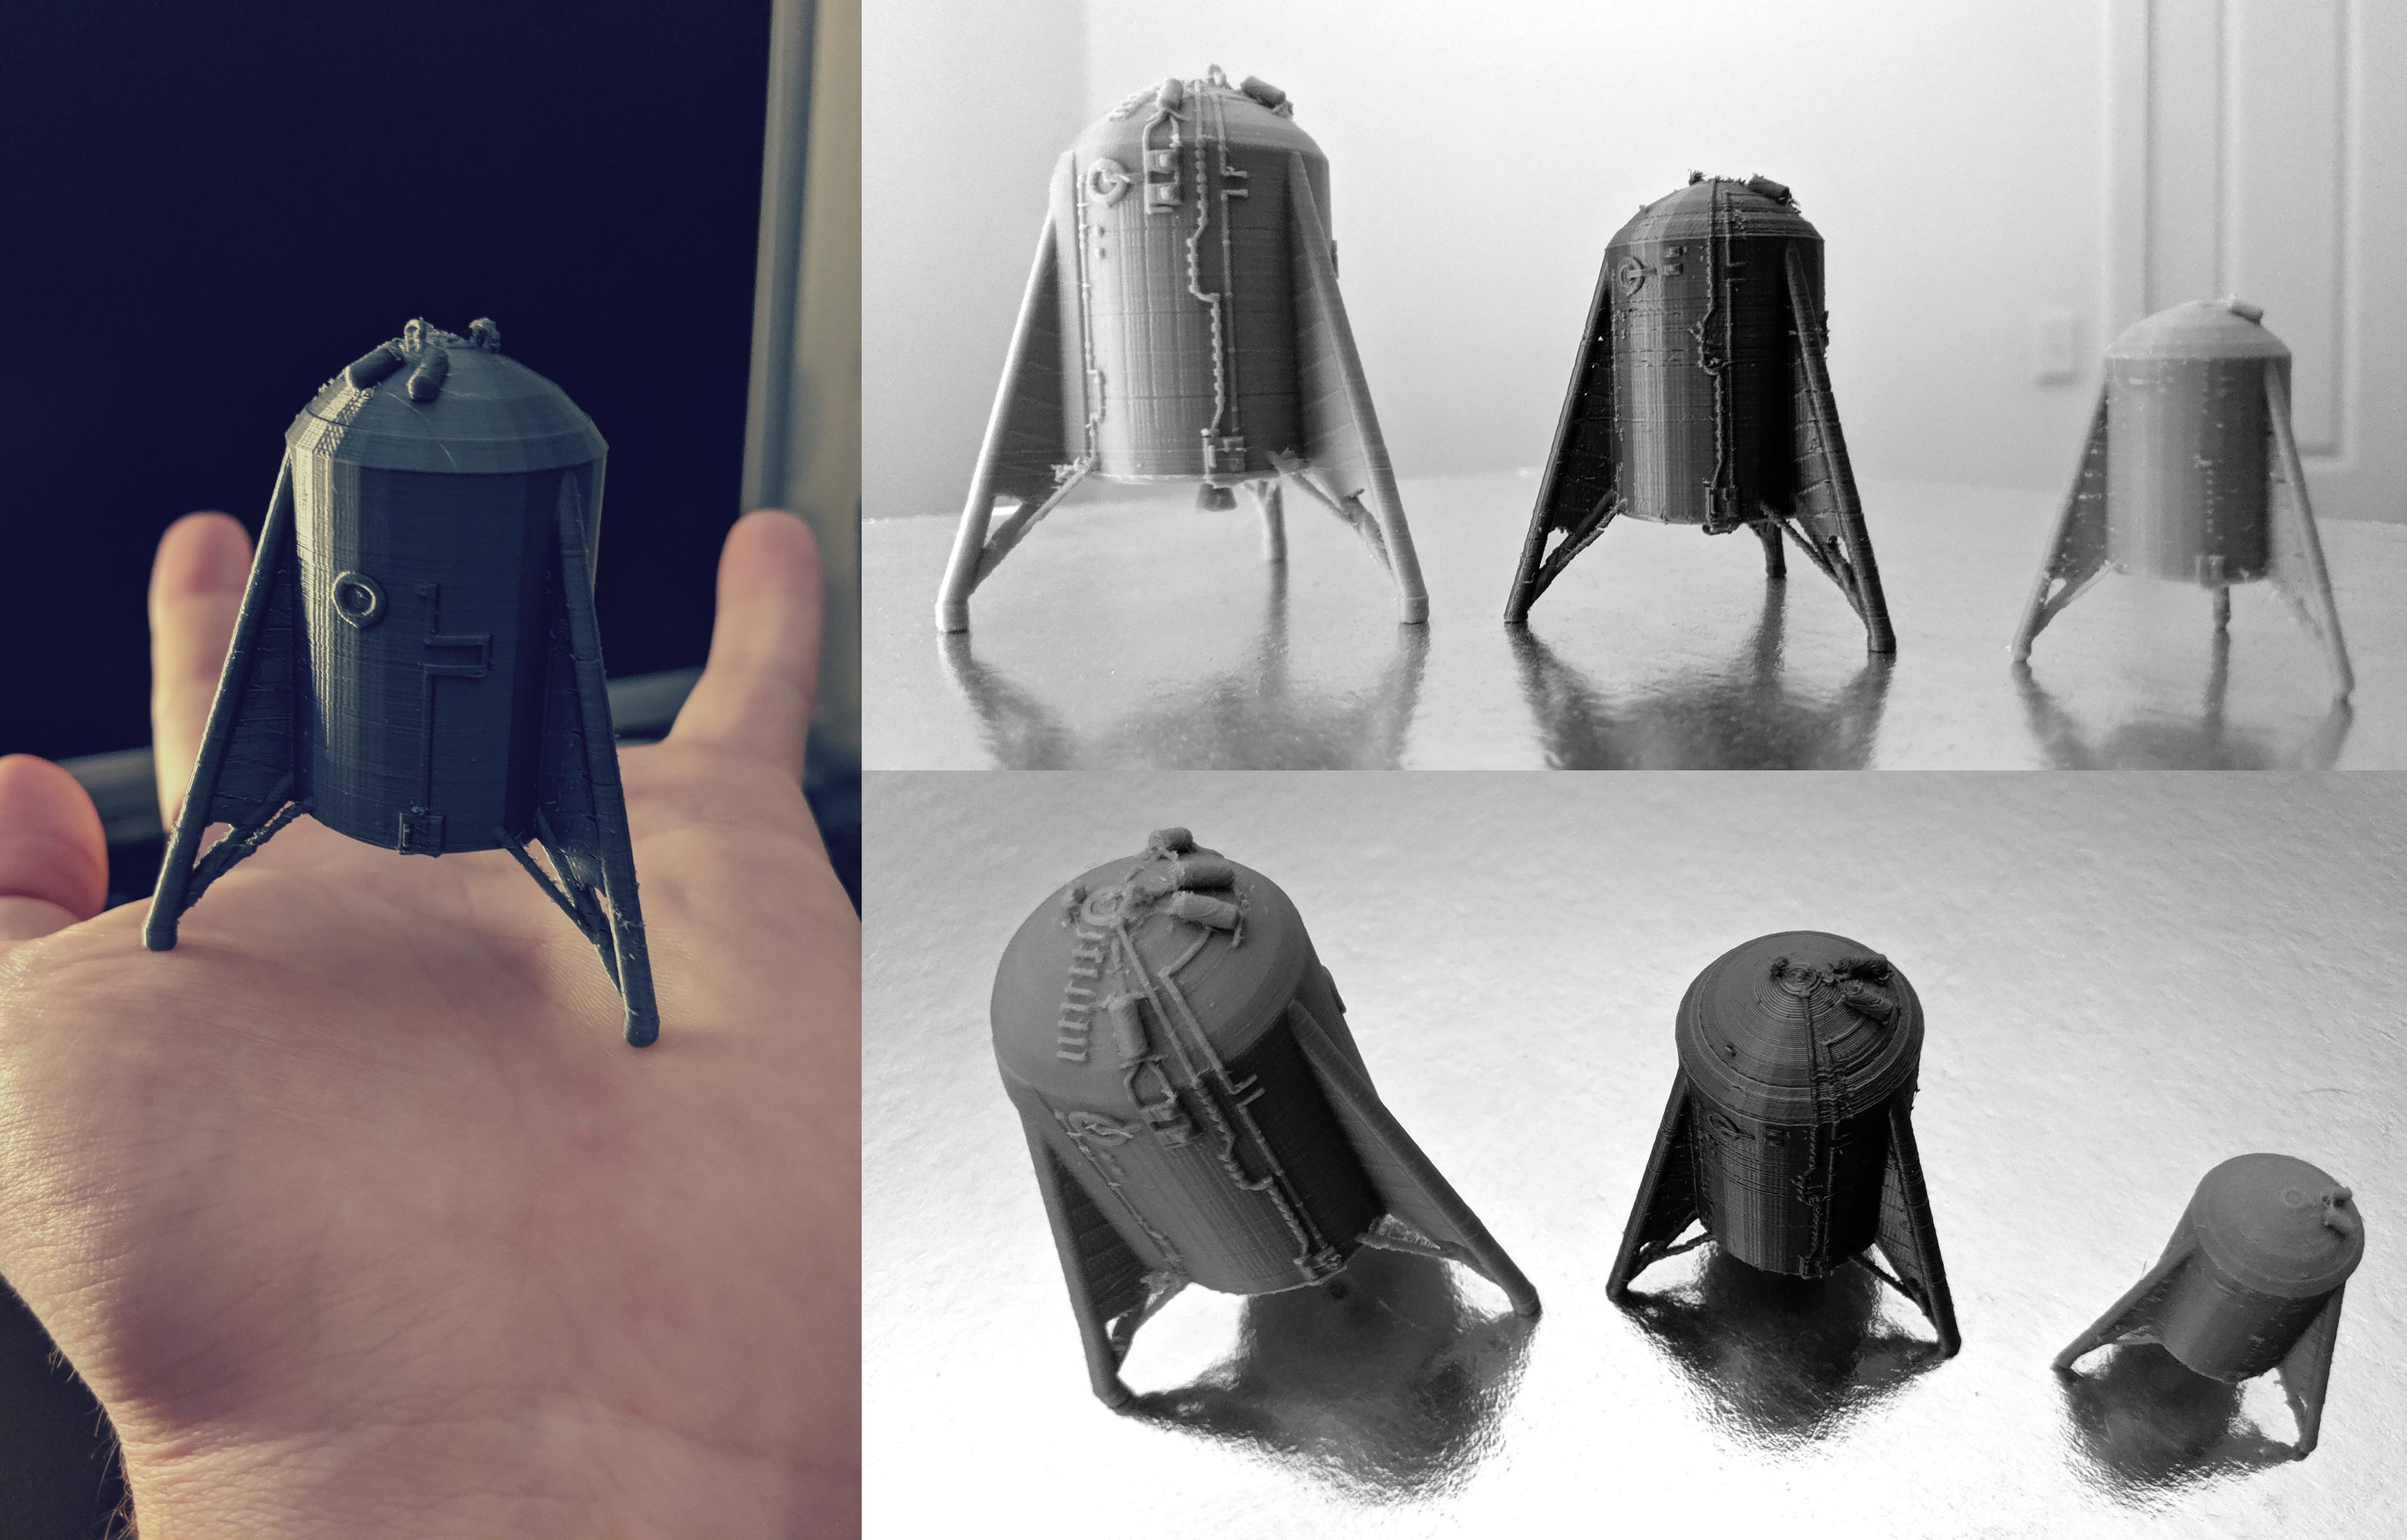
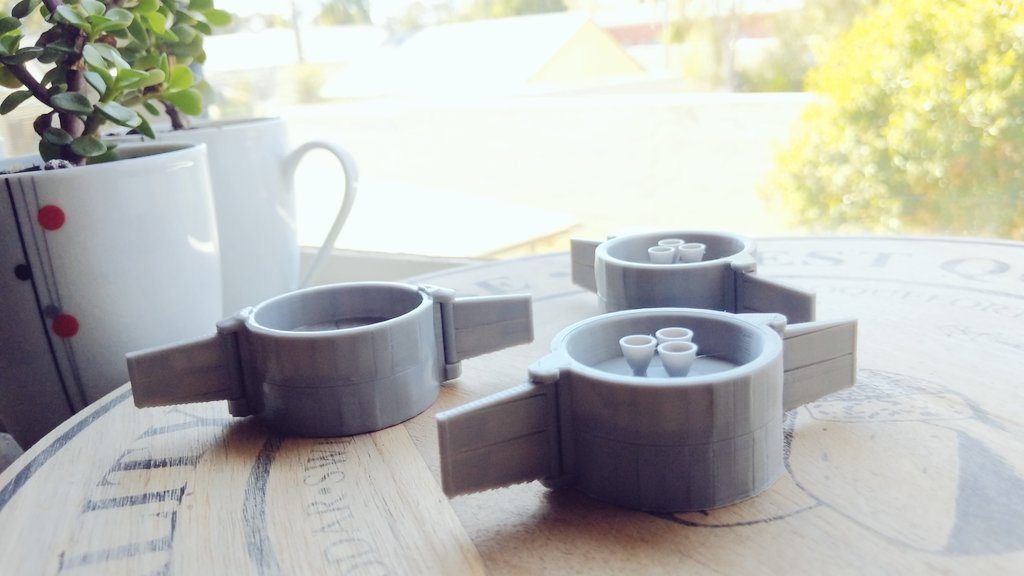
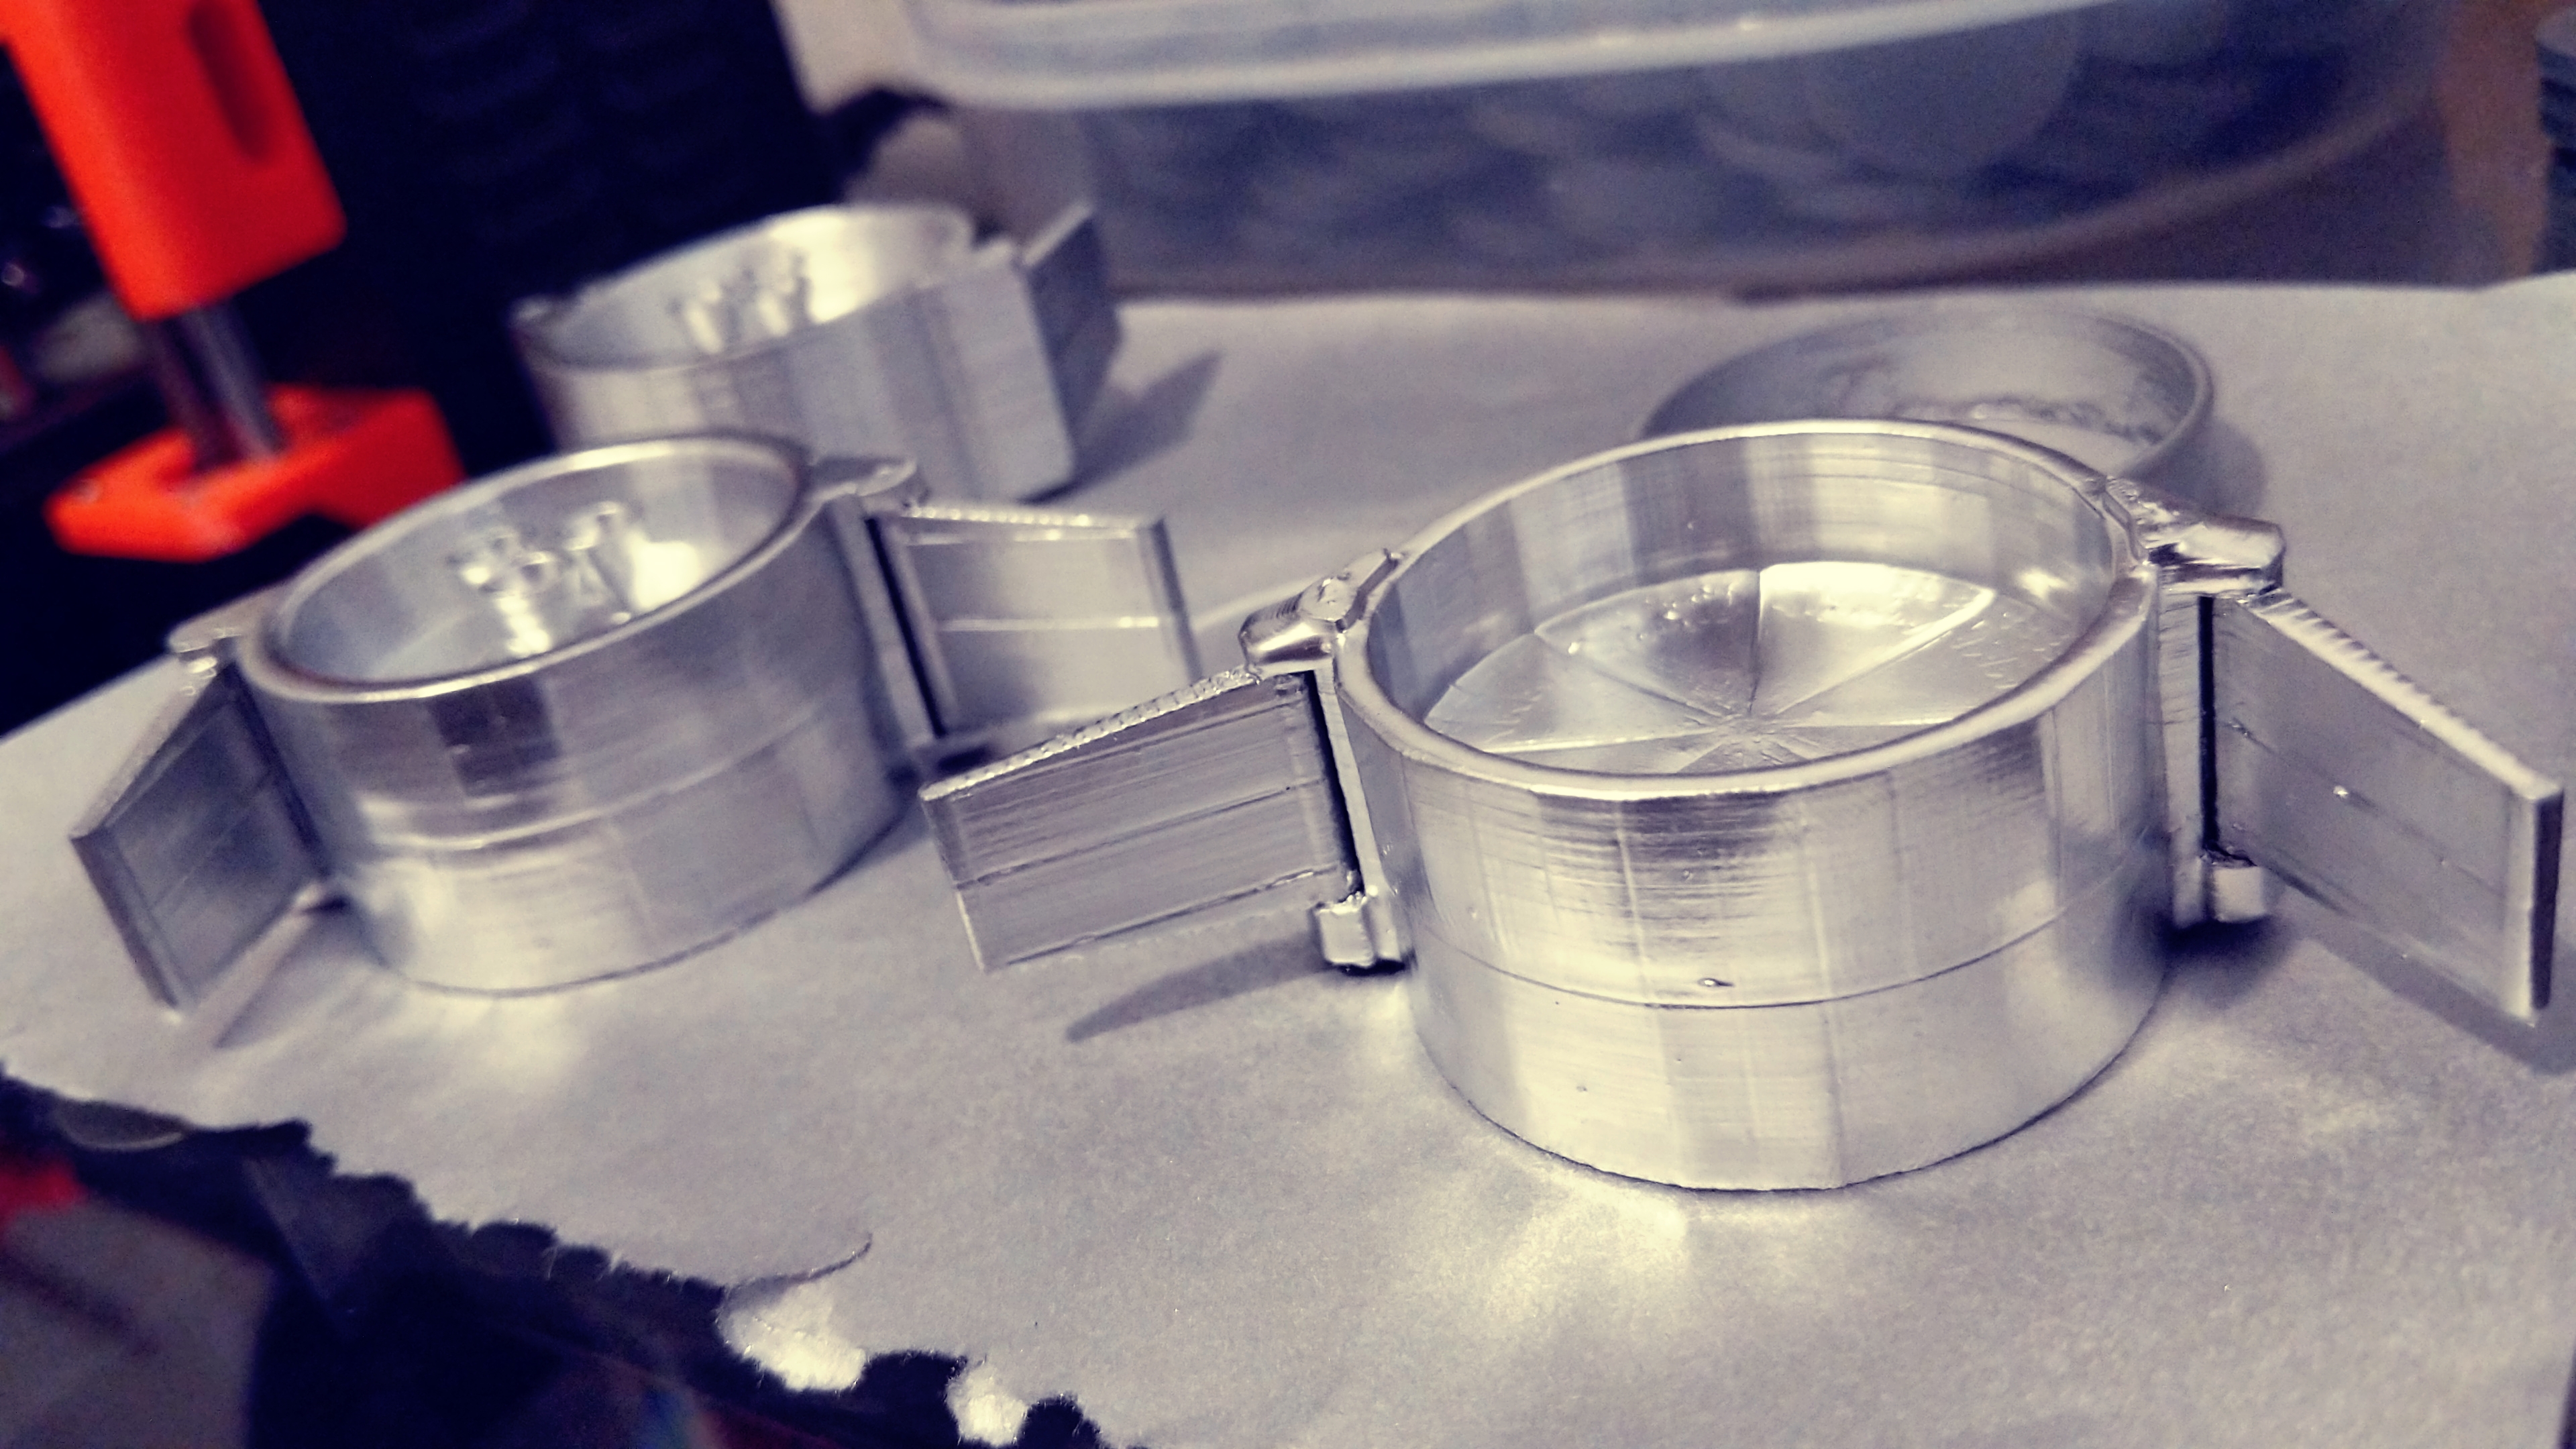
You can see the first 3 models here, from a few days of modelling and printing and iterations. Each time I was bringing out the details, finding more and more reference photos to get the finer details and odd bits (like the cowlings only being on 2/3 of the legs and very unique piping to each third of the body)

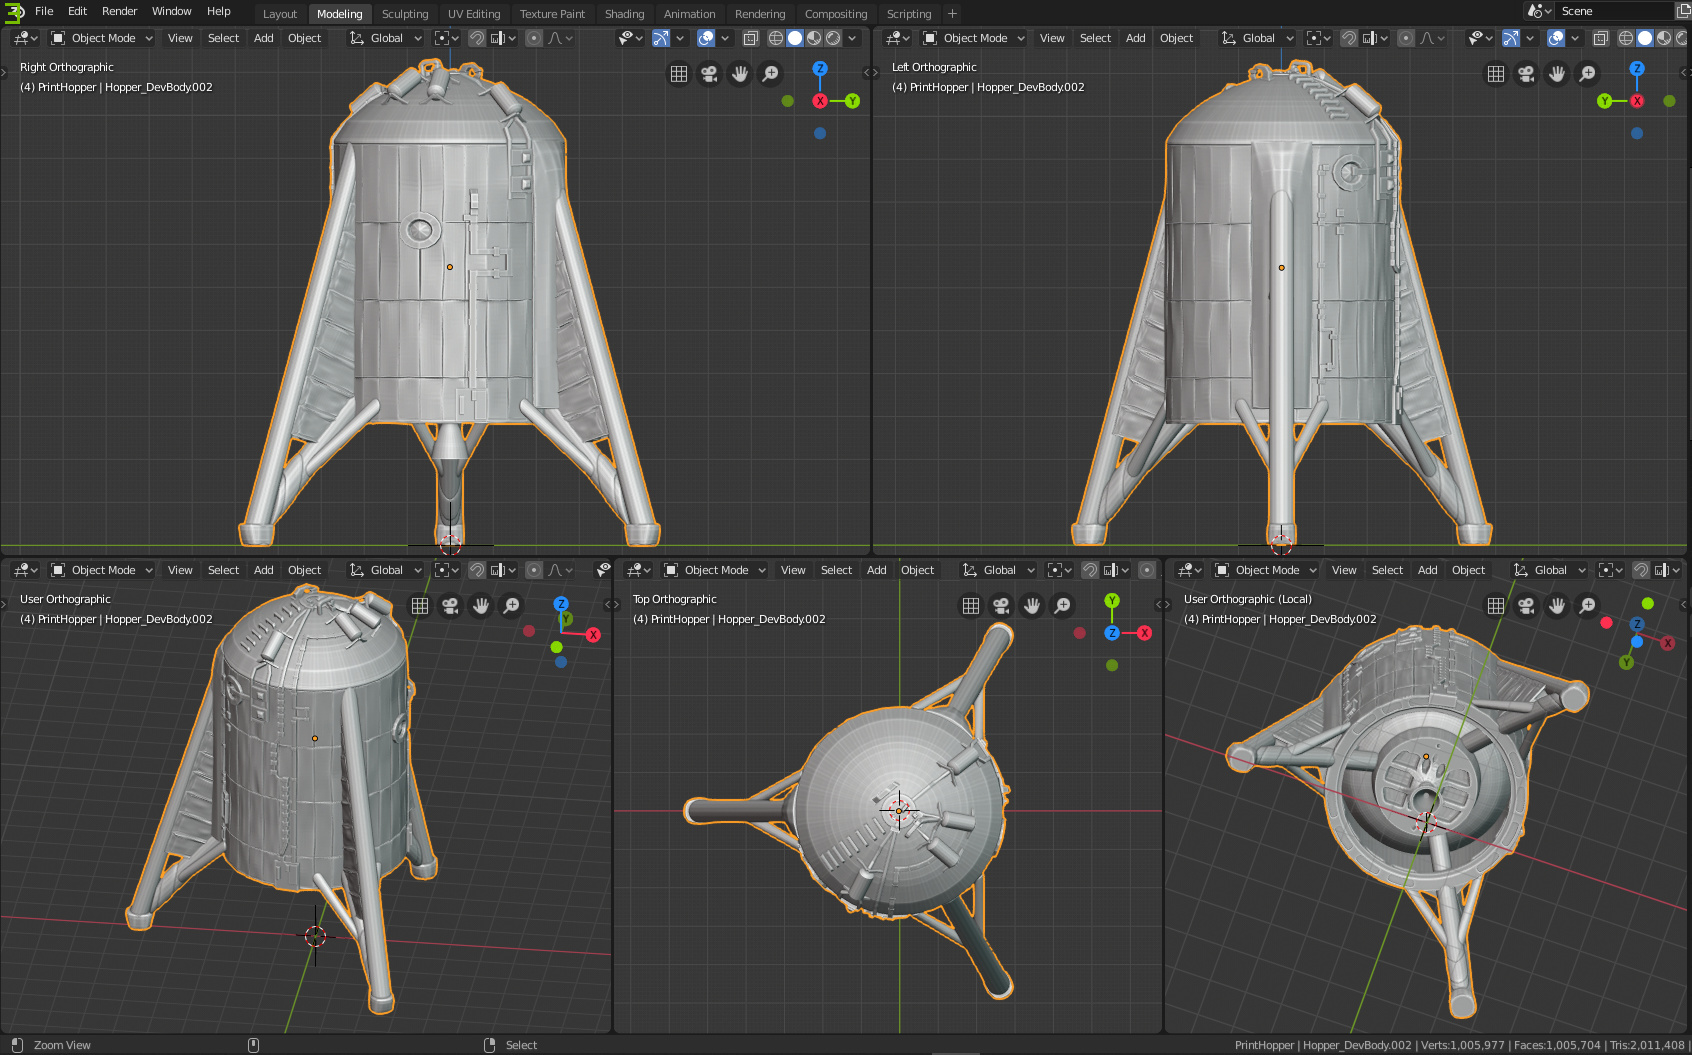
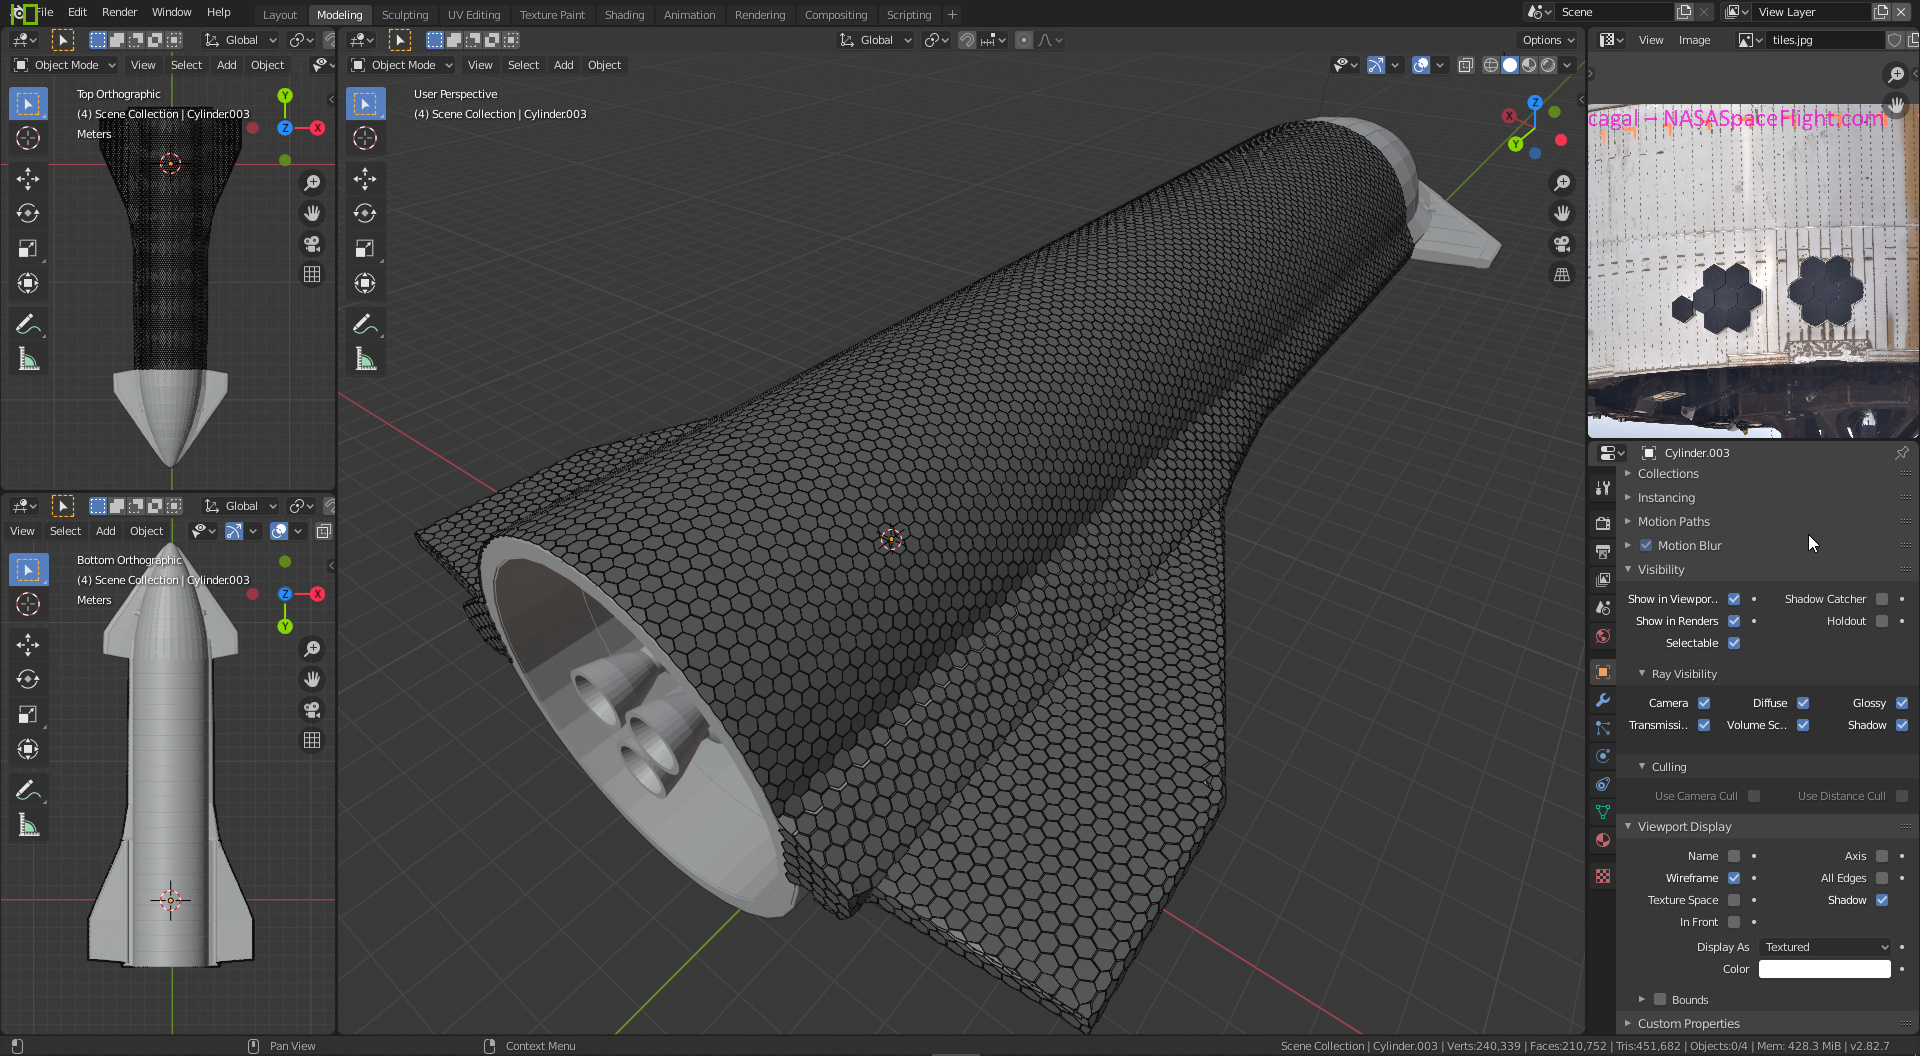
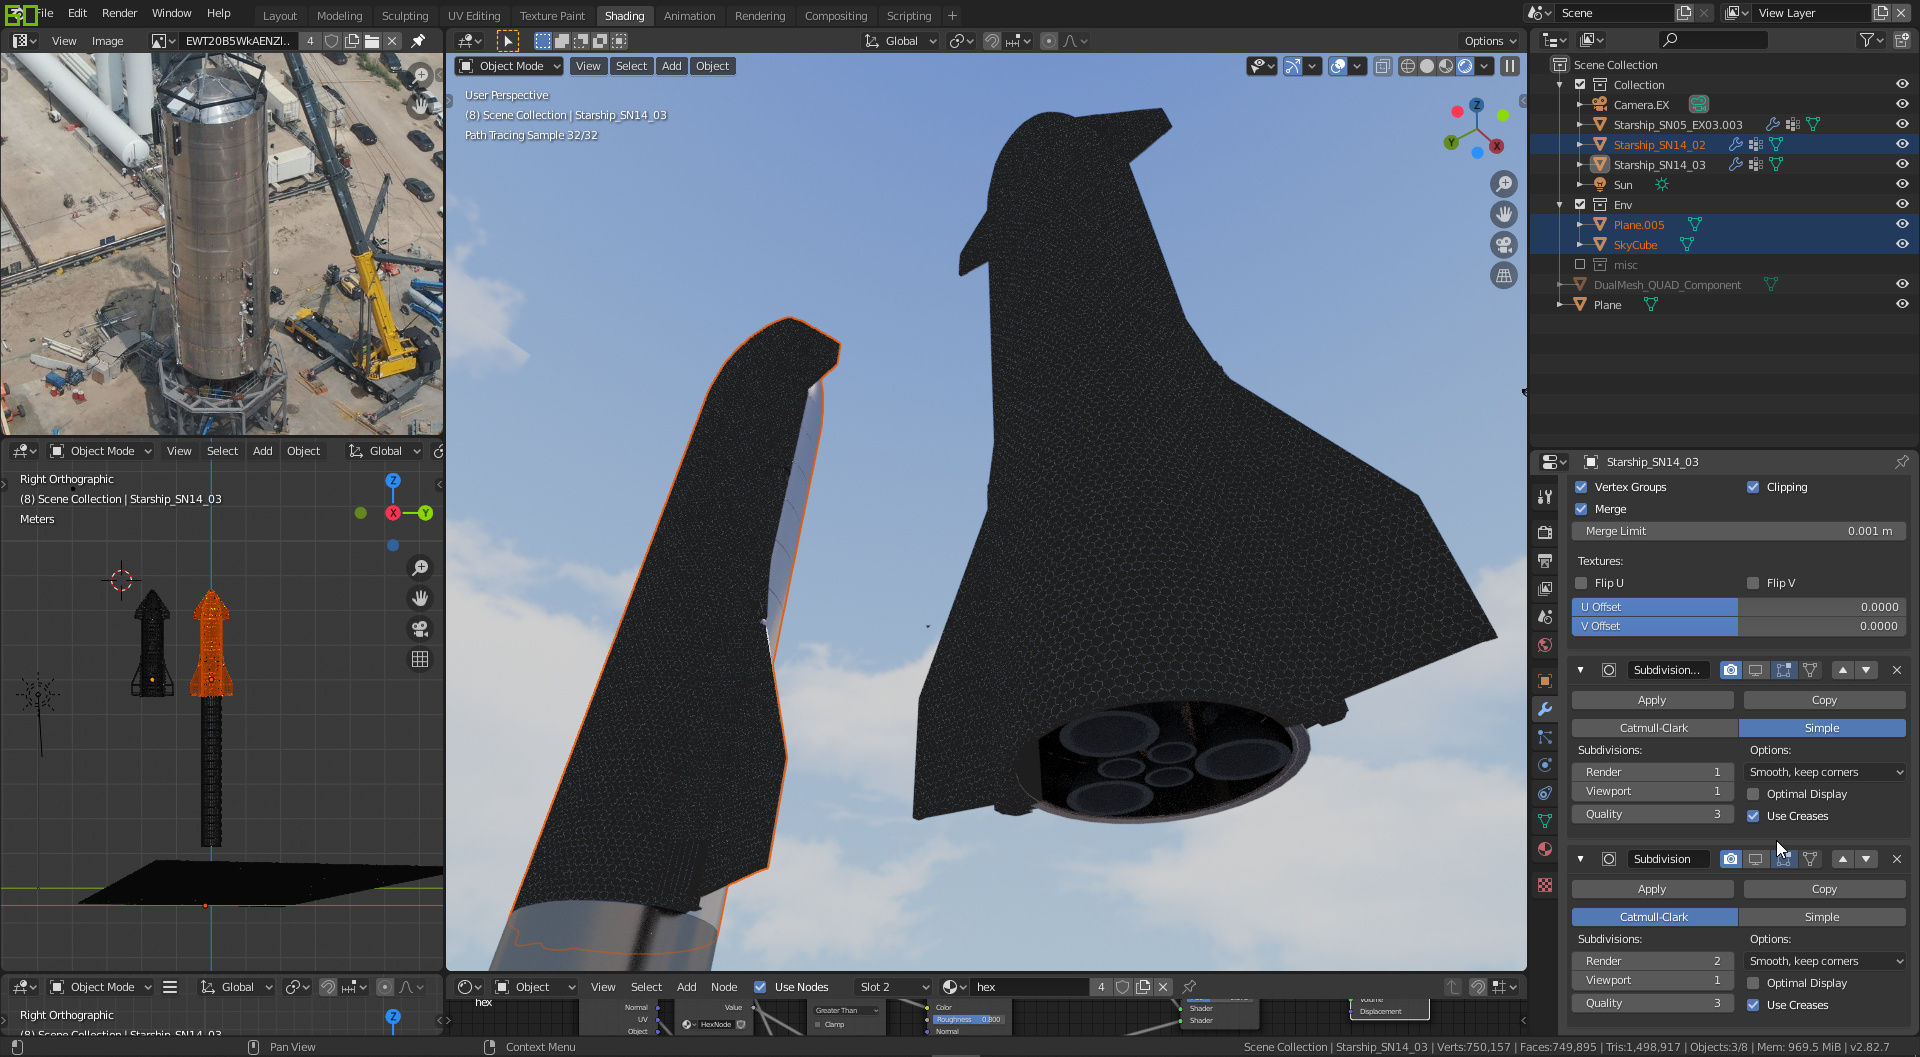
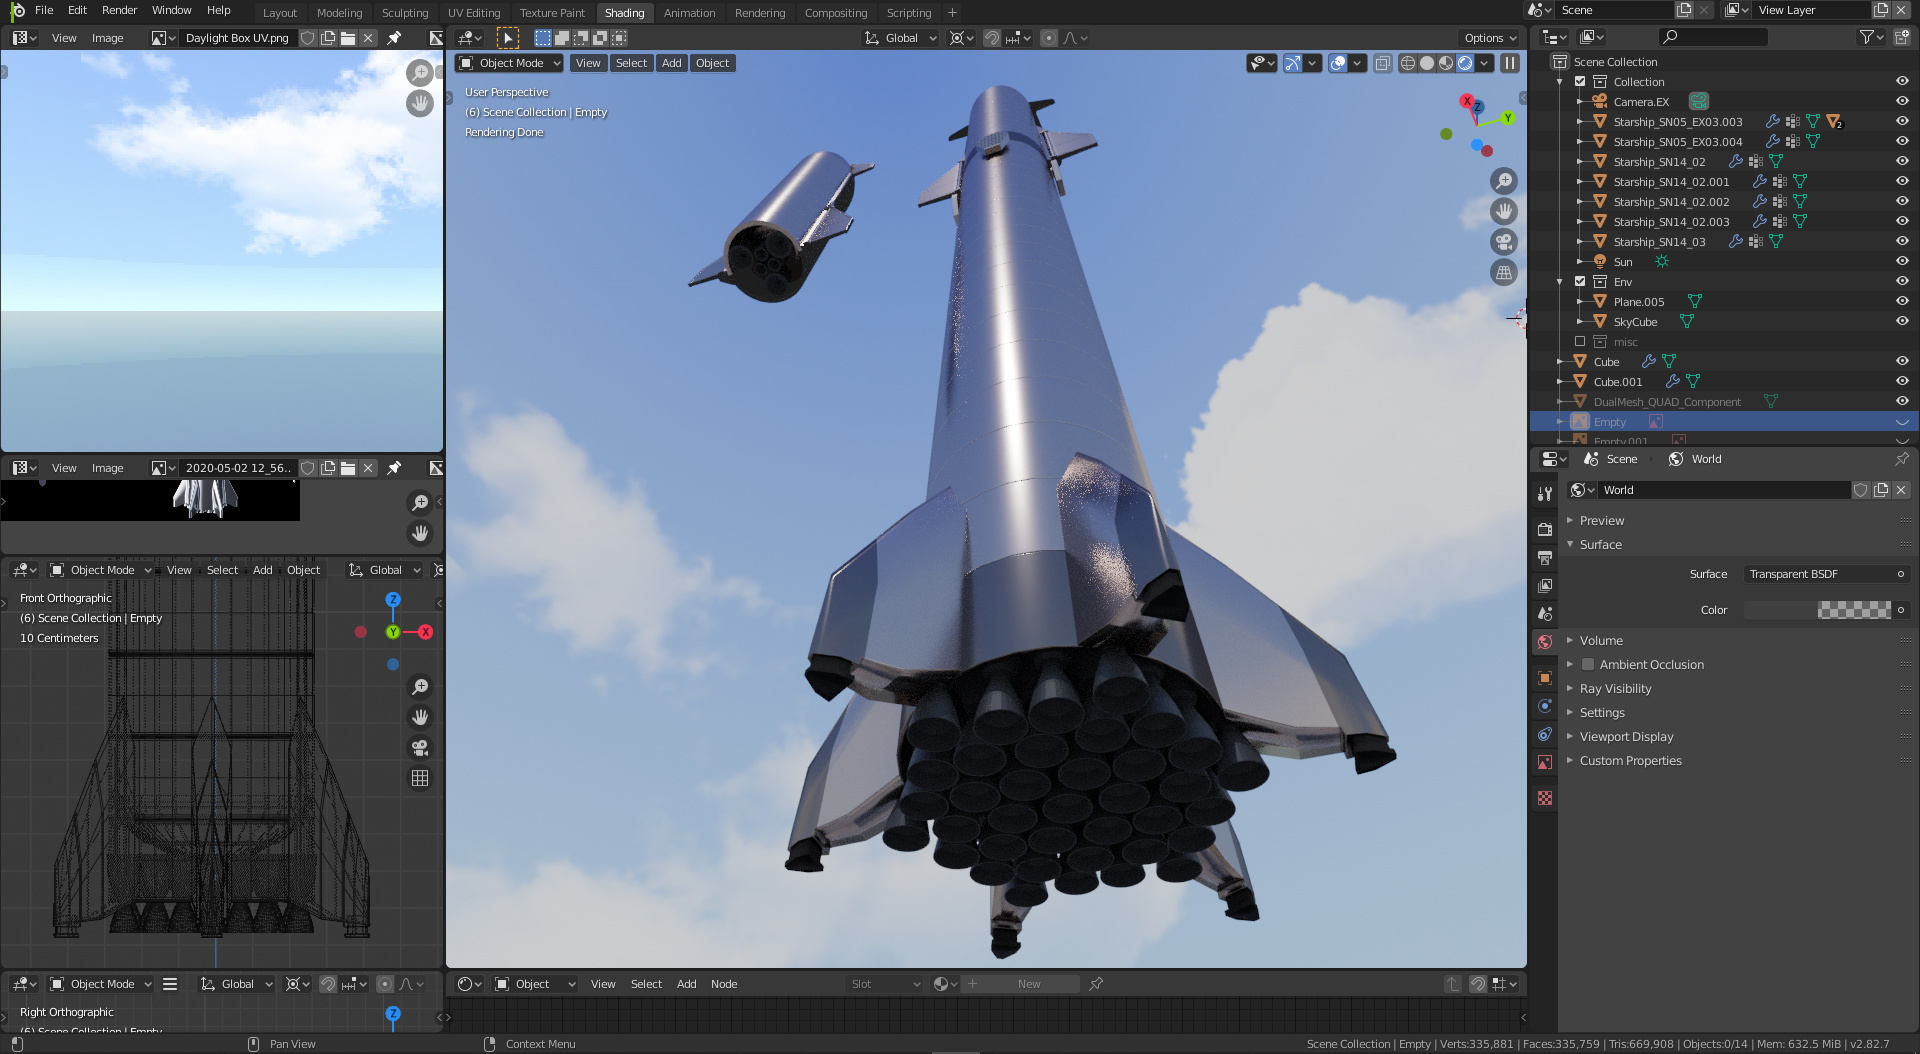
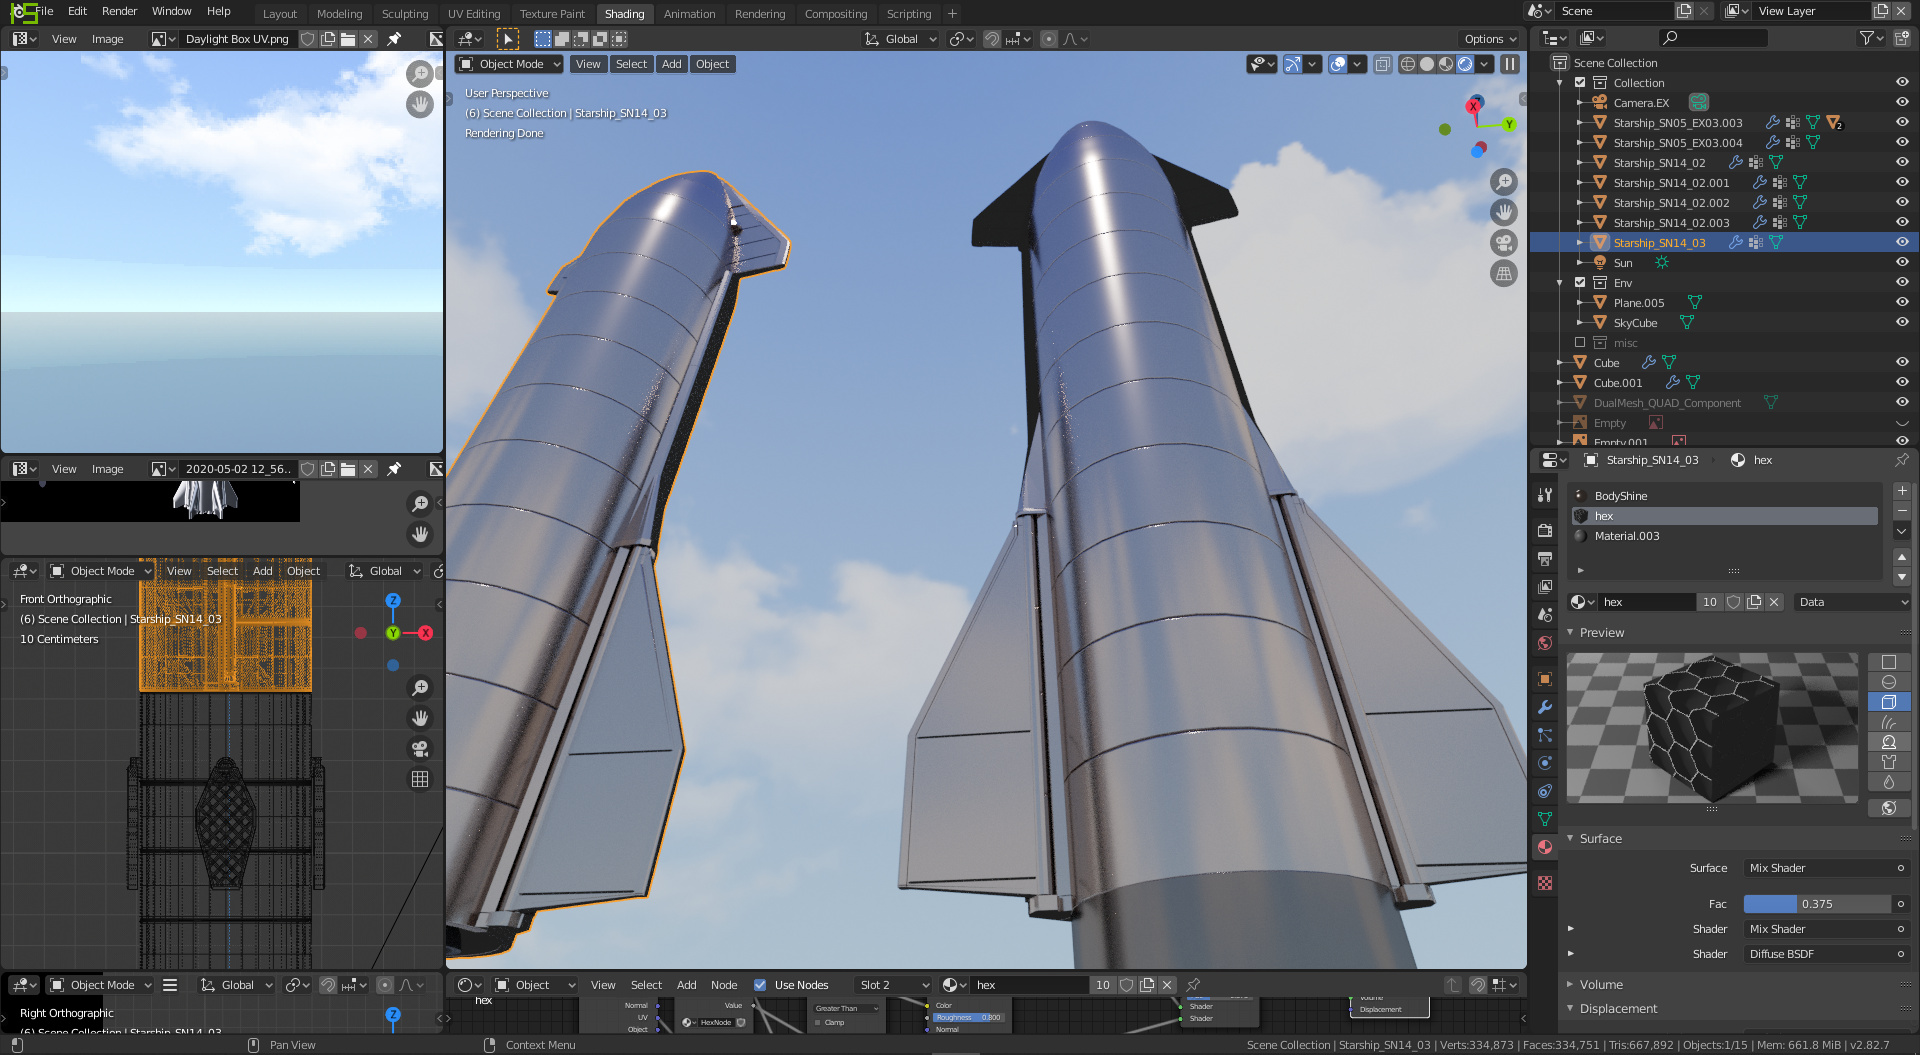
At this point I was pretty happy with the largest starhopper model, so it was time to move on to a bigger and more ambitious model and start on the fullsize MK1 Starship.

I’ll post more progress in the next thread, but thats a start for today!


As always, the best places to follow my work are below:

twitterFollow
youtubesub

6 Likes

Hi Alex,

great work! I came to your article looking for a Starship Model for my #HoppAR Mobile application. It is a gift to all fans of space exploration such as myself as well as a tribute to the recent innovation SpaceX and other companies are offering. Also your StarHopper Model is very promising!

Please have a look at #HoppAR here and let me know your impression as well. If you think your StarShip model can fit into this app with Attribution to the author (you) then let me know.

Best!

Josef GRUNIG

Thats really cool! Id love to see something like that using VR headset, youd really get a good idea of the scale of it. Are you going to add the 150m hop too? Being able to watch it from the landing pad as it launches and comes towards you would be pretty neat.

Back to working on my starship models so I should catch this thread up so I can start posting weekly progress.

So after getting pretty comfortable with the Starhopper I started modelling a nose cone for the taller version of starhopper, ie how it originally was meant to be with the nose cone attached (IRL the nose cone blew over before the test flight and was destroyed - SpaceX decided to continue testing without it since it wasnt cruical for what was really a prototype vehicle for testing their new Raptor rocket engine in flight)


Added my own custom greebling, which was really just modelled by extrapolating the greebling from the smaller model and guessing where RCS modules might be.

Some early paint tests (still working on finding the best way to paint these models)

Then… first modelling of MK1. Some of the dimensions completely wrong (since it wasnt fully assembled by the time I had this mode together), things like the upper canards are the wrong shape and wrong position, and I later removed all the greebling which didnt line up with the real Starship. Likewise proportions here are completely wrong as well, width vs height is all wrong in this model.

First test print of MK1

Did not go well.

1 Like

Hi Alex,
VR is an option and I am not excluding it at all. Thank you for the suggestions, I will probably change the height to reach the real 150meter hop. BTW in AR you get a very close idea of the dimensions if you stay nearby buildings or trees. In the meantime I bought a nice model for the starship which I was missing yet. Stay tuned by downloading the app, you will get notified once ready!

Good stuff
But also probably a good idea to start your own thread for ongoing work on your hopper project (let me know if you do). Id like to keep the focus here in this thread on my 3D modelling and printing work as much as possible! :slight_smile:

Early prints of the MK1 Starship turned out ok, although I discovered I had a lot of issues with the scale of the model. Working off picture references is difficult sometimes, but with some decent blueprints I managed to get the scale a lot more accurate.

Credit to u/caseyr001 from the SpaceXLounge subreddit for this awesome blueprint, really helped me get the proportions more accurate.

Ended up with a bit of a shipyard going on, I was iterating and test printing models very fast here, ended up learing a ton about Blender and equally as much about 3D printing and the ins and outs of my printer.


And during development I realized I could model hinges and print the Starship with potentially adjustable wings, early tests showed it was indeed possible! (altho modelling these took a lot of trial and error)


First full scale test print of a Starship with adjustable wings (both bottom and top wings can be adjusted) Ive chosen to go with 1:200 scale and had to print in 2 halves due to the size:

And also importantly from here on out I made the model hollow. The smaller versions I did before adding the adjustable wings werent hollow, but printing larger at 1:200 scale really meant I needed to do this - or else spend a small fortune on filament when printing!

This past week Im back to the basics finishing my Starhopper model. Just over 6 months since the real Starhopper flight and I started on the model. I figure this model has come a long way, it was the first I ever worked on learning the Blender 2.8 interface and its time to print it and get it painted up so I can call it finished! (and ofc literally shelve it to be displayed)

I worked a lot on developing a proper panel surface, that was hard to get right, I really wanted my model to have the dented and rickety paneling Starhopper is known for (and for that matter practice so the MK1 model can be accurate in this way as well)
Using these smaller cut back models I iterated the hinges again based on the past tests and worked on making the uneven panels. Getting that mix between resolution and scale takes a bit of experimentation betwen Blender and 3D printing so these smaller models are a great way of doing that. They take 3 hours to print so they made a great testbed for model iteration.


Also, perfect for painting tests too! Just as the 3D modelling side took a lot of iteration, finding a good way to post-process the model also took a lot of testing.

Ive got painting ‘workflow’ down to these stages:

  1. The model gets 4-8 layers of alternating ultracover (must be a plastic bonding spray) and quick dry timber protect, I found this approach in this video about smoothing PLA with plastic based sprays. Got to be careful not to remove too much detail, but the 4-8 layers seem to work well for this model
  2. Chrome paint (1-2 layers seems to do well)
  3. Hand paint details (like darker engines, fuel lines, external tanks etc)
  4. Timber protect & gloss cover (again) to seal and protect the model

After the first 2 steps:

Final result after all steps:

Heres an animated look at the test print, one test ring on top modelled at maximum resolution and a chrome painted test model with bumpy panelling test:
https://twitter.com/Alex_ADEdge/status/1238694063957630981

Exported the final version of the Starhopper model as of today and prepped for printing:


Ended up coming to just over 1 million polys.

In the process of being printed as of posting this comment and should take around 12-14 hours at the maxiumum print resolution my printer can manage (0.1mm):


The resulting 1:200 scale model will stand 94mm tall

And while Im at it, I found this Tesla Cybertruck doorstop model and printed/painted up this weekend as well. Another good test and painting practice on a similar chrome model (afterall Cybertrucks and SpaceX Starships will be made out of similar metal - both being built with Stainless Steel!)
I think I need a better set of brushes though… hand painting is tricky and I want the highest possible quality result for the upcoming models.

1 Like

Hi Great work! Is it ok that I forward your post to Elon Musk?

Thanks yvesbodson2!
And yeh by all means feel free to. Ive tweeted at Elon in the past a few times about various things but his twitter must be so full on Ive never gotten a response. Certainly dont mind him seeing my work.

ok will do and copy to you my mail

Amazing work! Do you have any plans on making the files available or for sale? I have some free time and working on a Starhopper or SN1 print would be awesome! Keep up the great work.

1 Like

Hi Brady,

At this point I do plan on releasing the Starhopper model freely for download/printing since so many people have been interested. Potentially MK1 or SN varients too. However Id like to print and finish the models myself first before I do that, so I can have top quality pictures of the finished product. Im in the process of painting Starhopper right now though, so that could be done within the next week with some luck. Stay tuned!

Welcome to BlenderArtists too btw! :slight_smile:

1 Like

Speaking of Hoppy (Starhopper). The final model printed flawlessly and Im on to painting it currently. Base coats are going on first to smooth, chrome is up next, then hand painting details and final polish.

This has been a lot of 3D modelling work in Blender, as well as finding the ins and outs of 3D printing, but its starting to pay off. Cant wait to have Starhopper done and move on to the big final MK1 print, then sleeker/smoother SN varients of Starship!

That would be great! I’ve been working in other 3D programs and still need to teach myself some blender. I’ll have to see what other programs to learn for school. Keep it up! It’s great that you are actually texturing the metal sheet seems instead of texturing them on. That makes for a way more interesting 3D print.

1 Like

Heres some further work on a near-future Starship varient as well. I put a good few hours into this model yesterday getting it up to spec and setting up materials. The goal was to use cycles to render this photo-realistic(ish) edit of a photo recently posted by Elon Musk:

https://twitter.com/Alex_ADEdge/status/1254776234355027973

I did this other edit a few weeks back based on another photo but no 3D was required since I could grab pieces from other ground-level photos, so it was all done in photoshop with some minor bits like the wings cut from my MK1 render:
https://twitter.com/Alex_ADEdge/status/1245145530058952707

The edit in the first image in this post however was complicated enough in the view angle + chrome rocket that I couldnt just chop up other photos, I needed to go 3D to get it done. Thankfully I had a half finished Starship model lying around! I just needed to add the smoother rings to it, update the fins and add a chrome material and lighting, all matched using the original image.

The way you can setup Blender to do preview renders at all times makes for a really nice workflow Ive got to say! No need to continously ‘render, wait for render to complete, adjust something minor… render… wait for render to complete…’ and so on like I used to in the early days of Blender, now I can see material and lighting changes almost right away.

More pictures

A slightly different edit, for a nearer-future SN05-06 ? We should be seeing this kind of Starship IRL in the next few months or weeks with some luck:

Comparison of the original photo (left) with my edit (right):

A look behind the scenes in Blender. Very simple setup overall and a good lesson for me in render layers. The custom shadow is rendered in another layer and the final composite is pulled together in photoshop. A good deal of photoshop was required to move that crane into a new position. But the render itself was pretty much complete and raw from Blender, just needed minor level corrections.

Ive got more plans with this edit, and then even more exciting plans with this model, more soon!

2 Likes

Starship model got some more attention last night. Heat tiles are meant to cover the wayward side of Starship (the side that faces into the ‘wind’ during re-entry). The current prototype undergoing testing (SN04) in Texas has some test tiles applied to it, which are a good reference on size and spacing.

When it comes to my model I was consdering doing this with a texture, but using geometry has some advantages if I can keep the polys to an absolute minimum. So far my computer is handling it fine. Very finiky work though.

The shrinkwrap, mirror and solidify modifiers are a godsend for work like this and really cut back on effort needed. The only manual parts are really around tricky bits of geometry like the wings. Im sure theres better approaches but its working well enough for now. Ive got almost all of the wayward side covered in tiles now.

IRL reference:
Photo taken by Bocachicagal

Tiles!

2 Likes

hehe man, you’re starting to get serious :smirk:

Starting to get serious? Haha how do you mean? :thinking:

Some more updates, a good few hours more put into the Starship model.
Ive moved away from geometry based tiles, and came up with a simple material which should do the job for now:

Some bits were difficult to UV unwrap, so the material doesnt tile well in places, but its a lot quicker and easier to work with. Elon has also mentioned that the wing and static aero structure of Starship has changed again, so I’m likely going to need to update the model and redo the UVs in the near future anyway. Keen to find out exactly whats changed.

Thanks to 100drips for the Hex Node, found here: https://www.youtube.com/watch?v=OENT4l4PFNE

Another angle:

Also started on the Super Heavy Booster.

Quick Grid fins:

And a whole lot of engines!

And finally I gave in and did some UV polishing, in particular the area at the top of the wings, where the tile texture transitions to a dark texture, then to the reflective stainless texture, wrapping around the geometry to the leeward side. Tricky to get right but pretty happy with how its looking now. Using the model on the SpaceX website as a reference here, which also reminded me the upper winglets are black on both sides, with only tiles facing wayward - so thats fixed now also.

2 Likes

wooooow, damn you’re a genius! Bro, is it possible to download the Starship model? I need a Starship model for my Powerpoint presentation :rofl: