The big Blender Sculpt Mode thread (Part 1)

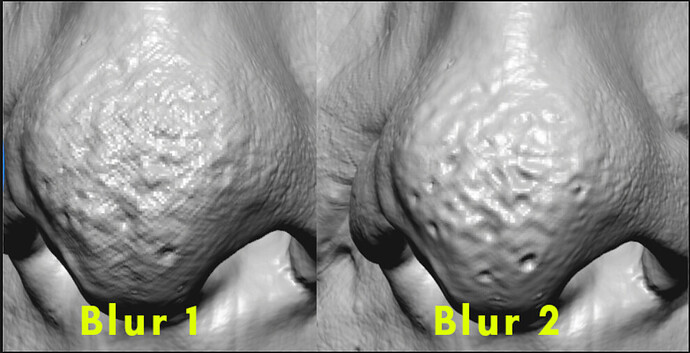
To me sculpting and painting feels better with blur 2. Blur 1 produced more high frequency noise while sculpting. At least on my test mesh.


Blur 1 also produces more of those zig zag patterns. Blur 2 ftw.
I have used the normal sculpt draw brush here.
image
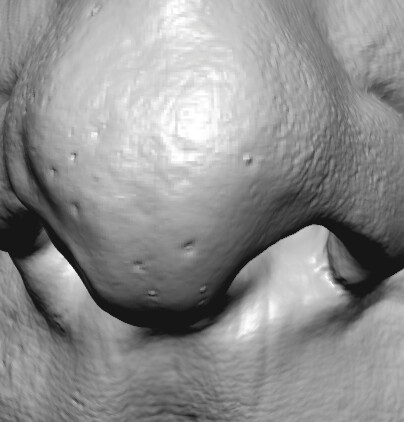
Original mesh

7 Likes

Well. I did not test it, right.
I did not test it with cavity factor above 1, with a texture or draw brush.
So, I had noise with both.
Because blur 1 is less steep, I found blur 1 more predictable.

After a second test, I admit that there is less noise with blur 2.
But blur 2 is producing steep boundaries.
Blur 2 needs more blur steps to get rid of them. But we are also getting rid of pattern, by doing, so.
Blur 1 with a little bit of austosmooth still seems to be a better option to me.
It gives a pattern easier to fuse.

1 Like

Thanks for testing.

I should explain the two blur modes. Mode 1 smoothes the final mask, however mode 2 actually changes how it’s computed. It builds the mask from two smoothed meshes at different strengths. I suspect this ends up being similar to an unsharp mask mathematically.

8 Likes

Btw the problem with visualizing the mask is performance. Computing a blurred cavity mask is actually fantastically slow, which is why the code builds up the mask incrementally under the brush and caches it for the duration of the stroke.

We have discussed adding some kind of tool to bake the current automask to a normal mask. Seems like this is worth doing.

11 Likes

Interesting approach. Any ideas how to achieve it in Blender?
Zbrush: sculpting cloth with Deco brush - YouTube

Breakdown:

  1. ability to further tweak stroke on curve which exaggerate most tweaked parts ( like accumulate )
  2. falloff at the end and at the beginning of the stroke ( less influence at those ends )
  3. more influence at concave than at convex (im not sure but it should be helpful )
1 Like

You should obtain something not as perfect but similar by using View Plane as Sculpt Plane and a View Spacing distance for a falloff based on view and Curve stroke method for Curve preview.

Using Curve Stroke method allows you to alternate pushing of relief and smoothing of tips.
Same Curve can be used for a Clay brush. Reused and repositioned for using Smooth brush on tips.

You can also try to use Cloth brush. Push Deformation is supposed to be made for that kind of work.
You have to press Ctrl while drawing the stroke. But that does not work with Curve Stroke Method.
And falloff goes only in one direction. You have to use it doing at least 2 strokes for back and forth.

2 Likes

That does look neat. I do want to improve our ability to do curved strokes in the future, though there’s no time at the moment. Code-wise this is actually the same thing as stroke interpolation, so when we do get to it we should be able to do both at once.

13 Likes

yes please, also i would like to suggest some features for curve strokes because they need some love:

that the strokes can be drawn, edited and stay attached to the surface of the object that is being sculpt, so that would be two options view and surface mode or simply just like grease pencil works, because is annoying the way is projecting the curve in the view just like stencil (that one can be kept too so then would be view, stencil, surface)

being able to “import” a curve (either bezier, poly, or svg curve file which is also bezier usually) into a object, and conform (shrinkwrap the curves to the surface) the curve to the object and add desired details from them…

mirroring of curves to any axis and symmetry of course, and merging of loose curve points together, subdivide and etc, just we do with curve objects…

“set base” (is that how is called right?) for curve strokes, for example kinda like layer brush functions but that we are able to undo even strokes from a surface to reset it to the original one maybe with the help of multires displacement eraser brush (but without having any multires modifier, if not otherwise a separate brush for that or some other option idk)

taper or radius setting for end and start and more custom radius or tapering, or profile settings, but maybe instead can be created another brush (maybe lets call it “curve brush”) for all this advanced settings and features which is preferred, so then the curve stroke can be deprecated and removed and replaced with an advanced brush instead.

So this is just an idea, which i think the Z program doesn’t even have some of brush like this or even better than what i am describing afaik, or if it does have it please someone enlighten me xd
2 Likes

:+1: I hope stroke repeating will also be added soon. In ZBrush I use it a lot. For example: a stroke with a crease-type brush, then choose a pinch-type brush and press the ‘1’ key to repeat the exact previous stroke.

6 Likes

This looks like a job for shift+r

1 Like

That doesn’t work for brush strokes in Sculpt Mode, unless something has recently changed.

Yes. Pablo forced repeat last action to remesh in sculpt mode.
User can not deactivate that.

We can deactivate or delete the shortcuts about remeshing. Shortcut used to repeat last in all modes will continue to remesh in sculpt mode.

He did it to hide the fact that repetition of last stroke is a non-existent feature in sculpt mode.
Because it was possible during a small period of development to repeat last stroke, during experiments with undo system.

1 Like

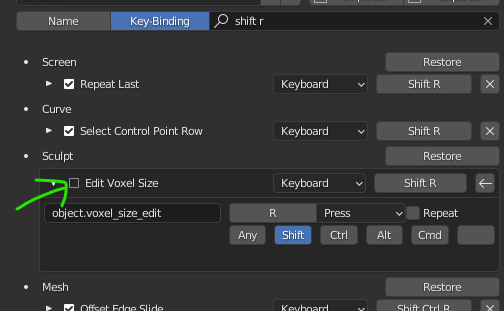
Just uncheck its keymap.
obraz

Or better change to something else.

1 Like

@zeauro @gorion103 Thanks, but as far as I know (and as Zeauro mentioned), the Repeat Last function doesn’t work for brush strokes, only for things like repeating a mask smooth operation, which is in itself very useful until the real-time mask operations from the Sculpt Dev builds have been added to the Master builds.

2 Likes

Damn, i’ve checked it on move operation where it works -_-.

2 Likes

HECK, its has been a pain clicking back and forth the pie menu to smooth the sh*t out of it several times, dang i could have use it all this time repeat last shortcut😑(but changing the remesh one of course…)

2 Likes

Yeah, it’s a pain. I bound sculpt.mask_filter to Ctrl Shift Click, so it functions similarly to how Zbrush does it. Now it’s ctrl+shift+drag for mask lasso, and ctrl+shift+tap to smooth mask.

3 Likes

I don’t see why remesh sizing and application can’t be combined into just ctrl+r thus freeing up shift+r for repeat stroke which really needs to be a thing eventually.

3 Likes

Combining them would force the user to see that grid ui every time they want to remesh. Most of the time I just want to tap ctrl+r to quickly remesh at exactly the same resolution.

How about the R key alone? It seems like it’s free. Right now it just activates rotation like in other modes, but that can’t be intentional since S and G don’t behave like that.

Another key that seems abandoned is E, which currently opens a menu with the… stroke methods? :man_shrugging:

I love sculpting in Blender, but I had to replace half the keys and make a few python scripts to feel comfortable (at least Blender allows this, unlike the Z program :P)

1 Like