The initial Blender / Maxwell workflow is incredibly simple. So simple that we don’t need a specific Maxwell plug-in.
Model and UV map in Blender, rotate model 90’ along the X axis and export as an .obj.
My .OBJ export choices for optimum intergration with Maxwell render:-
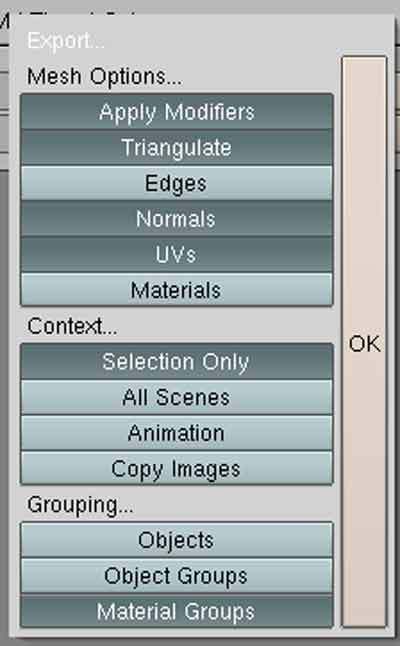
If the ‘Normals’ button is not pressed, it will not be possible to export any mesh smoothing applied to your objects. This can be useful for un-smoothed clay renders, but not for beauty renders.
Selecting ‘Material Groups’ instead of ‘Objects’, will retain objects as seperate entities when imported into Maxwell Studio. If you assign materials in Blender before export, the material names are added to the opbject names when exported.
This is very useful for assigning MXMs (Maxwell materials), to the correct mesh objects.
You can use .3DS, .LWO and other mesh formats if you prefer them to .OBJ.
The two most important factors with Blender and Maxwell are:-
1>. Scale. - Maxwell will not give correct lighting solutions and incorrect DOF, if the scene scale is wrong.
2>. Converting your mesh to triangular faces before export. - If you don’t triangulate your mesh objects before export, Maxwell Studio will have display issues and will leave holes in your mesh. Re-export from Blender with the ‘Triangulate’ button pressed, or CTRL+T in edit mode.
To help with scale I will post my base .Blend file for accurate scale translation with Maxwell.
This .Blend file includes a simple cube, which when exported as an .OBJ file, will measure 1meter x 1meter x 1meter, when imported into Maxwell Studio. The grid is also set up for accurate real world scale modeling, with 1 grid unit equal to 1m. This will be available later today.
Blender materials will not import into Maxwell. Only the names of your Blender materials will be used. All material work, including primitive UV mapping if needed, can be done once your model has been imported into Maxwell Studio.
Introduction to Maxwell Studio coming tomorrow.
Sonix.