The Unmaking of a cyborg, Animated Short.

Hi All,
I’m still learning blender, so this is mostly just a project to practice those areas which i’ve yet to learn fully. i.e.

> low poly Quad Modeling (I’m used to programs which only use triangles and have no subsurf or multires).

> rigging, especially soft body rigging.

> animation, especially character animation and movements.

The short will probably feed in to a much bigger project. But for now this is just going to be a 3-5 minute movie based on the deconstruction and storage of a cyborg body. It’s kind of a homage to the intro sequence from the first Ghost in the shell movie, where Major Mitako’s special body is put together.

Here’s an early rigging test i did, trying to reverse engineer the LUDWIG rig from blender artists.
I will do my own rig when it comes down to it (currently next thin on the list after making the hair) but I need to understand how it works first.

http://i178.photobucket.com/albums/w249/pickledtezcat/Art%20Project%202/b568fedb.jpg

Next a preview of the face texture;

And an early shot of making the inner skeleton.

http://i178.photobucket.com/albums/w249/pickledtezcat/Art%20Project%202/fa485391.jpg

Keep a look out for updates. I should be able to update this fairly frequently.

Neat Cyborg model I hope you keep up with this modeling project! Try adding a few edge loops to the hip area only 1 or 2 should do it this will help you get the look i think you want :smiley:

Yeah, maybe it needs two more edge loops there.

So far I’ve taken a cylindrical edge loop style, only branching off at the arms, neck and legs, but I think I need to add some rounded loops on each arse cheek and each breast, and maybe the two shoulder blades. In the torso these are the areas of highest detail which need topographic modeling.

By deleting 4 intersecting quads and then extruding the resulting hole inwards you can add a certain amount of edge loop detail to a small area without using triangles.

Grr… It’s difficult to model in quads, I think I need to rethink the topology of the body in future models, but as this mesh is only going to be in use for a shot part of the animation (before her “skin” gets removed) I think I’ll carry on with it.

I’ve managed to keep all the shapes to quads, but the edge loops have been interrupted in some places. I think in future the way to go is to work from concentric loops focused on the areas of highest detail as islands. As the loops are expanded they can meet up and be joined.

The other way to do it is to start with a cylinder to get the basic shape and then work inwards to create the concentric loops around the detailed areas. I guess it’s a question of experience. Eventually you find the best way of doing a particular feature.

As this is my first human figure in blender (I produced a number of unsuccessful projects using Open FX) I think it’s going OK.

I want to create a conforming soft body dress once I’ve made the head, hands and feet. I need some practice on getting clothes to work first so I’m going to produce a test rig to see if I can get it to work. There’s no point rushing in to things, and if you’re doing something for the first time it helps to build a test model before you attempt to work on your main project.

Usually the second attempt is better executed and most of the time if you’ve made a mistake and the test sucks, you don’t make the same one twice.

Ok, you need to put a nudity warning in your thread title dude. Click ‘edit’ on your first post and add (nudity) in brackets at the end of your thread title. That’s for the reference pic mainly.

Sorry, I did 5 years at art school where nudes are a common part of art and art history.

I guess because I’m not shocked at seeing a naked person, I’m tend to think others wouldn’t be too.

Anyway, I’m not happy with the edge loops on the skin so I think I may rework it from scratch. It had got a little above the detail level I wanted any way.

Oh no need to apologise - it’s mainly because there are 13 year old kids and such running around in here. I don’t have a problem with it personally :wink:

I like the look of the cyborg skeleton, though your humanoid skin does indeed need a few more loopcuts if you want more detail. It looks rather squarish atm.

Well, I’ve made a little progress, mainly due to TorQ’s excellent face tutorial

Though it can’t overcome my lack of edge loop experience and my low organic modeling skills.

I need some feedback on the model before I start rigging and texturing.
Ignore the unfinished hands and feet for now, they should be done soon. I need to know if the proportions are about right. Also I’ve not yet added the lips or eyelids, I’ll wait until I’m rigging before I start with those details. That will be the point where I can decide how many edge loops need to be added for smooth animation and if any can be left out.

It’s a low poly character, so don’t expect high levels of surface details at this point. I’m going to add most details through normal mapping and textures later.

I’m not planning on animating it with the skeleton inside at this point.

And some more work on the face. The model is going to be a Korean woman. She will be wearing the traditional Korean Hanbok in the final version. Creating the Hanbok shouldn’t be too much of a challenge. The Hanbok is made of quite stiff fabric and doesn’t drape like softer garments. The difficult part will be trying to come up with a combination of camera angles and models to make it look like she is disrobing before entering the deconstruction room. I still need to work on the ears, and the hair. I’m still working on trying to make it look more feminine and also more Asian.

http://i178.photobucket.com/albums/w249/pickledtezcat/Art%20Project%202/4a5710fd.jpg

A quick update, I’ve been experimenting with hair, this is not particles, rendering time about 3 seconds with no shadows and no rays.

I want this model to be really quick to render as it’s going to feature in quite a long animation and I only have a cheap laptop to do it with.

http://i178.photobucket.com/albums/w249/pickledtezcat/Art%20Project%202/d8342271.jpg

The face will look better when it’s rendered and rigged, right now it’s in repose, ready for easy preparation.

I’m thinking it needs more lateral loops in the chin to cut down on the squareness…

OK, I’ve decided to scrap what I’ve done and start over.

I need more experience with modeling before I can continue. My biological modeling skills are not up to what I would consider my minimum standard right now, so I need to improve before I’m ready to throw a lot of effort in to a full project.

I’ll return to this once I’ve made the main character. But for now I’m off to work on my techniques.

About your biological face. Since there is no wire to show your face loops it is hard to give constructive critique. If your aim is to mimic the “cyborgs-dolls” in Ghost of the Shell I would consider making the cheeks less inflated and make the lips less childish. The eyes could be more distinct aswell, try to make folds grooves just like a real eye. Eyes demands alot of work considering they are the most (atleast I think so) important feature of a face.

ps. the skull shape is very cone headish right now, try to make it more oval than cony on top.

The face wasn’t specifically meant to mimic the dolls from GITS 2, but it turned out that way anyway. I’ve spent all evening trying to remodel the face more in line with what I want, but I still need more practice and a better prepared set of edge loops. I’ve been trying to approximate ridges and bumps by using two parallel edges rather than a single one. I’m going to start over with some better reference pictures. I was using images of Caucasian women and then trying to remodel them to be more like an Asian face (I couldn’t find any good orthographic Asian female faces).

I think I’m going to get one of my Korean girlfriends to model for me.

I won’t post what I ended up with here, it’s too far off mission now, and although i did learn some good lessons (like a better approach to human hair for next time and some fast and dirty methods of UV unwrapping) it’s time to take those lessons and apply them to a new project rather than trying to salvage something from this one.

I’ll just to use this one as a test rig, maybe I’ll use it to test methods of clothing and rigging as well as animating. Not for public display. :slight_smile:

G’luck! I think this will turn out really cool if you are going to have several robots that show off different robotic elements underneath the the bilogical.

After some reworking of the mesh, deleting a whole load of loops and then remaking them with better topology I think I’ve got something I can work with.

The human aspect of the model is only going to be shown for a few minutes during the animation anyway, and most of that will be from mid to long distance anyway. It’s going to be a low poly model so there’s no need to get too involved with modeling at this stage (I’ve already spent nearly a week on just the face).

I’ll post a preview again once I’ve textured her. That’s going to be a difficult part because the texture layout I use will have to accommodate a reworking later to represent the bionic muscle and flesh beneath the skin (once the skin is removed). I’m thinking of using really power lights to burn off the skin, with the skin whiting out and when it fades back in the skin will be drifting down as ash, with the sub flesh beneath revealed. (a hollow mesh exploding off perhaps using the J-particles build of blender or another technique).

The subflesh will be shed by using a high voltage shock to cause a chemical reaction. The flesh will suddenly change state, sliding off like honey (normal mesh switched for a liquid simulation).

Finally the body will be disassembled using a re-rigged character joined to a rigged environment with robotic assembly arms and welding effects.

After some more work I’m actually happy with where this figure is going.

I’m going to make some test animations and renders just using the figure once I’ve made some clothes. I think in the end it does look Asian, and also manages to look feminine.

I’m not totally convinced, she’s still a bit butch and my edge loops really didn’t get any better, I need to spend some time with some tutorials before I try another human or biological character.

Here’s the loops;

http://i178.photobucket.com/albums/w249/pickledtezcat/Art%20Project%202/9daab4b3.jpg

I tried to keep the body low poly, whilst adding more loops to the head. I did a similar thing with the hands, which also look pretty ugly. It’s not going to be easy to animate, but I don’t plan on having an expressive face this time around. The facial expression is going to be early fixed, perhaps with a little movement and blinking.

Here’s a preview of the texture I’ve made, I followed and excellent tutorial which suggested adding a second UV channel in order to remove any visible seams, it worked quite well. There are some artifacts here because it’s a render direct from the program view port. I should also point out that as the body and feet will be covered by clothes I’ve chosen not to add lots of detail to them. So no toes, and a pretty boxy torso. In fact the face and the hands are the only areas I added detail.

http://i178.photobucket.com/albums/w249/pickledtezcat/Art%20Project%202/9782c05b.jpg

And finally a preview of the face, with SSS added. I think I’m not going to bother with SSS or AO in the final animation, I’m going to bake the textures with AO and then use simple light sources for the main light direction. Here I used a fake AO dome, combined with AO rendering and SSS, so it took a little while to render.

My computer’s graphics card has issues with blender, so I can never tell when scene is finished, i have to keep going and clicking on the render pop up to see if it’s done (there is no preview, just a black screen).

I want the final project to be as simple as possible to render, that’s why I want to bake textures and use simple models as much as possible. It’s going to reduce the quality of the final animation, but ti should speed things up and actually allow me to get it done.

http://i178.photobucket.com/albums/w249/pickledtezcat/Art%20Project%202/2cf33f74.jpg

Why is it that SSS most often actually seems to darken the material rather than adding light? Maybe it’s my shader settings…

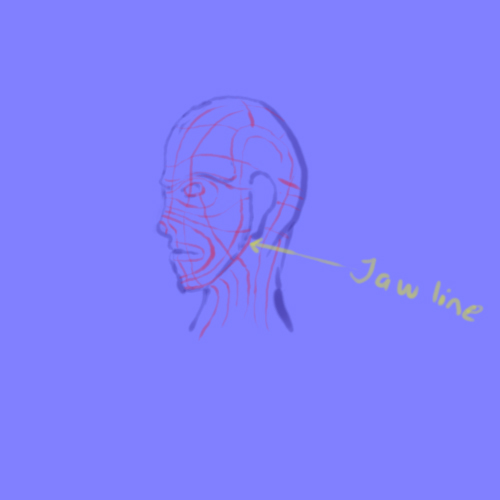
Hmm… I dunno if I like those loops. For instance, the jawline is located precisely where the ear is. Right now I allmost only see eye and mouth loops. Nothing that goes from the chin all the way around the ear for example. I allways use the pic below as a base and then mold it into whatever characteristics I want. There are plenty ways of doing it though.

There are plenty of loop images on the web, but I thought it couldn’t hurt with one more. :slight_smile:

Attachments


Thanks, as I said, the loops suck. this was my first try at making a face with edge loops. Before I’ve only used triangles. Honestly on my model the ear and jawline was the messiest place. I tried to be clever and have most of the face loops merge in to the neck so that they don’t follow down in to the body. In the end it just made things messy.

I suspect the animation of the neck is going to be ugly too. I found a god tutorial on making the loops for the face, but noting initially n the ear or head and neck.

Mostly the ears and neck are going to be hidden on the model by the hair so I’m not so bothered, but next time I’ll do a better job.

Just a little update. I’m working on the rig right now, This character is isn’t going to do much so the rig is not very complex, I want to have two main human characters in the animation and as I’ve spent to much effort on this one already I may as well use this one rather than try and make a whole new one. :slight_smile:

I’ll make a whole new character for the main part of the animation, this one is going to be a background figure.

I still need to work on the hair, eyebrows and make some teeth. I really don’t want to use SSS in the final animation but I’m really liking what it can do for a character…

http://i178.photobucket.com/albums/w249/pickledtezcat/Art%20Project%202/9f6e8faf.jpg

About the face loops on her chin, you don’t need to have equal number of faceloops under her lower lip as on the upper lip. This is generally the trick to reduce the loops reaching the neck. Her chin is also very smooth which makes it even easier to do that without any problem.

Everything looks great otherwise :slight_smile: are you going to make particle hair as you talked about in my thread? I will be looking forward to that.

Well, I will use the particles to produce an animated UV map. It’s easy to get the particles how you want them for a few choice “strips” of hair and then use bezier curve guides to make the hair wave and flow. I want the individual hairs to move a little when she does.

We’ll see how it goes.

I had a lot of trouble with her jaw looking too square so I added some extra loops in that area. Next time I’ll just make better use of the ones I have. It’s hard because an Asian face is so much flatter than a western face, yet the ears are no further forward. I wanted to keep the jaw curved and not masculine, but also keep the face fairly flat. That meant adding an extra set of loops between the jaw and the ear.

as it is, the jaw and most of the ear is going to be covered by hair, so it’s not going to be such a problem.

I need to do something with the eyes thou, right now they look too flat and glowing. Maybe it’s because they don’t have any SSS compared to the face, but still, I want to experiment with them later to bring out some shading and highlights. Asian womens eyes are very beautiful, despite being almost totally black. Like pools of ink.