The mesh to point set to face should give you that !
Just to update where I’m now… not so far from the beginning…

Now that I’ve this, new questions arise:
-
Have you some tips how to select and measure the edge lenghts of a mesh (island)?
My idea is to take every mesh island, measure the edge lenghts, take the longest and use it as dimensions for the grid, divide the dimensions by the measure of the roof tile, get the tiles numbers and set the grid vertices, booleans the grid points with every mesh island to exclude the one outside the mesh. -
I’d like to use mesh islands as the roof mesh could have some segmentation, so I have to be safe and consider as one element every mesh, both with mesh subdivision. Is it a too safe approach?
-
as the first point, the other approach I’d like to explore is the curve way like @sozap did but I still have to know the longest edge measure.
 … I think…
1 Like
thank you,
as you can see above, I’ve used that node and it works (but I’m too far from what I’d like to do…but step by step I’ll do… probably ![]() )
)
1 Like
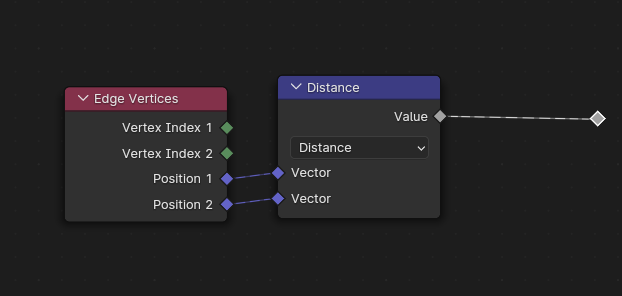
This gives you each edge’s length and from there you might get to what you want.
I don’t get what you’re trying to do, sorry ![]() But it seems to go in the right direction.
But it seems to go in the right direction.
What I was doing is to instance a giant grid and remove what is outside the base mesh using geometry proximity. But as said, it’s not that simple in the end…
Here a some retrieved posts where I show a bit of that technique, that might give you some hints !
Good luck !
2 Likes
Probably I was a bit unclear.
I was meaning that, as I’m exploring to use every pitch roof area to distribute the correct and needed number of roof tiles, I should pay attention when a pitch roof surface is made by 2 adiacent faces.

Obviously if I’m going to manually model the base mesh by myself I’ll never do something like this but as I’d like to make a more general tool, I was thinking to have a more safe way to calculate the area of every pitch roof, trying to consider the same mesh island like those 2 faces are considered like just one

Is it more clear?
1 Like
Greate.
Thank you very much…I’ll dig for finding something useful.
Much clear indeed !
In fact having such geo creates trouble with my technique of instancing grids, but maybe you’ll find another way of doing !
Obviously this depends on the case but generally supporting a lot of different scenarios will lead to an exponential complexity, at some point you choose a path and this sets the possibilities and limitations of the system.
Even more, ideally you should be aware of those when choosing the path ![]()
Normally when building a GN system it’s recommended to start with a pencil and paper and do some planning / design. That doesn’t mean you should have all the answers but at least having 70% of the job nearly figured out.
If that’s not the case, it’s probably better to keep training or focus on simpler stuff… But that’s just my opinion ![]() you should do what you feel right !
you should do what you feel right !
Have fun !
1 Like
I hope to be able to ![]()
Right…for example, one constraint I’m thinking on is to limit to the straight pitch roof…to be clear not curved pagoda roof style. But until I’ve a more clear frame about my progress, I’d like to leave open my mind.
I’m using a mixed approach made by a general plan (in my head) and a check on track if I’m able to do it…and when I can’t, I’m trying to subdivide the problems in smaller parts and when solved I try to reassemble them…
thank you for sharing both pratical details and general tips.
1 Like
Hey !
I see, I don’t want to sound like a broken record, but I highly encourage you to do more planning on paper first.
It’s too bad I got rid of all the doodles I did for my projects so I could have shown you.
Ideally you should be able to clearly explain the process from start to finish beforehand, in a similar fashion people do storyboards before shooting a sequence.
“In your head” is ok, but most of the time you can’t have as many things as you can in a paper. Having every idea in front of you will help a lot to get a step further and foresee stuff that won’t work before running into blender…
If you want to start doing complex node setups, this kind of planning is nearly mandatory. On one working day I tend to spend between 30mn / 2h doing planning and doodles until it’s pretty clear in my head.
It’s not the best example, but this is some 3D doodling for a course I did for a few friends of mine :


Normally I do all that on paper with even more planning sometime.
And that’s the end result :

I must admit that with experience I can do everything in my head without too much planning, but that really means it’s super easy for me.
But if you try that for a while you’ll see that you’ll be much faster.
It’s a general rule that apply in many areas, you should separate the thinking process and the action. Just like when going to the grocery store, you can go freestyle and figure out what you need on the fly. Or when at home you see what you need , make a list and the go to the store.
With the second method you’ll forget less stuff, you’ll go faster, and eventually you’ll save some money by buying only what you need…
Same principles apply in many areas of CG…
Anyway, sorry for the long post, I won’t insist anymore !
Have fun !
3 Likes
@sozap Do you think that this could work, with some changes, to (for every mesh island created by a split edge node):
- compare all the edge position
- find the lowest one (vertically speaking, z-axis)
- use it to make a selection
It seems yes but I’d like to know what do you think.
1 Like
That’s incredibly great advice. I’ve gone down quite a few rabbit holes trying to create a node setup, and would have wasted far less time if I’d taken half an hour to think about “Ok, let’s break this down into steps. What steps are needed, and how will those ripple down the chain? Do the ripples indicate a previous step needs more planning?”
It’s easy to just throw instances on top of selections, then blob something on top, repeat, repeat. Then you’ve got a mess that might work for one situation, but has no flexibility for anything else…
1 Like
Hello !
It’s been a while since I wrote this post, I’m not 100% sure about the answer…
I would have to try by myself to really be sure, but just like you it seems to be…
Then each island is a face basically ? that looks pretty similar to my use case.
I think I was trying to access to the highest vertex rather than an edge, so it might be where this might fail…
I’m pretty sure you already work that way, but just in case, the best way to work that out is to make a little test file, or even better start with the .blend in the other thread and see if that can work for you case, and then implement that in your main scene.
Rather than trying to test right away in your main scene that is probably a bit more complex and harder to maintain !
Anyway, the solutions provided by Zeroskills and Moshus where pretty interesting and worth giving a try !
Hahaha, that’s the spirit ! It’s crazy how we can become much better at what we do by just being more organised. It’s not always about skills and knowledge.
It’s just like with references, 1/ pick a few good references, 2/ study them = instant progress ![]()
Skipping planning is kinda fun since there is some kind of pleasure in doodling and experimenting. Planning and organisation generally means spending 1 or 2 hours thinking about all the possible outcomes, where things could go wrong, and it’s a bit heavy on the brain too… That’s probably why we tend to skip it and prefer jump in blender right away !
But in the meantime doing some planning is like activating super power mode, things become much smoother faster and better. This saved me so many time on tight deadlines !
1 Like
Well…I’ve a very little main scene with few nodes at the moment…but surely it’s a good tip and already when I face some issues I open a new scene and starting from scratch…both with shaders and other things like particles or anything that needs some testing.
Now…trying to do something simple, I can’t understand why this is not working.

Just to show what I have before the delete geom node.

The logic should be:
as I’d like to work with mesh islands, I’m “simulating” to have a mesh island composed by a single 4 edges face.
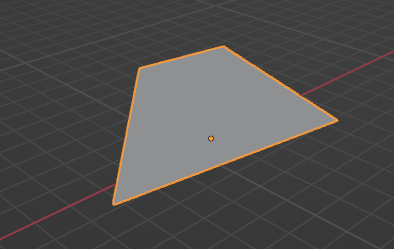
So…starting with a single face I want to find the lowest edge of the face so I thought to compare the edges centers heights with the face center height.
Why I can’t select the lowest edge?
Where am I wrong? Why is not comparing that points in the way I’d like?
It seems correct but I obviously not…but I can’t figure out why…
comparing_pointsHeights.blend (1018.4 KB)
EDIT: if my algorithm has a bit of correct logic, please, if you decide to help me, could you correct just this without introduce any others one? As I’m quite sure that I’m missing some GN fundamentals, I’d like to understand that and correct me in that way.
I’ve read many times the introduction pages of GN Blender manual and that pages seems clear but when I try to create something “new” it seems that I’m missing something.
Obviously, if my logic is completely wrong, another one is needed… but in my opinion should work… ![]()
1 Like
The overall logic is good, but the way it’s translated in nodes isn’t ![]()
There is a lot to unpack to explain why your file doesn’t work, and it would take some time to go through all the details…
Here is my take on your idea :
comparing_pointsHeights_2.blend (1.0 MB)
Hope you can find a few tips in there…
The best thing to do is to keep doing these kind of very simple exercises until you have a good feel on what is happening and you get the expected result !
Good luck !
2 Likes
Don’t worry. Fully understandable.
It’s already a great thing to be able to ask for an help and get some good replies.
sure!
Yes…I’m trying to keep the thing as simple as possible… I have to clear understand how to face every little piece of this puzzle…then I’ll try to assemble.
1 Like
It seems working great and it avoids also to make the edge heights comparison inside a mesh island.
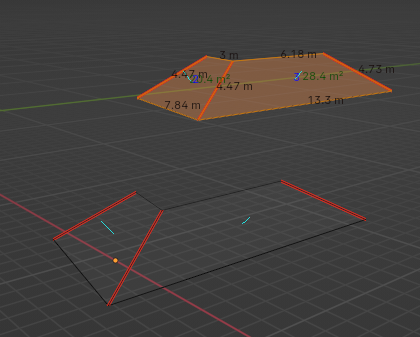
But know I can’t understand how it can… ![]()
or more precisely…I can’t understand how it can keep the edges with the own face.
The reason is that the “Capture Attr” set for Face is before the other one set for Edge? It seems not because I’ve tried to connect in reverse way…before “capture” for edge and then for face and it still working in the same way…
So, it’s still a mistery…
I mean… the Capture attribute nodes read the position vectors of the faces and edges centers. Why the edges of the highest part of the mesh are not deleted as I have a face center of the lowest part of the mesh that is lower than the higher edges?
Yes the order doesn’t matter !
Well, I think you misunderstand how it’s working…
You think every edges position are tested against every faces positions, but it doesn’t work that way.
Say we have two faces A and B.
We store the position of these face with capture attribute, then every element of face A (vertex , edge) will inherit the face A position in the capture attribute.
But they have no idea of the value of the face B.
In the same way, elements of face B doesn’t have a clue about the value of element of face B.
So what I did is basically capturing each faces position, then elements (vertex, edge) inherit that value.
Then it’s possible to compare edges position, with the position of the face they belong to…
I recommend you do some tests around that until this is really clear as probably in many situations what happens is quite different from what you think !
1 Like
This is exactly what I haven’t catch… so the elements of every face are automatically in relationship with each other.
I was thinking that the Capture Attribute node populate a list of elements(and their attributes) and stop… like put marbles inside a bag and then I would recreate a relationship between the elements…
Thank you very much for this explanation!
1 Like
cool !
yes it turns out that it’s not straightforward in geometry nodes to do these kind of comparisons. On top of that it’s a bit expensive in terms of performances.
Loops like repeat zone, and the upcoming “for each” loop should makes things easier for these cases.
Anyway, I bet things will start to make more sense once you get the logic of how attribute are stored and what kind of data you access in the graph !
1 Like