🚀 Turbo Tools - Faster Cycles Renders & Compositing!

Ok, I tried out the out of core rendering you mentioned.
That’s pretty amazing, it worked (for materials). I was able to do a 25GB test sene.
15 GB for geometry and 10GB for materials. That’s a really good hint.

I wasn’t aware that this blender today video stream has also a pitching component. I will try this at a future point. However, I created a new and shiny right click select for this feature:

Maybe you want also to upvote it :slight_smile:
And now I stop hijacking your thread :stuck_out_tongue_winking_eye:

1 Like

awesome, 17 gb of pooled VRAM for geometry should be enough for practically any scene if instancing is utilised. I did some automotive product shots recently, with the car driving through a photorealistic landscape with several hundred thousand foliage instances, and it still only came in at 6gb, even though the cad file contained literally every car part (down to the smallest screw)!

I’ll keep my eye out for your suggestion on the blender today weekly livestream :slight_smile:

Don’t forget about culling by the way. If you turn that on, and then also enable it for each object, you’ll save a ton of memory:

You have to enable it for each object too. select them all, then hold alt when clicking use camera cull. That’ll turn that option on for them all at once:

:+1:

2 Likes

Here’s the link to the Turbo Tools addon for anyone reading the post for the first time:

2 Likes

Hi, hope you’re well.

I sent out an email a while ago regarding a bug in Blender which in some cases can cause problems if you have SSS materials being fed by a texture or gradient. https://developer.blender.org/T96967

The workaround of adding a ramp node between the texture and the principled’s SSS inputs, and setting the black level to 0.0001 is pretty straightforward, but I’ve just had a customer who had too many materials they’d need to amend. Whilst it’s not an issue with the addon, it can affect the results the addon produces, so I’ve written a script to automate the fix until the Blender Foundation are able to fix the underlying bug in Blender.

If you paste the below code into Blender’s script editor and press the script editors play button, it will add the ramp with the necessary settings between each principled node’s Subsurface input and the connected node:

import bpy

for mat in bpy.data.materials:
    if mat.use_nodes:
        for node in mat.node_tree.nodes:
            if node.type == 'BSDF_PRINCIPLED':
                if node.inputs[3].links:

                    from_node = node.inputs[3].links[0].from_node
                    from_socket = node.inputs[3].links[0].from_socket
                    ramp = mat.node_tree.nodes.new('ShaderNodeValToRGB')
                    ramp.location = from_node.location
                    ramp.color_ramp.elements[0].color = (0.0001, 0.0001, 0.0001, 1)
                    mat.node_tree.links.new(ramp.inputs['Fac'],  from_socket)
                    mat.node_tree.links.new(node.inputs['Subsurface'], ramp.outputs['Color'])

Cheers
Michael

2 Likes

TurboRender strikes again !
This time helping me to render those insane volumetric steam right next to subsurface scattering with NO NOISE how the hell does it do that !!! MAGIC I tell you…MAGIC !
Though I still don’t know how to use TurboRender with confidence, it seemed to just give me results that works.

Used TurboRender for this 5 mins straight to the point retopolization tutorial I just released:
https://www.youtube.com/watch?v=2gJzX_ijnMs

1 Like

Thanks, it’s great to hear the positive feedback. Excellent video too :+1:

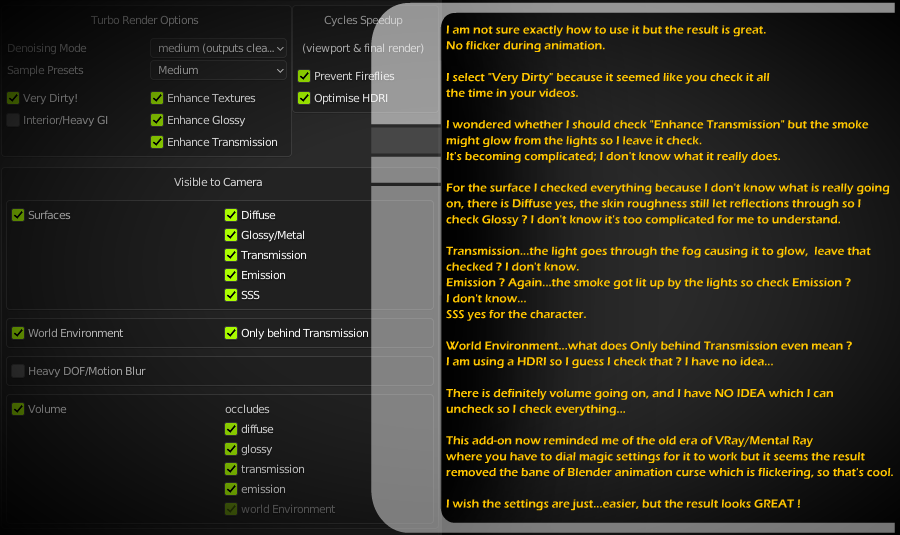
Very dirty = leave on unless there’s not much noise before denoising (depends on the number of samples you use, for the sample presets generally leave it on)

Enhance transmission - only has an effect if there’s a lot of texture detail in the transmission (transmission is glass or water enabled with the transmission slider in the principled bsdf, or the refraction bsdf). Generally I’d leave this and enhance glossy off. Enhance textures is the only one I’d nearly always leave on.

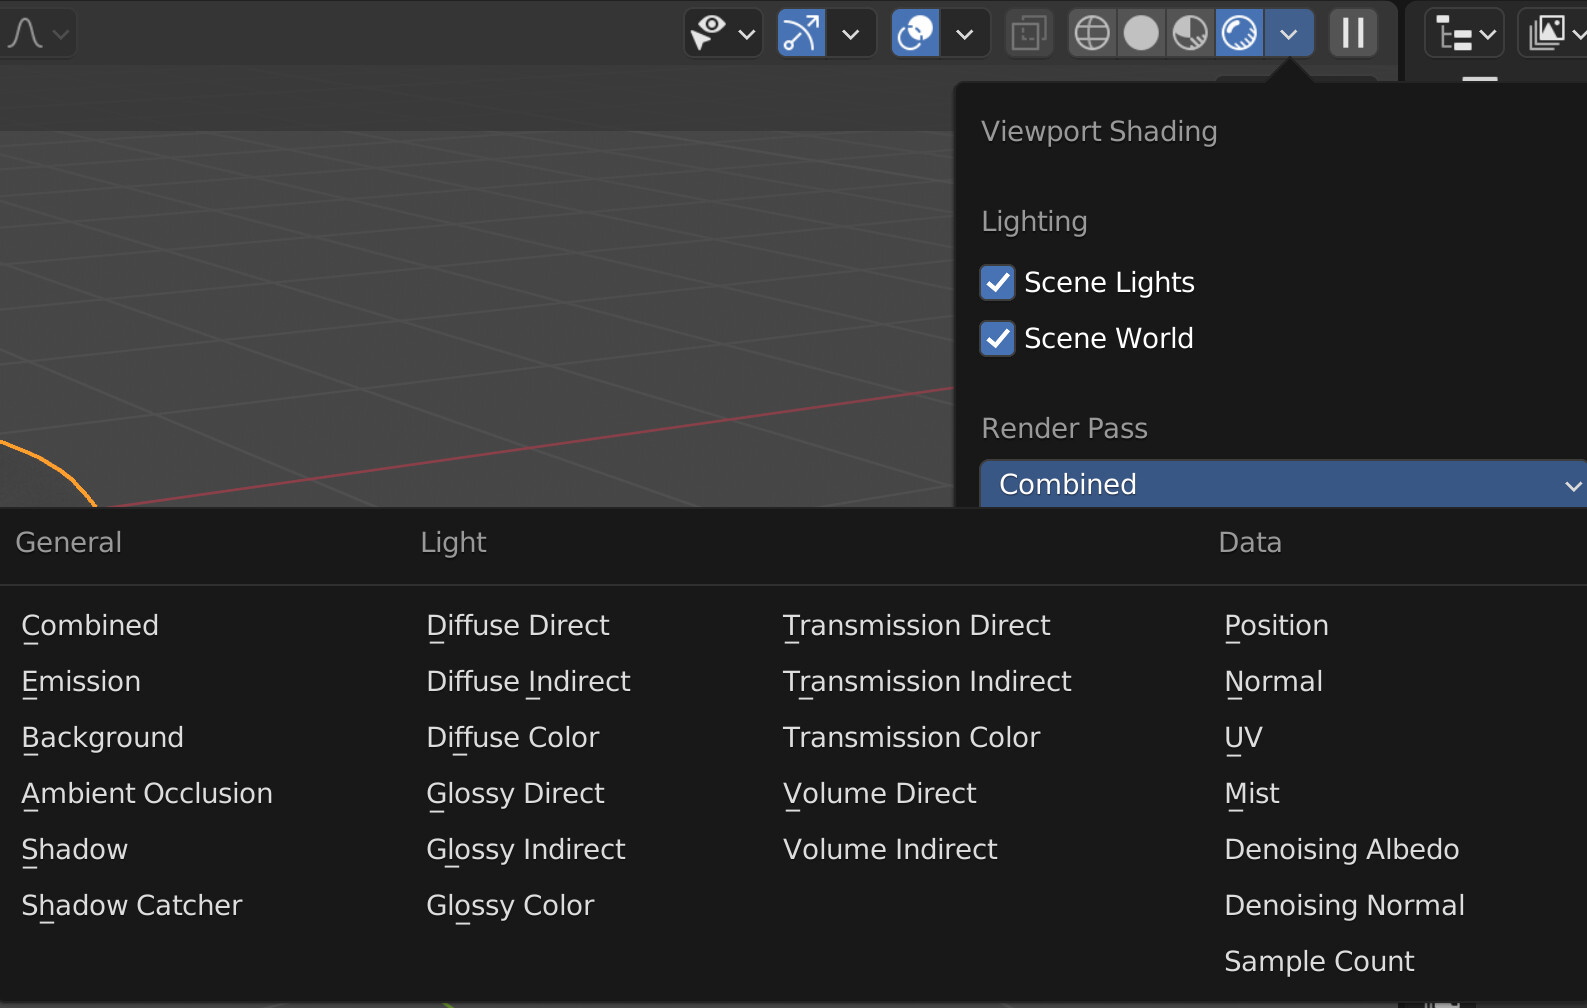
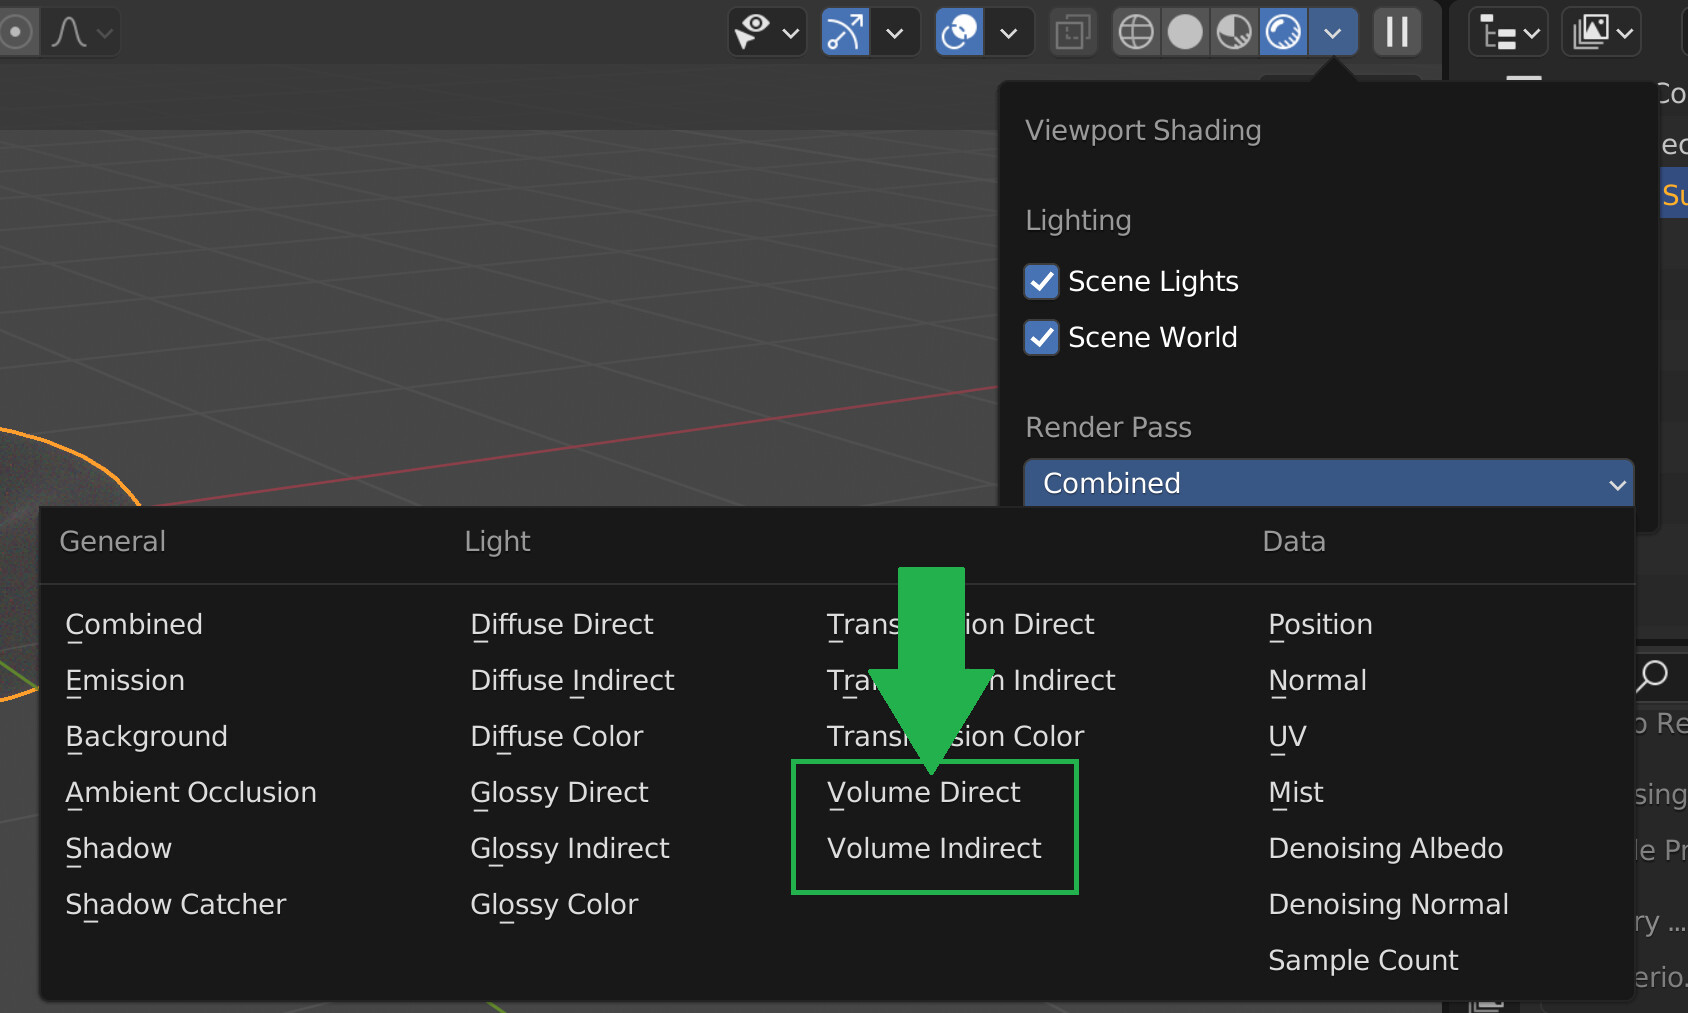
It’s best to only check what’s necessary. Checking more stuff than is being used could result in much longer render times, particularly in the higher denoise modes (high/ultra). To check what you need you can check the render passes in use during viewport rendering here:

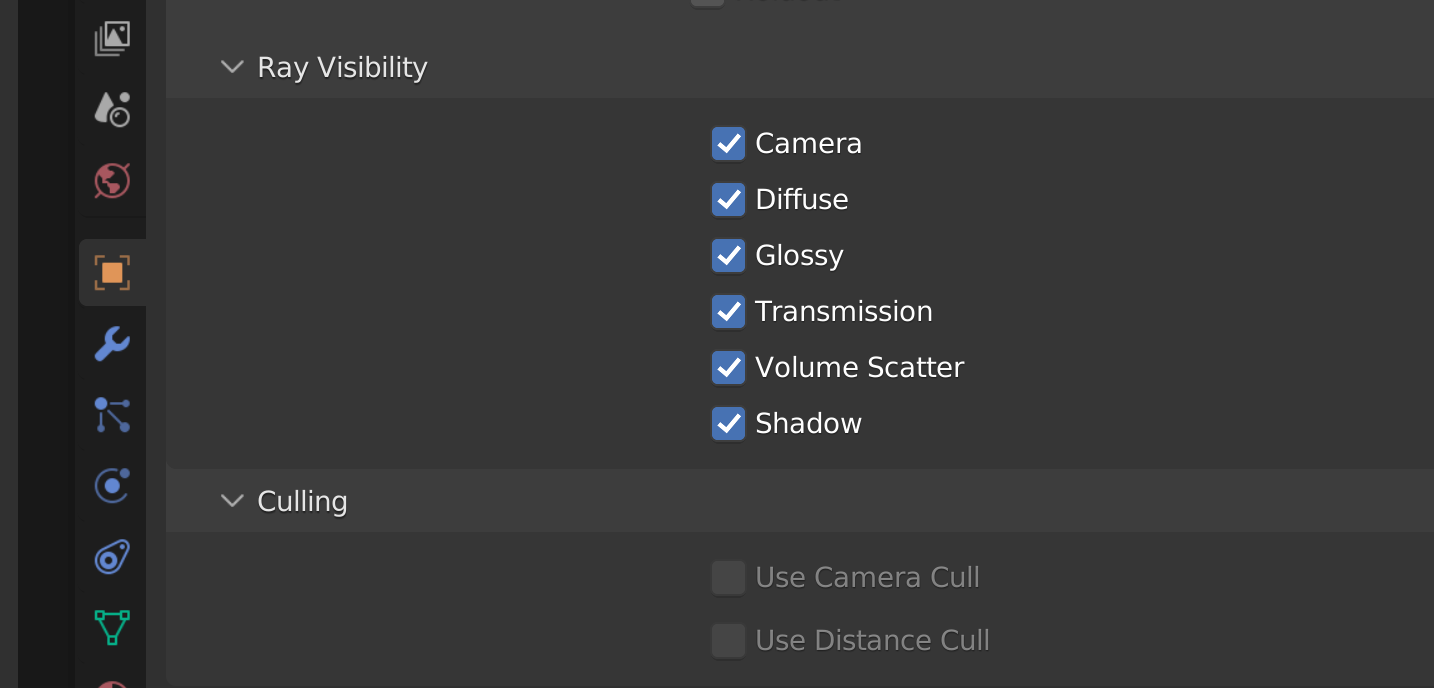
SSS is if you’re using SSS in the principled or with a subsurface scattering node:

World environment is a HDRI, and ‘only behind Transmision’ means the hdri is only visible through a transmissive surface such as glass or water, and is not visible directly. Basically if it’s only visible through transmission, there’s no need to denoise the environment pass, so it’ll save some time.

When you have volume in the scene, if there are any surface occluded by the volume you would tick the occludes checkbox for that surface type. For example if you have glass behind the volume, then you would check occludes transmission. If you have volume and glass in the scene, but the glass is not behind a volume, then you don’t need to check the volume occludes transmission checkbox. If you only have metal behind your volume, then you only need to tick volume occluded glossy (metals don’t have diffuse).

Hope that helps. All you need to remember regarding the surface options is, if you’re not sure, look in the viewport render passes one at a time. If any of the diffuse have data, then tick diffuse, if any gloss have data (not entirely black) then tick glossy, etc. If you have volume in the scene, then look at the volume passes, remember where the volume is, then check each of the other passes to see if they show anything in the same place:

Thank you, I definitely need to practice using this add-on more and in the meantime, I appreciate the effort you have went to for the explanation.

1 Like

I would like to lobby for a “rebuild Compositor node tree” and “automatically enable/disable Post Compositing when Turbo Render is enabled/disabled”

Not sure if these are possible, but I think it would be a helpful addition for a future update.

Many thanks!

1 Like

thanks for the suggestions.

If you delete the node tree in the compositor, you can just add a render layer node, a composite node, wire them up, and then hit refresh all or just re-render. It’ll automatically create and wire up the cache node for you (moving all links from the render layer node to the cache node). I could add some extra logic to automatically add the render layer and composite node if they’re no longer in the compositor, I just worry that this might cause problems for people who have removed the nodes intentionally. Under what circumstances do you find you need to remove the render layer node and composite node?

It’s not possible to disable the post compositing when turbo render is disabled, because turbo comp wont be able to function unless the cache nodes are generated at the end of rendering. These are required even for EEVEE renders as they allow all the compositing features to operate which aren’t tied to rendering, including caching, resaving file output nodes, publishing, real time compositing, render file management, etc. So if you don’t want this functionality, then you have two options:

  1. Disable the Turbo tools addon temporarily.
  2. Use the shortcut to render without turbo tools (alt f12 (still), and alt ctrl f12 (animation).

In both cases (unless you don’t need to composite at all), ensure you move all links from the render layer cache node’s and standard cache nodes back to the node they’ve cached. This can be done automatically by selecting the node which is cached and clicking the ‘cache/uncache’ button. For render layer cache nodes this would mean selecting the render layer node, and for a standard cache nodes this would mean selecting the node it represents. I’ve coded it so that you can select them all and press the ‘cache/uncache’ button just once to save time.

If you don’t need the compositor at all, then you can disable in the output properties panel’s post processing area, and then disable the addon or use alt f12 (still), and alt ctrl f12 (animation) to completely bypass turbo tools without uninstalling :

1 Like

For anyone wondering why the compositor still needs to process even when Turbo Render is not enabled; check out the below video. It shows the additional non render related functionality that the addon also provides in the compositor. The cache files are a necessity for these compositor tools (turbo comp) to function:

Free statue test scene (shown below) is available from the Turbo Render web page if anyone want’s to try it. Link is just above the first comparison image.

Looking for some help with your addon. I am rendering an archviz scene with the room on one layer and the furnishings on a number of other layers. When I hit F12 to render the denoising is only being applied to the first layer rendered, being the room. The additional layers with the furnishings are not being denoised. Is there something I am missing or not doing properly?

Hi. Can you confirm you have a render layer node in the compositor for each of the view layers?

If you want to upload the scene somewhere and send me the link to the support email address I’ll take a look for you. The addon is fully compatible with multiple view layers providing there’s a render layer node for each in the compositor.

Here’s an example. Notice there are two render layer nodes, each with a different view layer assigned.

Once it’s finished you’ll get a separate denoised cache node for each of your view layers:

By the way, if you don’t want to do the compositing in Blender, in your 3rd party compositor you can either use the render layer cache exr’s found in the project cache folder you’ve set, or you can create file output nodes for each render layer node prior to rendering.

You can create these file output nodes automaticlly by selecting the render layer nodes you want to save, and clicking create and wire in the file output node section of the turbo comp panel:

Hi Michael, thanks for your help with this. I found, as I suspected, that it was user error. On further checking I found that under the “View Layer Properties>Passes>Data” that the include “Denoising Data” box was unchecked. Once I fixed this the denoising was applied to all render layers. Thanks again for a fantastic addon.

1 Like

Thanks, no problem :+1: