May i suggest „very nasty“ as a more convenient naming for the very dirty preset?  i like your little f-word-style-snippets a lot. It makes work in blender a lot more fun
1 Like
Ha, thanks  I was going to call it ‘downright sleazy’
1 Like
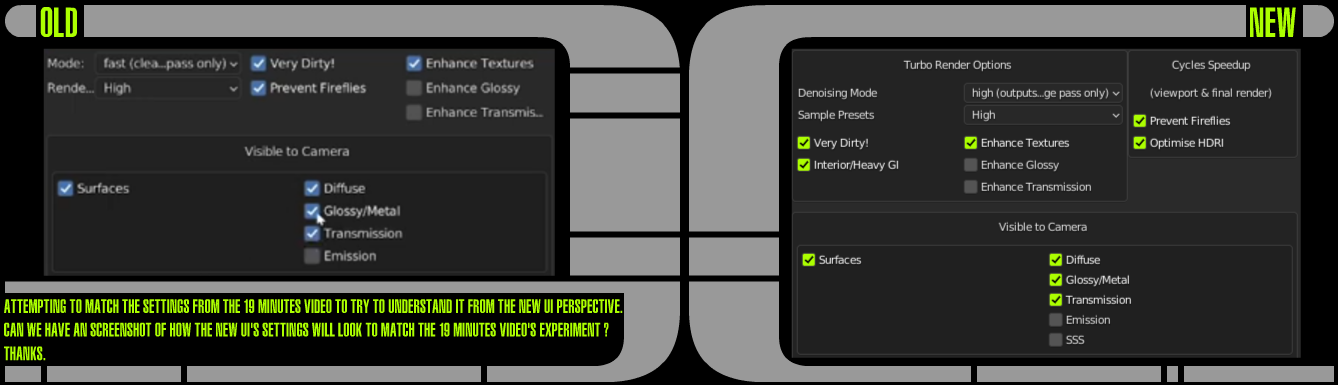
Please see attached image, watching the school experiment video now, digesting it slowly.
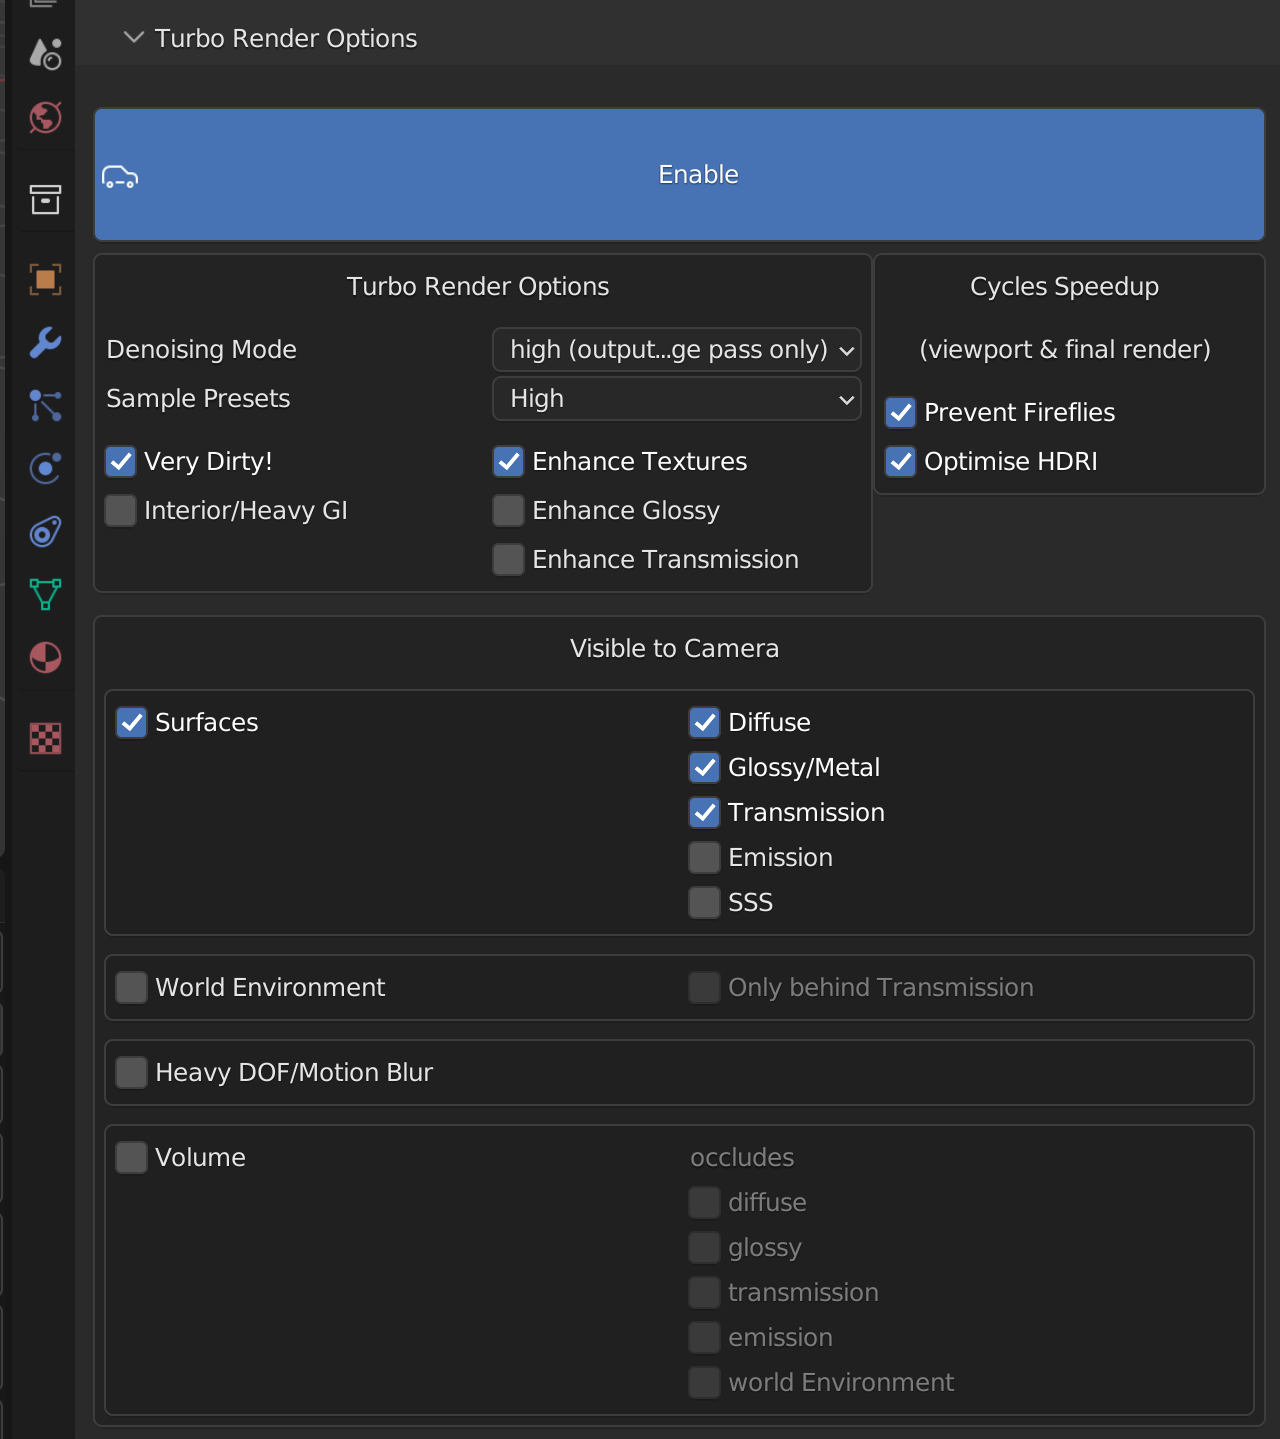
A single equivalent screen, just a single image would help ;p Thanks
the new ‘high’ denoising mode is the equivalent to the old ‘fast’ mode. The draft and medium modes were added to make the addon fast enough to use on scenes that render to a denoisable state in under 20 seconds or so, because with the high mode, the additional processing time slowed down the overall render time (including denoising) unnecessarily.
Interior/heavy GI should only be used if the scene has areas that are lit mostly by bounced light as opposed to direct light. This helps avoid artefacts. You don’t turn it on for an interior scene that’s well lit as this would slow rendering, instead you turn it on just if there are issues in dark corners etc that doesn’t have a direct view of a light source. A good example is the dark kitchen scene above, which is lit almost entirely by indirect lighiting which enters through the window, and then bounces around to illuminate the parts of the scene not directly visible to the hdri outside. So in that scene I enabled ‘interior/heavy gi’. In the same scene with all the kitchen lights turned on, it wasn’t necessary to enable that option, because it was so well lit by direct light. If you can you should always disable the option unless you have problems, because it will increase render times substantially.
I suppose you could say a very loose of thumb is to use as a bare minimum:
denoise mode minimum recommended sample preset
draft                     crap
medium                    crap or medium
high                      high (lower than this may introduce edge artefacts in some scenes)
ultra                     high (lower than this may introduce edge artefacts in some scenes
)
This is scene dependant as discussed yesterday, but this is a good starting point.
Thank you, that single screenshot would help a lot of people, so helpful that maybe…it could be the default ? So that the render…might I say…just works ? ;p
Just imagine there are two giant buttons at the bottom:
“Good Starting Point for Exterior Scene”.
“Good Starting Point for Interior with lots of GI”.
And you would input into these two magic buttons your years of research ;p
All the other button stays, but these two button right at the VERY bottom execute auto magic “I will check all the good boxes for you cause I be a good boy” ;p
I don’t think it’s a good idea to make that the default, because if people’s scene’s only have a volume, or no transmission, or just metal etc, then the default is going to render much slower than it needs to.
Thanks for the questions though, I’ll update the product page’s instructions to give the additional detail you needed.
Thanks
michael.
2 Likes
Thank you for your engagment, I really love your energy and confidence in your video.
You talking about “hold on, the next thing I will show you will blow your mind !” makes me want to buy the add-on again !
1 Like
Well, it is possible to buy in bulk 
2 Likes
@Michael_Campbell great addon, I bought it, but need test anymore, no speed gain in my scenes, I think my scenes already was heavy optmized. I Bought it, mainly, because the composite cache system.
turbo render works in command line render mode? (no blender ui)
what is direct and indirect clamp values for firefly free option?
what the use for ‘visible to camera’ panel? and the volume panel?
optimise hdri sets res to 1024 manual? or another value?
and last… how better config to render exterior vegetation scenes without flicker noises? (many trees, dense grass…)
1 Like
Hi, thanks for your purchase  The speed gain is achieved by Turbo Render by it being able to produce comparitively good quality results at lower sample settings than the denoisers available in Blender’s render panel, this means you can reduce your render settings to render faster. How much exactly you can reduce the settings is scene dependant, so there’s no hard and fast rule.
Yes it works from command line. See the product page for instructions.
direct and indirect clamp, clamps those light rays to avoid fireflies and reduce render time.
visible to camera is where you tell turbo render what your scene contains. It uses these options to avoid denoising unneccesary passes. For example if you have no transmission, don’t enable transmission, and it’ll denoise a bit quicker.
Optimise HDRI sets to 4096
The sample presets are optimised for still images, so I’d use your own render settings for animations, and use either ‘high’ or ‘ultra’ denoising modes. I can’t say what sample settings you’ll need exactly to avoid animation flicker as it’s scene dependant. I can say though that temporal flicker is better in Turbo Render than the new Optix temporal denoising from the tests I’ve seen from others.
1 Like
oh, I forgot to mention. In my tests, temporal noise was much worse if blender is set to have animated noise. So I’d recommend disabling that in the render settings when rendering animations
1 Like
thank you.
In vray I used to use static seed noise for better quality denoise, but almost all the cycles anim tutorials says to use animated noise seeds.
1 Like
No problem. Perhaps the animated seed is better for the denoise options in the render panel, but in my tests with Turbo Render I found turning it on introduced flicker that required higher samples to get rid of. If you find this not to be the case in your scenes, could you let me know please?
1 Like
yes… I let you know…
sobol or multi-jitter in your opinion??
Thanks. I’d stick with progressive multi-jitter.
New update just released, 2.0.7.
I found that the high sample setting and upwards could lead to unexpected indirect lighting artefacts unless ‘interior/heavy gi’ was enabled. To avoid the substantially slower render times that option can introduce, I’ve modified the high, ultra and insane sample presets to cope with moderately indirect lit interior scenes much better when ‘interior/heavy gi’ is disabled.
3 Likes
Thank you, now I no longer have to do a double take on whether to check the interior GI checkbox anymore…at least not as much 
1 Like
On thing I can confirm is, that works excellent on Mac and PC under 3.1. Just sometimes when a rendering is running and you change settings it can hang a while.
2 Likes
The slight hang is if you change a setting during the denoising process as that’s un-interuptable (if I understood you correctly) It shouldn’t cause any hangs during viewport rendering, as it doesn’t instigate anything until final render.
Just bought this and it appears awesome on first test. An important question for my workflow - will this be able to support light groups when they are included in 3.2? Great work!
1 Like