They look great. 
Prince: Thanks a lot
[og]GrYpHon: Lots of great entries this week, so probably not a winner here
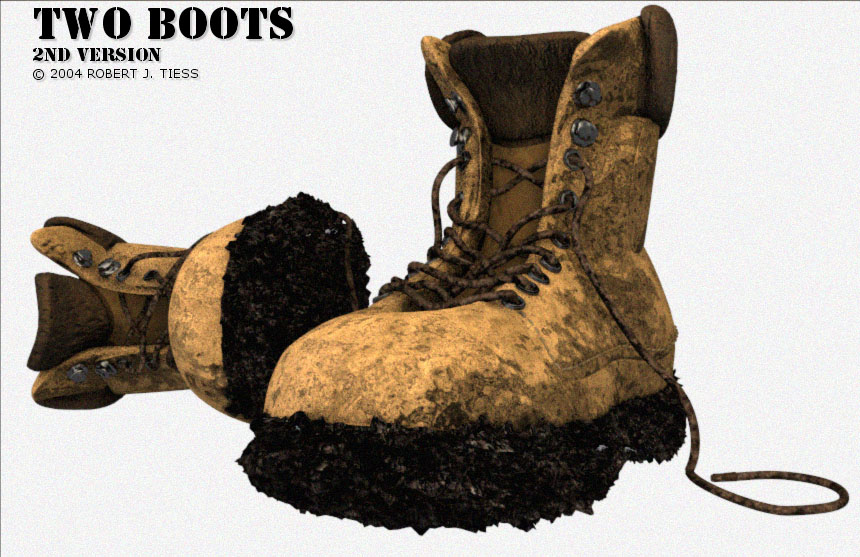
BgDM: Thank you very much BgDM! I am experimenting with a separate blend trying to add dirt/age to the boots. Some interesting results so far with displacement (at the rendertime expense of having to increase subsurface divisions though). If anything looks good I’ll post it 
uli: Hehe thanks man Yes, the materials on the laces were not great in my mind, but I looked at some of my shoes and the real world textures mostly suck too 
Kansas_15: Thank you very much Yes, AO got a little too dark under the shoes, even though it’s relatively low value. I’m using the original Blender spotlight with buffered shadows as the primary light source and shadow provider.
Wiggie: Thanks! Yes, the shoe laces were somewhat challenging. At one point in the 3d view I was going up and through each lace hole, and that was an interesting point of view for a while
R2Blend: Thanks R2Blend!
Wu: That’s so funny  Thanks!
anogarlr: Thank you anogarlr. After the laces, the second texture I’d probably revise slightly would be the upper darker leather part. I’m working on an alternate version based on BgDM’s suggestion, so right now the textures are intentionally looking rather messy at this end If I can get it to look convincing enough I post an alternate render.
Sonix: Sonix my friend, thank you for the kind words. I first tried stitching by doing a curve/path follow, etc., and after some frustration with that I decided to make this literally a “hand stitched” shoe The laces too were fun but involved to get just right. The other time I had created laces was for the Skater image, which I posted here a while back. In that one I “cheated” by not making true laces but rather subsurfaced meshes that criss-crossed - not good for closeup work, but sufficient if seen at a distance. Here I wanted to do it right, although that took several more hours to accomplish I agree with your steel toecaps suggestion too! Maybe in the alternate version I’m working on I’ll tweak that area of the mesh.
blacer003: Thanks! The laces were done with bevelled extruded Bezier curves, and then for the wireframe they were converted to meshes.
toontje: Thank you very much The suade is a mixture of several different textures, including cloud, voroni, and stucci with slight nor. AO also adds in some noise, which in the case of the leathery look I was trying to attain, helped make the texture more convincing it seems.
Usagi: Thank you very much Usagi for the very kind words!
thorwil: I really appreciate that thorwil Yes, for this render I wanted the shoes to look fairly if not completely new (and that because I knew anything used would require more work and effort than could have been squeezed into this weekend). I’m getting some interesting results with the alternate version of these boots, which takes into consideration BgDM’s suggestions. If anything good comes of those experiments I’ll post a render.
Kansas_15: Yes, you were right: procedurals they are For scratch marks on the alternate render I might turn to custom image textures. I’ll see how that goes, but for this one it’s all procedurals
mr_bomb: Thanks! I agree about the topmost texture wanting to be tweaked
Vaccine0101: Wow cool thanks I’ve used the wireframe technique in several of my last Blender projects and posted the technique elsewhere in the forum. Basically it involves (for me, as I approach it) creating a separate Blend file that is potentially twice the size of your original file, since twice as many meshes then exist. Only two textures exist in the new file: the wire and the mostly “solid” (slightly transparent) texture. I duplicated the model/scene and then assigned a wire/solid texture to each respective copy. At one point in my original post on this topic I had suggested to use Shrink (ALT S) to scale down the “inner” solid mesh (which was assigned a partially transparent material), but then it was suggested the Zoffs value could attain similar results, so here I simply have a separate blend file with two copies of the boots and parts, with each set having a respective wire/solid texture. Then for the wire material I increase the Zoffs by 1 and go up from there until the wire is perfectly visible.
JDA: Thanks
RobertT
It’s no good, you’ve inspired me to rework one of my old shoe scenes that elysiun never got to see.
So thanks for the tips with the laces, I’ll get cracking on the old scene today.
Thanks my friend.
Sonix.
You’re most welcome Sonix
I hope to see a render from that project!
Yes, I myself have got to get cracking on some more of my projects in progress
I have some a bunch of ideas I look forward to working on in the upcoming official 2.34 release…
RobertT
Wow, you replied to every one of the posts since you posted the picture. You must have a lot of free time for typing for all that :o
Actually, I work two jobs and am a rather busy person, but as I had posted a while back I make the time particularly for Blender (by sacrificing much of my free time/sleep) because it is very important to me and something I approach very seriously, yet enjoyingly, and with as much dedication as I can gather week to week ![]() I am determined to become better, so I have been putting in major sustained efforts, which I include in that effort getting back to people
I am determined to become better, so I have been putting in major sustained efforts, which I include in that effort getting back to people ![]()
Also, even more importantly so in some ways, I am so totally appreciative that people actually take the time to view and comment upon my work, so I feel I owe them the mutual respect of replying to their comments wherever I consider it’s appropriate. Constructive comments I received just over the past year or so have helped me excel as an aspiring 3D artist, as I take into consideration all the feedback and experience and apply that cumulative knowledge to future projects ![]()
Plus I type really fast ![]()
RobertT
I do admire your work Robertt, you’re right up there with the elite blenderheads like @ndy, I hope to get up quite soon myself though i’m already pretty talented at doing things with blender.
This looks amazing. I love the materials. You would’ve won if you had participated in the WC.
Not different from me to be honest. Except I’ve just the one job. ![]()
It’s certainly all worth the effort you’re putting in mate, I hope we can all keep helping each other to improve and push the boundaries of Blender made graphics, further forward.
Sonix.
Those seams! :o
Interesting.
I think you should change the colour of the background to something that would compliment the mud and dirt.
The boot itself looks pretty good. The sole IMO, looks aweful (sorry  ). The displacement map totally destroys the look. Until Blender can do displacement mapping with better precision, I would tend to not use it.
Model some globs with metaballs and then add a nice colur and bump map. It will probably look better.
BgDM
Wiggie: I have another version yet with a background, but the contrast wasn’t so good with that one.
BgDM: I totally agree about the sole I had subsurf up to 5 for the mesh and displacement at about .1 using a fairly simple cloud texture, but even at that extreme subsurf the jaggedness didn’t disappear, even after much experimenting with the texture size/contrast/brightness/nor/etc values. I also tried custom displacement maps, but they tended to “inflate” or deform the mesh too much, not quite the muddy look. Displacement seems almost too powerful at very small values (.1 - .2), very difficult to tame it seems, but this is something I will continue to work at. Metaballs could be a good solution. This alternate version was a fun little exercise, thanks mostly to your suggestions after the first render, but for now I’m done with this project
RobertT
Have you tried to reduce the brightness of the displacement texture? There’s a slider in the colours section of the texture buttons.
If it’s not so bright it should reduce the sharpness of the mesh edges.
The mud patches on the leather sections, could do with the nor value increasing to make them look more like mud splats. My only crit.
Top work as always,
Sonix.
Fantastic, where did you learn that?
Those boots really do now look real muddy, about the jagged displacement, you might want set smooth for that area on to make it look like it has more precision.