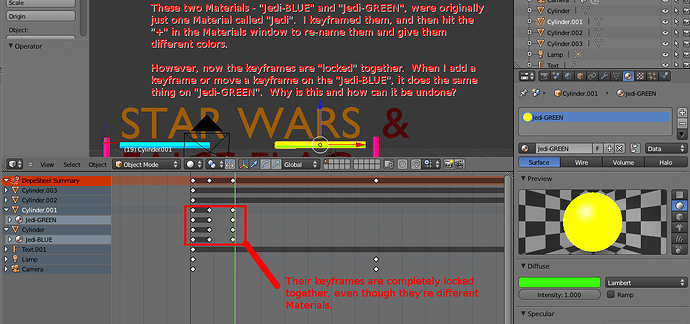
I had one Material (called “Jedi”). I Keyframed its transparency at a few points. I then decided I wanted two different colors, so I used the “+” button to create “Jedi-BLUE” and “Jedi-GREEN”. (Both were obviously different colors.)
So they were two totally separate Materials, now. However, their Keyframes were still locked together. If I added a new keyframe on the Emit for “Jedi-GREEN”, for instance, then “Jedi-BLUE” would also have an identical Keyframe.
Does anybody know why this is and how to liberate these two Materials’ Keyframes from one another? (Lsmft was able to achieve this with the Graph Editor, but he didn’t really understand how he did it.) Thanks as always.
The + button duplicates the material in such a way that its Material F-curves are shared, not duplicated. To Create a copy of the Material with it’s own separate F-curves, use the “Make single-user” button in the Material context panel – it appears next to the “Fake User” button (F) next to the Material name field under the Materials listing. But, and this can be confusing, it only appears if there is more than one user for the Material, which means it may not be visible. To make it visible, use the “F” button, then the numeral 2 will appear. Click it, and a new, single-user copy of the Material is made, including its own discrete F-curves.
Clear as mud, right?
BTW it used to be possible to do this with F-curves directly in pre-2.5x, but apparently that feature has been removed.
“Clear as mud”…with fogged-up glasses, on top of that!
Okay, well, I’m still not quite having success. I went to one of the Materials, “Jedi-BLUE”, hit the “F” button in the Properties > Materials thing, and the number “2” did indeed show up. It automatically generated a new Material, “Jedi-BLUE.001”. Then, I test keyframed the Material’s Intensity…but this new Material was ALSO linked to the old “Jedi-GREEN”.
Did I follow the steps wrong?
No, it’s another endearing (and even more confusing) feature of Blender – look in the materials list for Jedi-BLUE (no suffix) and try keyframing that. It should have a separate F-curve. For some reason, the “original” material gets the suffix as if it’s new, and the single-user copy gets the old, non-suffixed name. Can’t say why. It took me quite a few confusing experiences to discover that.
Sorry I missed that in the first description – it’s so routine for me now I don’t think about it as something that needs to be explained, though of course it should, since it’s anything but intuitive.
BTW, a tip for recognizing shared F-curves: In the Graph Editor, the Material F-curves can be made visible for multiple Materials at once, and when curves are shared, toggling a channel’s visibility in the channels index/listing (left column of the Editor) will toggle any shared curves as well.
Okay!
NOW I think I get the “endearing” process. After hitting the “F”, then the “2”, then the new “Jedi-BLUE.001” appears, I then have to go back to the original “Jedi-BLUE”.
Thanks, Chipmasque.
Yeah, sounds about right. But… “check my math.” 
'nother tip: The same process is useful for other datablocks (which is what Material is) like Mesh, Actions, etc., though there are generally more direct methods for those. Some Object’s datablocks are not automatically copied when an object is duplicated, and if these are animated, they end up sharing the animation data, which can also lead to confusion. The “Single-user button” is a good remedy for those instances as well.
Chipmasque,
I haven’t really studied Datablocks yet. They were in the Tony Mullen book, ‘Introducing Character Animation with Blender’ and I tried it, but I never really got too comfortable. One of these days, I’ll guess I’ll have to force myself to learn them as a whole.
But I did indeed “check the math” for this particular Materials issue, and this has worked for me. Thanks again!
I learned about datablocks mostly through osmosis, seeing references in posts and such, finally it sank in that it’s just a label for the collections of data that describe certain things in Blender. For example, an object (one type of datablock) can be a Camera (another type of datablock), and so it has a Camera datablock that contains the data that give the camera its specific properties. If an Object is a Mesh, it has a Mesh datablock that consists of data on vertices, edges, faces, etc. How these are all linked together to form what gets rendered is the really arcane part, and I have only a slim grasp of that aspect, mainly gleaned through experience. But there are times when it’s very helpful to have the “datablock” concept to work with, such as when manipulating animating data, materials data, etc.
Yeah, I picked up on about that much. Since you say they’re so helpful, I’ll definitely try to find a “block” of time to devote to learning them, someday. But I haven’t just picked up on them by osmosis, like you did.


