This is a followup on an earlier conversation about how shadow passes work in Blender. Attached is a new blend that tries to understand shadow passes better. The attached images are of the SHADOW PASS that is produced via the compositor.
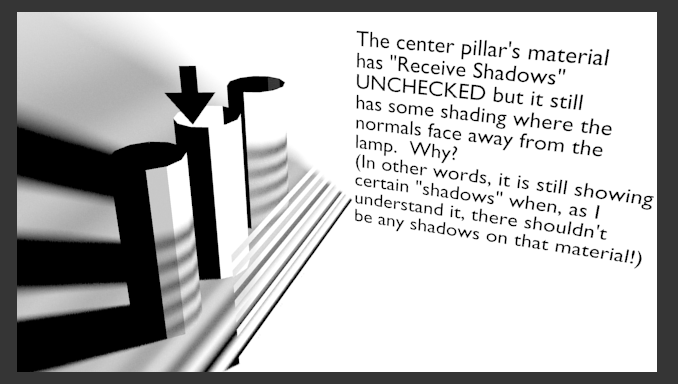
The center column’s material has “Receive” unchecked in the “Shadows” section of the material editor. And in the render (which is producing a shadow pass) you’ll see that there are still some shadows appearing on that column, similar to where the diffuse material would darken the material (the darkness is based on the normal direction in relation to the lamp, e.g.).
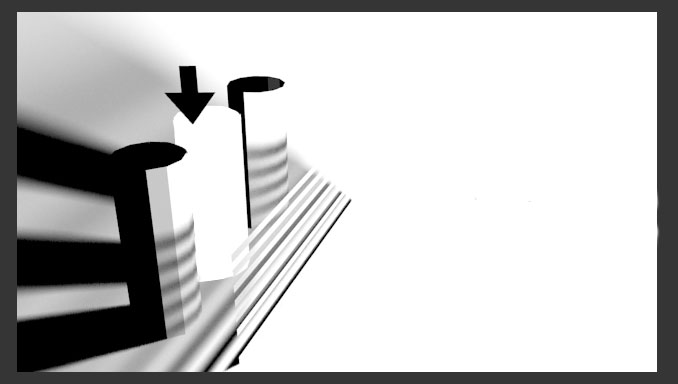
My understanding is that, with “Receive” unchecked, the center column should appear completely white, like this (modified in Photoshop):
In other words, it seems like it shouldn’t receive ANY shadows, even those cast by itself! What am I missing here?
EDIT: Forgot to attach the blend; here it is: shadowPass2.blend (458 KB)
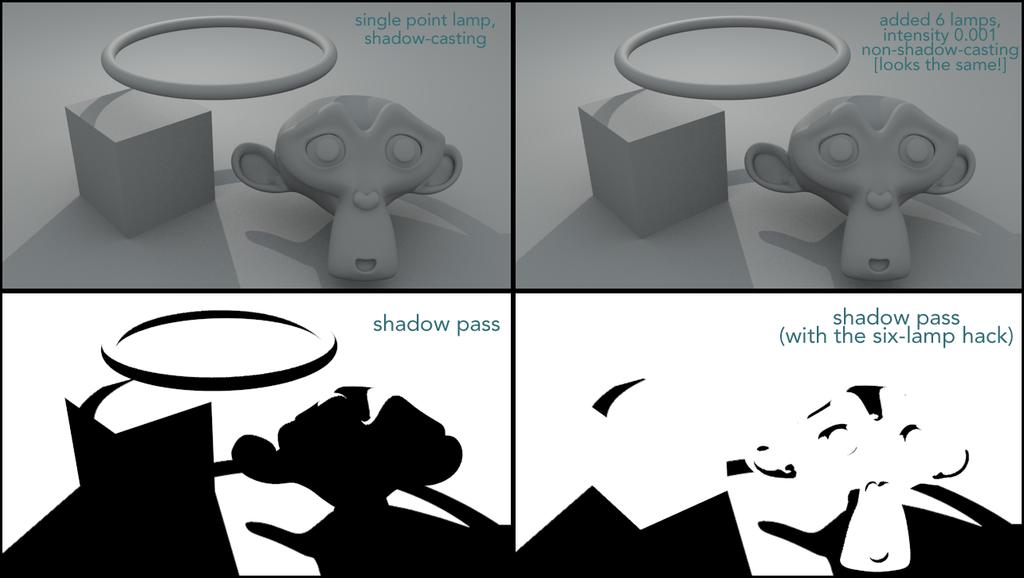
Ooooh – I think I have a solution (a hack, granted) that will fix it all. All it requires are six point lamps, set at orthographic angles (top, bottom, left, right, front, back) with no shadows enabled and a super-low intensity, like 0.0001. Here’s an example:
The attached scene consists of a box, a torus, and a suzanne. The single lamp is casting a shadow. The six lamps are grouped together (in green):
By adding these six lamps, you guarantee that every surface will have a lamp (however inconsequential) pointed at its surface, so no faces will turn black for the reason that Daccy pointed out above. Thus, all that is returned are the shadows that have been cast!!! [Expressions of joy! More expressions of joy!] This includes self-cast shadows (like on suzanne’s ears). I’ve been trying to sort this out for at least a year; this is a happy day! [Joy!]
Oh, awesome! That’s a solution!
Still, it is just not right that we have to do it, especially when it’s obviously enough to add these super-low intensity lamps to trick the renderer to give us what we need. I think there should at least be an option somewhere to turn of this awkward selfshadowing!
But well, this is cool hack, so thanks for that!!
Nah…it is just a kludge. I don’t want to be forced to use a specific lighting rig just to get shadows to work correctly.
Besides, let’s look at the output from a “professional program” like Cinema4d.
Now let’s look at Blender’s shadow pass.
So the problem is clearly a bug in Blender. Notice the difference, compared to the C4D output. As we have seen discussed in other posts, the face of the cube is not really in shadow, it is simply being shaded, however it still ends up in the shadow pass (why…bug). Also the black triangles in the upper left/right corners should not be in this pass at all. There is no shadow being cast there. It is simply where the alpha exists. This should not be black, but white.
It is so sad to see years go by and Blender still can not output a shadow pass.
The specific bug was not “fixed” per se – click on the link to see Ton’s rationale. He does acknowledge that Blender’s current approach to this can cause some problems some of the time.
There have been some updates on how shadows are addressed in the 2.58 builds of blender – in materials, under the Shadow options, if you check “Shadows Only” you now can choose “Shadow and Shading”, “Shadow Only”, or “Shadow and Distance.” I haven’t needed to use this yet, so I haven’t tried it out much. But I believe this was put in to address some users’ concerns about how shadows are being rendered.
For my part, I’ve been using the six-lamp-hack method without much fuss.
And can I make a simple composite render out, just minus the Shadow component, or do I have to rebuild the image from Diffuse and Spec etc? All I want to do is have seperate shadows to filter.
When I turn off Shadow only I get the right result.
Just to explain I don’t want to render the plane in the composite but I do want the shadow as a pass, all this so i can key the box into a video and change the shadow density.
What I did was place the CG stuff (the cube) on one layer, and the “real-world” items (the plane) on a different layer. Then I used render layers:
for the SHADOW composite I include ALL layers but only use the shadow output, multiplied with the AO for good measure. (I only have the AO appear on the floor and not on the cube for the shadow pass, as the AO already appears on the cube. That’s what the alpha channel input into the factor of the AO/Shadow multiply node is for). I’m also using the 6-lamp hack from above, which keeps shadows off the dark side of the cube for the shadow pass.
I couldn’t get the new shading features to work on this – in fact, they seemed to mess up the logic of the shadow-pass in the compositor. So I didn’t use them.
The CG render simply excludes all the “real-world” ground elements. So I only get the cube.
Note the darkness in the upper right- and left-hand corners – that is because we reach the edge of the plane, leaving nothing. I’ve found that you always want to have something in the background for your shadow pass, or else you’ll have to mask that dark stuff out later on for the composite. (Personally I wish the shadow pass would render any “absence” completely white instead of black, but that’s just me.)
I see, yes but I wanted to use the shadow receiving elements like the plane to occlude other objects too. Providing a key channel via material mask transparency.
Can you give a specific example? If you want the shadows to define the transparency of a material, you can use the “shadow pass” as the alpha channel for the material (perhaps a render of just the ground elements, for instance). If you want to create a matte from the objects, you might want to try using the Object IDs… Would either of those approaches work?
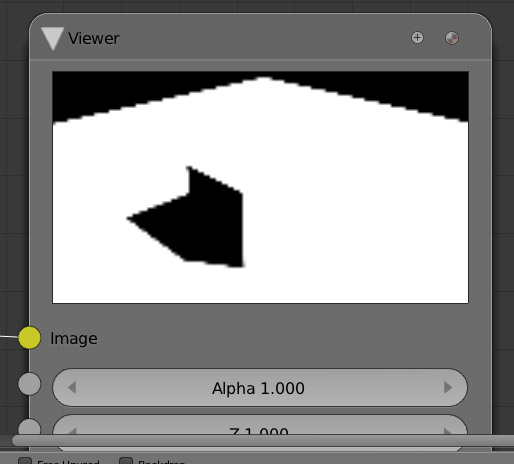
Here I have circled the occlusion or matteing effect on a plane. You cant see the plane as it is a shadow only material but the arrow points to the shadow. But the shadow pass doesn’t include the shadow at all.
I think what you’re experiencing is related to the fact that you don’t have any faces in the deep background. As I mentioned earlier (the blackness in two upper corners of my example) “nothing” in the scene shows up as black in a shadow pass, which is also what indicates a shadow [unfortunately]. Thus, your cubes are NOT in shadow, but your plane is in shadow, so you can’t see it…
A second possibility, perhaps in addition to the first, is that you don’t need “shadow only” materials when you’re creating a shadow pass – I believe the shadow-only materials are created for the actual image render. So you might want to use a basic diffuse shader for the plane.
If you’re compositing over a photo, using a “deep background” face (along with the 6-lamp-hack method) will make EVERYTHING but the shadows white. And then you can use a Multiply Mix Node to composite your shadows over your photo. And, of course, you’ll need to build one or two other render layers that don’t use the deep background or other shadow-catching surfaces.
I’m sure there are other ways to do it, incidentally. This is only one method, but it works!