I’ve taken a look at your model - nice work, here are some hints:
You should consider to include the crosses into the texture but get rid of them from the mesh. They cost a lot of polygons but do not contribute substantially to the shape. Paint them with a color- and bump-map and they will stand out sufficiently.
To unwrap mechanical objects, the option “Follow active (quads)” from the unwrap menu (key U) is very useful.Regards
Are you going to be using this in the blender game engine?. I’d start with BB’s suggestion. Then you need to decide how diverse you want the texture to be. I would use texture space for one of the sides and the top of the med box and then just apply them to all the faces. To unwrap this I would hit ‘1’ to get to front view then go into uv mode and open up a uv/image editor. Then hit ‘u’ and select from perspective then hit 7 and do the same. Then place them how ever you like of the UV/image editor.be sure to only get two of the 4 little triangles in the corners.
This model is not ment for Blenders Game Engine, I’m making it for Darkplaces (http://icculus.org/twilight/darkplaces/) a Quake-engine with alot of advanced features…
Don’t you think that the crosses will add anything that you can see ingame?
There is alot of shadows and stuff in Darkplaces, so I thought it would look nice with some extra details to the mesh.
But I could add them (the crosses) to the normal-map I have for the mesh.
Link to pic on the normal-map: http://xs.to/xs.php?h=xs114&d=07162&f=Normal_map.jpg
It’s just a renderer of the normal-map for the top of the box, hope that you see how it shall fit.
And as with the UV-mapping, I tried “Follow Active (quads)” but I diden’t get any resault that were good with it, proably it’s just me that just can’t handle it.
I tried the “Project from view” and I think that it came out well…
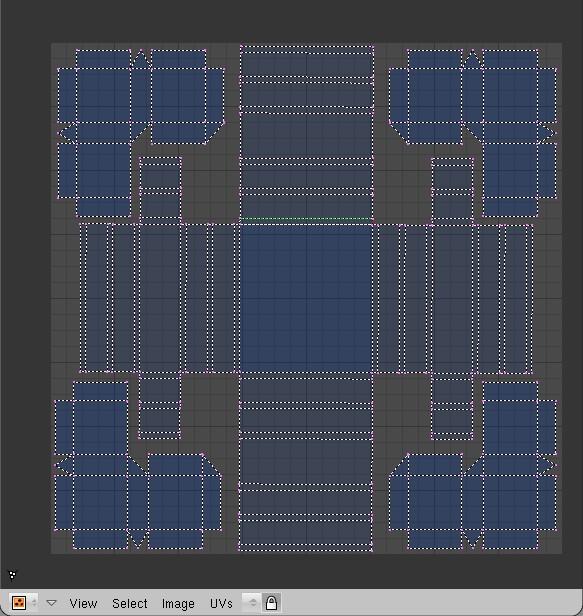
This is how the UV-map look right now: http://xs.to/xs.php?h=xs114&d=07162&f=UVtest.jpg
Just gonna do the things I have written on the image…
“follow active” does work a bit unusual: You don’t get an entirely fresh UV_map, but the unwrapper starts with your active quad (=last selected) and unwrapps faceloops outwards. Try with a cube, then it’ll become obvious.
This means you’ll need one properly projected quad to begin with and not too many triangles, because they’ll terminate faceloops. When I tried unwrapping without the crosses, the results turned out OK (see screenshot). Since you have a normalmap, include the crosses there and be done with! :eyebrowlift:
Ah ok now I understand how it works.
But I think that I will go for the Project From View-way because this one don’t add the details where I want them, when it’s time to texture it… But it will look more diverse especially on the sides with Follow Active since I merge all the sides into one on that one to get the most pixels for the texture. :S
But it is always great to learn new things!
And maybe I should include the crosses in the UV since it will reduce the polys alot.
But that ain’t my biggest problem at the moment, I can’t handle the md3-exporter ( http://xreal.sourceforge.net/xrealwiki/BlenderExportMD3 ), the game dosen’t find the texture for the model, but I can see the model ingame…
