You could use the “OnlyShad” option (found in the shaders tab) for the white plane. That way, you can postpro a white BG (or simply use a white world) to achieve the wanted effect.
Thanks for the reply Myke.
I know about the Only Shadow, but I think there should be a way to achieve this result using alpha channel for the floor object … I’m thinking I’m doing something wrong with the material settings.
Uh, why are you telling us the texture settings of the plane’s material, if it’s just plain white?? That is, if there’s no texture channel and turned on, those settings are useless… and if you want a plain white material, what are you texturing?
The sphere looks more hemispherical, bisecting the plane… are we talking about radiosity here? The “bare white” tactic? Because your cube stack looks illuminated harshly, some of the front shadows are nearly black.
For your white color plane & sphere, did you push it’s reflectivity up to 1.0? IF not, it will appear gray unless you really saturate the lighting which will in turn blow out the highlights of everything else.
Setting alpha lower for the floor?! That will make it translucent, and let the background (which I assume is white) show through, is that what you’re hoping?
There’s a few different approaches to this, but yours is … well, different.
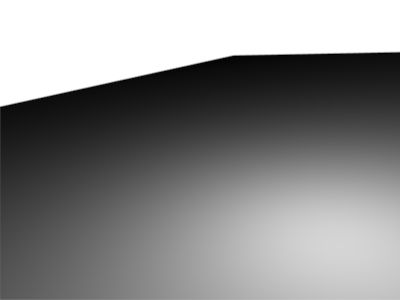
If I use a simple white material, it looks like this (look at the white plane.jpg)
It’s a test without AO, but that grey remain visible (even if more subtle) with the AO turned on.
Yes, I mean that bare white tactic …
About illumination I’ve left one lamp light on the scene and turned on the AO with the following settings:
distance: 5
both
plain
energy 1, bias 0.050
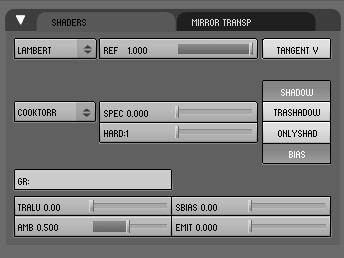
Yes, the ref. is pushed up to 1 (shader.jpg)
And here I’m getting some trouble … I’ve to read something more about the way alpha works in Blender, since I’m confused. For example clicking on the ALPHA button in Map to window, I’ve noticed that if I click again the alpha text turn in yellow … it seems simply that it becomes inverted.
Even more confusing is the Purple default color under STENCIL, NEG, NO RBG buttons … let me take a look @ blender wikipedia resources, there should be something about it.
I’m rendering the final image as AO.
I’m doing this tests because I’m finding the AO Blender render really fast (or is it me?) … unless I’m doing something wrong with the AO settings and so it renders faster …
A wild guess: Illuminate the scene with a white SUN Lamp for more even illumination.
Pressing some texture space buttons twice does indeed invert the result.
Alpha (in the texture buttons) affects the transparency of the texture. Alpha in the materials button affects the transparency of the material (and therefore the object) but only if you turn on Ray Tansparency or ZTransp.
The pink/magenta/purple colour is the default colour Blender uses to textures that are applied as “Col”. Pretty isn’t it?
But you simply shouldn’t need to touch the texture panels (Texture, Map Input, Map To) at all since you haven’t applied a texture so, as HT said, they won’t do anything.
As I wrote in the first post I’m using a texture:
texture = sphere
but perhaps I wrote it bad … it’s a BLEND texture using Sphere as Blend mode.
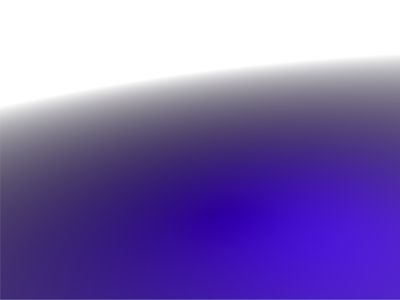
Now, to get deeper into this issue, I’ve changed the color, instead of white let’s say blue, but that grey halo is still there.
See the attached imgs.
OK, so notice how the plane picks up some of the blue of the cube, and how the shadow gets weaker as it gets out “into the open” where the light can shine on the surface where the shadow falls. But it still fades to gray when it gets outside of the influence of the light… that’s what light does.
You can turn on Emit some for the plane, just a little bit, so it gives off light. That will make it “pure” white but lessens (or completely erases) the shadows, or you have to add more lights or widen the beam pattern and range of the light in question so it covers everything…
If you host the .blend file somewhere, someone would be happy to look at it.
Are u using radiosity?
I don’t have my file here (I’m @ office now) … I’ll up somewhere this evening.
It could be possible to take a look at your settings?
Sorry, no, I’ll recreate it for you if I have to. I never save these little quickie samples else my hard drive would be littered with thousands of blend files I don’t even remember what they are for. Though lately people keep asking for them, so that policy might change.
That specific example was Yafray and GI with a white horizon, That way it’s kind of like having the world’s biggest area light… and because it’s much faster than using radiosity and AO with high samples to create the same effect… a one minute vs. twenty.
Some of those look good but for a simpler solution if you’re not looking for all the bells and whistles, I did this:
-add plane on layer one, color white,ref 1,spec 0,hard 1,alpha 1, emit .920(no need to set shadow only since there is no lamp illuminating it, only emit)
-add spot-light on layer one set to rayshadow and shadow only
-put Hummer on layer 2
-duplicated light from layer one to layer 2(to match angle), set to no shadows and layer only.
-I set the world color as white also.
I left emit down enough so it would not be pure white, that hurts my eyes…8)
If there’s no direct lights lighting, only ambient or global… it will be all white. But the second you add a light, ah well, theres a variation in the light level, hence grayer areas outside of the light’s influence. This is what light does. This is how we detect light. This had better be what you expect because you’ll hurt your head trying to redesign real or digital physics.
You can do one or more of the following:
Make the lamp shadow-casting only.
Add more light(s) to illuminate the plane evenly.
Expand the single light to include the entire scene.
Make the white surfaces emit light (though this weakens shadows)
I would simply darken the scene a bit but keep the white bright by turning up the spec and turning down the hardness, that way the shadow should stay dark. Then I’d use photoshop to balance the colors and since the ground was close to white and nothing else was it should become a pure white and still have the shadow.
before PS:
after PS:
But I would use heavily’s post #8 picture. The pure white will blind people.
I used to have the same problem as you. Then I discovered the joy of Ambiant Occlusion (AO).
I’ve become quite good at useing it and now most of my prodjects are done with it.
Is this what your after?
If it is, then this is how it was done.
Create scene.
Add SUN lamp with “no” shodows and rotate in the direction of scene.
Add AREA lamp in same general location and set to “Only Shadow” and “Ray Shadow” set samples to “2”.
Set Plane colour to “white” and put “ref” to “1”.
Go to “World Buttons” and change world colour to “white”.
Click the “Amb Occ” tab and turn AO on adjust samples to what you want.
Make sure Ray Traceing is on in your Render tab.
RENDER!
p.s. Render times can be long depending on how many samples you have. Also if you don’t get the results your after I can post the Blend so you can see my set up.


 “no no no” was to the gentlemen above you.