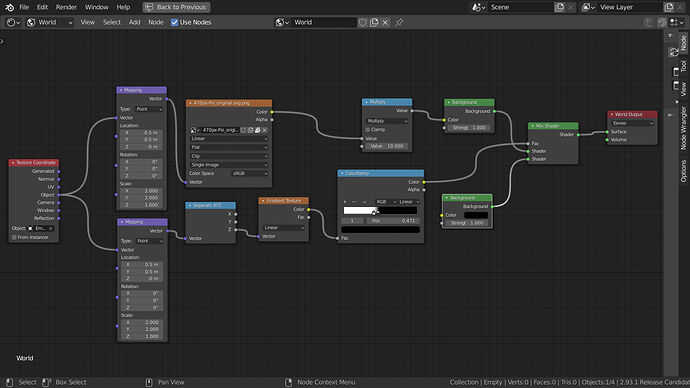
I’m trying to map a world texture, just to show single object as a background, in place directed by object. With trials and errors I set world nodes configuration, that seems to work, except one thing: the image is doubled and shows on both opposite sides of the world. I cant figure out, how to make in realy single. Sadly, as new user, I cannot attatch anything, but I uploaded .blend to my google drive: https://drive.google.com/file/d/1kRYdyEgjaRRtCmhnEzpZ6YHC7cacIr0L/view?usp=sharing
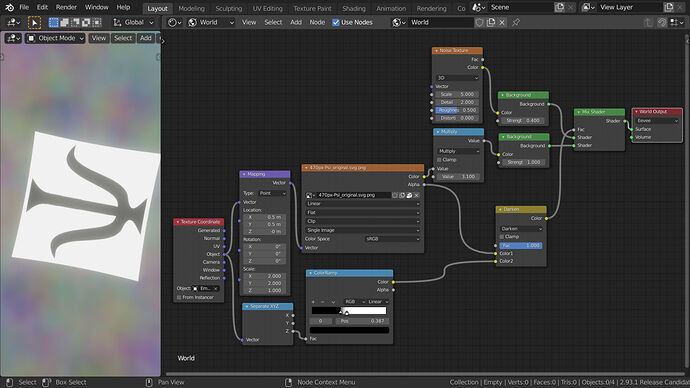
Not sure if it is exactly what you mean but take a look at this (I could not download your file):
To make the image single set the image node to clip and single image.
Thank You for reply. I’ve already done that. And fixed link to my .blend, should work now. To see, whats going on, set view modecto “Render” and look around. There should be two images on both side of view. I want one.
Ok, I suppose you have a reason not to use an image plane high up in the air instead of the world setup.
This node setup will get rid of the “copy”.
I think the copy is due to the object coordinates, both up and down correspond to z , right and left to x, front and back to y. So what I did was mask out one side, you can still rotate the empty and the single image will rotate with it.
Edit:
you do not actually need the gradient node you can do it with only the colour ramp (inverting the black and white stops).
Edit 2
After playing around a bit more, I thought, what if you wanted a different sky texture behind the single image (ie not black)
Thank You. I have stiil no bloody idea, why it works nor how it works, but Your set just works, even with some simplifications (for example with no connection between image alpha and color socket of Darken node, as well as with ColorRamp with default values). I noticed, that changing z-coordinate of image alters results considerably.
I suggest you activate the node wrangler addon (if you have not already). You can preview what each node is outputting by selecting it and hitting ctrl+shift. This will help you understand what is going on.
The basic idea is that when you separate the x, y , z vectors of your object and plug the z output into a colour ramp (or linear gradient) you get a black and white gradient from top to bottom (along its z axis).
With the node wrangler addon if you select the colour ramp and hit ctrl+shift you will see the gradient mapped to your world.
I used that gradient as a mask to mix the 2 background shaders and eliminate the copy of the image.
As you are using the objects coordinates to map your world settings when you rotate your empty the worlds z axis also rotates.
Yes it can be simplified the second mapping node was not necessary (I left it out in the second example.)
If you do this it does change a bit, If you look closely to your image you will see that the black parts will show the colour of the second background (the noise colour) and they will no longer be black.
I used the alpha output because the image does not have one!
The alpha output is giving you a white square ( well 2 of them there is one at the top and one at the bottom), where the image is, on a black background.
Once you darken the gradient mask with the alpha output you get a mask with only one white square where the image is.
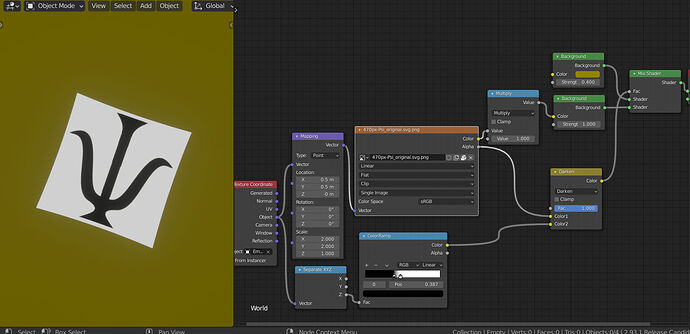
The result of using the alpha output and darken node is that the black parts of your image stay black!
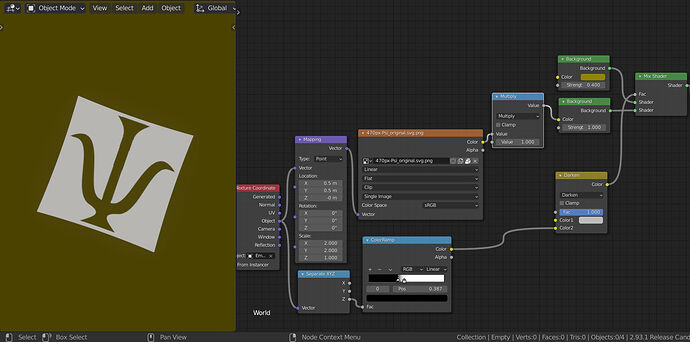
With a black background this is not needed but if you want a coloured background you will definitely see the difference.
Without the alpha:
Also note that as I left the top colour of the darken node at the default value (0.5 grey) the yellow background colour has been mixed with the black background and is darker.
With the alpha:
Yes putting the sliders closer together only makes the transition of the gradient more abrupt, I did this to make sure the edges of the image do not fade into the sky, It might not be necessary in this case.
I hope I have not confused you even more!
Thank You very much! No, You haven’t confused me. I needed one day to clarify it to myself, but You pushed me in right direction and now I understand much more! Here is my modified node set I find more clear to me (and that works):
And also a .blend file, if You want: starfield.blend
Of course I want! I love sticking my nose into other people’s blend files ![]() it looks great, you can now animate the sun and planet’s orbits with the empties!
it looks great, you can now animate the sun and planet’s orbits with the empties!
Happy Blending!


