Ok, I’ve updated Flick. The file is called now Flick_v01.2.blend
@Denny
may you look into the file, I hope I got your issues corrected properly! But I think this looks ok.
So grab your file here
The original post is updated too.
Ok, I’ve updated Flick. The file is called now Flick_v01.2.blend
@Denny
may you look into the file, I hope I got your issues corrected properly! But I think this looks ok.
So grab your file here
The original post is updated too.
the facial animation i’m gonna turn into a case study. it looked like a good way to rig, almost like the bones outlined the face muscles giving it a level of theory behind it.
Thanks for sharing this great rig!! I also agree with sharing this on Blendswap
the face rig looks good IMO.
You forgot to rotate the axis on the hands. For this setup it doesn’t seem to make any difference as the mesh doesn’t distort irrationally or functionality is broken, however for other projects I would recommend having the hand axis aligned with the rest of the arm to avoid complications with other relationships in the scene if you want to make additional controls. ![]()
I think we can call it final. ![]()
@ Denny
A yeah, you are right.I have overseen this bones. To get this consistent I provide one last version! At least I hope so 
EDIT
Concerning Blendswap.
I am sorry, but I will not provide Flick via blendswap. I have read the licensing there, and unfortunately there isn’t any non-commercial use license.
But nevertheless you can get that files here 
Great character!
One minor problem is that GLSL shaders doesn’t seem to work on OSX. Using 2.55 BF official on OSX 10.6 and ATI 4670
.Gian
That definitely did the trick ndee. I’m going to use the updated version the next time I practice some animation.
This is the second pretty amazing character work displayed here in the space of a week, it’s great to see such high quality. Well done Ndee!
Yeah, this blew me away. Really really nice.
Agreed. This is amazing work!
One thing I would like to see fixed.
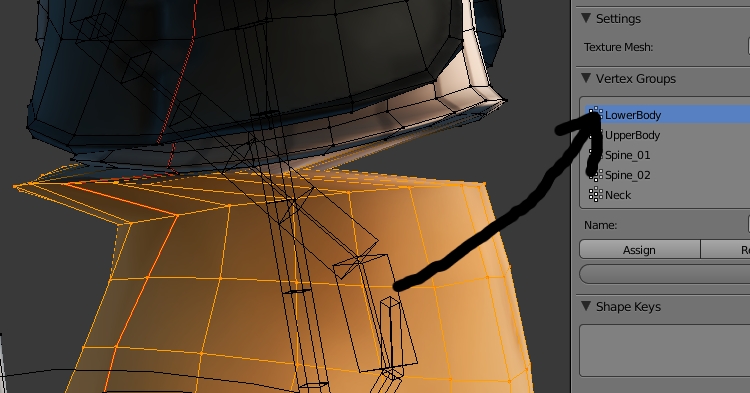
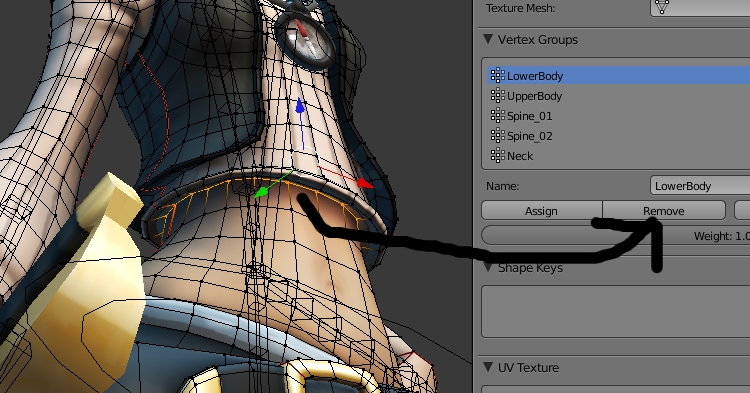
When you go into outliner and make the Flick object (the body parented to the armature)selectable and go into edit mode, there are some vertexes in the waist that are not following the armature. Or more exactly on further investigation you have overlapping vertex group there at the waist. This causes the mesh to go out of wack in edit mode. So if you are posing and you want to check vertex groups for weights or topology it is very distracting.
I fixed it by removing that loop from the lower body (I think) but it is the lower body group and upper body group that is the problem.
I don’t have a way to upload the file at the moment, but it is an easy fix.
In any case agreed with most of the above. This will be a great case study!
Love it.
Thanks for sharing it.
OK here is a link to the fix:
http://richardculver.com/resources/Flick_v.01.4.zip
If you are like me and you want to look under the hood on the vertex level the file as is has that problem I discussed. And here is the last version fixed.
Thanks for the great contribution!
EDIT:
Here are screen gabs of the problem.
The third one is the edge loop removed from the Lower Body Group and that seems to fix the problem. This edge loop is also shared by the upper body. A quick test with a pose shows that this is not a problem for animation either way but only affects looking at the model in Edit Mode.
Awesome! Thank you for the blend file!
Great character! Love her appearance!
I like what you have done with the face rig, but…
there are a lot of bugs/inconsistencies within your rig. I hope you don’t mind, but I have some criticism (v.01.3)…
I am a fan of grabbing bones and they should behave like I expect them to. I don’t like to use the manipulator or shortcuts for grab/scale/rotate.
You have bones that can be directly controlled that don’t do anything when you right click select them and drag to manipulate them (upperarms, spine1, spine2). This is because they have their transform property for location unlocked (which means the default rmb+drag operation is “grab”.) but they can’t go anywhere because of a copy location constraint.
The lower spine is not attached to anything, so you could pull it away by default. I suppose that is why you have a “copy location constraint.” But using this constraint in combination with an UNlocked loc transform property means you select the lower spine>drag, and nothing happens… You have to use the manipulator or the shortcut “R” to rotate the spine. A better solution would be to lock the location transforms ("N"key/sidebar in 3D view<just in case) and remove the location constraint.
For the upperspine, it has targetless IK which means your spine acts very rigid by default. Grab the upper spine and instead of doing a belly dance she just bends with a rigid spine. Remove the IK constraint, and the default behaviour will be rotation, which is probably what you want.
If you lock the (FK) upperarms you will rotate them by default. Again, you don’t need the copyloc constraint, it is working against you…
Or bones that you most likely want to rotate that you can drag off (shoulders, neck, hips). Maybe you want to be able to pull them away, but I think it’s more intuitive to just leave them locked so you rotate them instead. I don’t know how often I would pull a shoulder or a neck away…
You have bones on the chest with both a limit distance and limit location constraint. This makes the bones appear to lag when you drag/grab them around. A better solution would be to remove the limit location constraint (and the bone needed for it: Spine_03.002) or create new bones that you rotate and give that a limit rotation instead. Than make the current “boob bone” a child of this new rotation bone. And you want them to hinge, but only in relation to it’s parent, so you could give it a copy rotation constraint and have them copy the (Y/upward)rotation of the spine02 bone. (Just thinking out loud because I think you don’t want the bones that make the chest move go just up and down, but also make the boobs slightly come out for a more natural movement, otherwise you could just remove the limit distance constraint…)
The compass has a limit distance constraint, which is probably to prevent it from entering the chest, but you can easily make it intersect with the body anyway, so it has no use.
You also have some “limit distance” issues in the face, like the brows, if you want to limit how you can move them, don’t allow them to “dig into the head”.
Your IK poles for both the arms and legs are off. You should be able to find a value for the offset and/or the roll of the arm/leg bones that will have the arms point directly at the poles. It’s a minor thing, but not very intuitive.
In IK mode you do not need to see the upperarm and forearm bones, and you CERTAINLY should not be able to rotate them (in IK mode, you can still rotate the forearm).
In FK mode, if you move the hand with targetless IK, as you confirm the placement/location of the hand, it snaps back a little bit. I think this might be a bug in the IK constraint, because I’ve seen this once in one of my own tests without any reason for it.
There is something wrong with the eyetracking. The transition is not linear It looks at the target from value 1.00 to about 1.2, then it just snaps into place.
You also have some issues with weight painting, the hairs are affected by bones they shouldn’t be affected by, and the hidden hair controllers also don’t move very nicely due to the constraints they have.
The brows control areas of the skull that should be solid bone, and if you go into wireframe view you can see the skull shrinking underneath the hair.
You have some bones that you don’t need to help with deformation, like the two IK bones in the ribcage, and the four bones at the hip.
Last, I have no FK controls for the legs…
I think you have made a really great character, and I hope you’re not too pissed off about my criticism, but I think the rig could use some polishing.
Looking forward to a new version
EDIT: The FK hand snapping back issue does not appear in the earlier version v.01
EDIT: the reason for the upperarm copyloc rot is probably to get the arm to hinge, because the upperarm is parented to the spine, not the shoulder. There is a better way to do that. Put one bone at the tip of the shoulder that has the same orientation as the root bone, and have it copy it’s rotation. parent the upperarm to that bone and lock it’s loc transform properties.
The snapping on the FK bones when moving them with targetless IK is because some channels are locked or has limits on them, when you move the arm it doesn’t take this into consideration and it pops back into the proper pose when it evaluates the locks/constraints. The IK constraint should evaluate the limits to ensure it’s not getting that snappy effect but isn’t at the moment. I have the same issue on Biff.
Hey Denny, thanks for clearing that up.
Hey Ndee, I read in Denny’s thread that you were looking for alternatives for the mouth. I have some ideas about the stickyness of the lips, you could duplicate the controls for the lowerlip, parent them to the corresponding upperlip controls, and give the lowerlip controls a copyloc/rot (or just copytransforms) constraint, I don’t know how the upperlips are parented, but you could use a duplicate of the jawbone with copyrot and limit rotation (value like 0.5 or 0.4) to have the upperlip move along a bit when you’re moving the jaw… or something… when using limit distance you have less control over where a bone ends up instead of using limit loc/rot.
Instead of using a lot of limit distance constraints, try and see if you can get further by using a few MCH_jaw bones, which copy transformations with varying values from the jawbone. If you parent your lipcontrollers to those bones, it becomes a lot more reliable where your lip control bones end up. That’s how I plan to start my new face rig.
Wow, not only the model is pretty good, but it comes with good critiques that help to learn a lot!
Thanks ndee, Richard Cukver, Denny and Freaky dude
very nice! thanks for sharing blend!
thanks that is fantastic work.
@ Richard Culver
Thanks for this hint. I haven’t noticed it yet. When I created those two vertex groups I just inversed the selection in facemode. I forgott, that he selects the vertex circle twice.
@ FreakyDude
Thanks for your critique. And no, I don’t have a problem with it! I think it’s good to see a work from different perspectives. Many things that are clear for me aren’t clear for others, because i created it I do not see all issues. I will see what I can do about your points. But the good thing about creative commons is, that everybody can adjust it for his liking.
About the FK for legs. Is it important to have FK for legs? Never needed this befor. But I have to say, that I haven’t amimated that much yet. In which cases would you use fk?
@ Brachi, bojo600 and Triskelion
thank you!