I have searched around but have been unable to find an answer so…
I am trying to scale various rigged characters so I can make them proportional to eachother in a scene. Whenever I try this the mesh distorts wildly or bits of the rig remain unscaled etc.
Is there a global object that I should be scaling to ensure that all the mesh, armature etc scale up/down together?
I am trying to append characters into scenes and this is causing me a nightmare as the original characters are different sizes. I thought it may just be an appending problem but I seem unable to scale the rigs succesfully in their original files also.
Any help on my noobish question would be very much appreciated.
Thanks for your reply Daren, much appreciated. Sorry for being a bit nooby here but could you explain briefly how I parent the mesh to the armature as an object? I will look online also but would be great if you could explain to me as I know I’ll be doing exactly what you mean!
Thanks again for such a quick response.
Another way is to just add everything to a group, all armature and mesh parts/controllers.
Then add an empty to your scene and turn on dupligroup for that group.
Now you can just scale the empty and everything should be fine, no need to mess with the rig at all.
What I did - I put everything into a group - they all went green.
I then added an empty into the scene. I selected the empty and went to the object menu…make links…dupligroup
But there were no options to link the empty to that group I had created…?
Would you mind advising me step by step on how to implement what you advised…I’m going slowly nuts!!!
thanks for all your help!
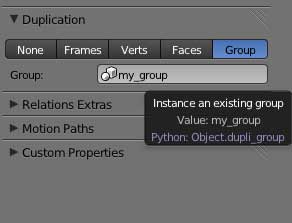
Once you have all your objects in the same group.
Just select Empty and activate the Object context.
Under Duplication choose Group then pick your group from the drop down that will appear.
What is nice about this technique is that you can make the Empty follow a path to simulate walking if you have a walk cycle.