Thank you all for participate of the post. Because this I’ll put more information.
Thanks to Rgaidao to share this links with us -->
Using Meshlab you now have three options to achieve it:
Transfer point cloud color information to the mesh (already covered in the tutorial). A good option when you have very detailed point clouds, but not very good when using sparse or incomplete point clouds.
Use osm-bundler camera parameters to transfer color information from raster images to the mesh.
To do all this you just need to open as a project, inside meshlab, the PPT output file “bundle.out” and after that the respective “list.txt”. The first file concerns to camera parameters and the second to associated raster images. After that just follow the already mentioned (and fantastic) Mr. P tutorials.
And you have the posibility to project the texture on Blender, using an add on that imports .OUT files:
swepower,
123d catch and Bundler+ PMVS2 are based upon the same principles, photogrammetric reconstruction. Here a short list of pros and cons for the two:
123D Catch
Pro:
Output is a fully textured mesh (.obj format)
Mininmal user input, just upload the pictures and download the finished model
(Probably) high quality settings for undistorting, matching and reconstruction since they use large clusters*
Con:
Max. input resolution of the images is 3 megapixels (they resize automatically)
Output is limited to max. amount of triangles and texture size**
You don’t know what happens to your input data
Bundler+PMVS
Pro:
No “artificial” limitation on input and output size (as much as your pc memory can handle)
Settings can be adjusted for different scenarios
Open source
You know what has been done with your data
Con:
It’s just a pointcloud. Meshing and texturierung are additional, time consuming tasks.
Depending on the imagery, point cloud can be quite noisy.
PMVS (for dense reconstruction) can be very heavy on memory***
More of a guess than a proveable fact.
** Haven’t used it in awhile, not quite sure what the current limit is. Used to be around 1,3 million triangles.
*** With a couple hundred images at full resolution, 32GB RAM are used easily.
It’s kinda late here, so probably I forgot something. But that’s what I have in mind right now. Maybe I’ll edit in the morning with a clear head.
cogitas3d,
thanks for the tutorial. I’m sure some ppl will find it quite useful.
Have you heard/ used VisualSFM yet? You might want to take a look at it; it’s a nice GUI for the entire matching and reconstruction process.
PPT (Python Photogrametry Toolbox) is open source and based on Bundler, CMVS and PMVS2.
123d catch, as you wrote, is closed source and owned by Autodesk
VisualSFM is, unfortunatley, also closed-source (just freeware), at least the last time I checked it. Here (http://homes.cs.washington.edu/~ccwu/vsfm/README) is the the README fiel, with the license.
From my own fumbling experiments (thanks cogitas3D for the tutorial !) I’ve found that 123DCatch is much more stable (PPT tends to crash a lot for no reason) and deals better with shadows. PPT does not seem to have any options for manual stitching. Also, there seems to be a bug if you use the “rescale images” option - I found that it basically just didn’t work using this, whereas I got something useable if I resized the images myself. And of course, both of them suffer from terrible, terrible names (why PPT ? why 123D catch ? why not Photogram… or Bundler, or something…)
That said, the results posted my cogitas3D speak for themselves. Clearly it can generate very high quality results if you actually know what you’re doing. I’m definitely going to persist with, I’ve got dozens of dinosaur and other figurines just sitting idle except for when my 3-year old nephew isn’t using them, and obviously he can’t appreciate them as much as I do…
HI Rhysy 2,
The quality of work with PPT depends very much from the quality of the photoset. The kermit is 640x480 pixel, so very low. The difference you noticed in your test is caused by the texture. If you see in the two pictures the meshes are almost the same (but in the one of PPT it is possible to see the right hand of Kermit, which is missing in the one of 123D catch), but the first image has a real texture (done with real picture on the 3D mesh), while in the second image (the one of PPT) the color informations are taken from the 3D pointcloud and “coated” on the 3D surface. If you will use the real pictures to do a texture for your PPT model, you will see that the final result will look better.
123D Catch in this case appear better because the light is active on Meshlab and smooth not. If you project the texture it will be better too, in PPT. On the 123D Cach viewer you see the object with texture, smooth and without light active.
There are several aspects which contribute to the final quality of the reconstruction.
1. Camera
The quality of the lens is fairly important. A good lens has less spheric and chromatic abberation, which influences the accuracy of the detected features of overlapping images. Furthermore it is important that the lens really can “use” the resolution of the sensor; a 15 megapixel sensor doesn’t help you if the lens isn’t good enough to properly transmit the light information onto the sensor.
The resolution itself can be important too. As luca said, 640 x 480 is fairly low to achieve a high quality of reconstruction. The more information recorded, the more can be reconstructed.
2. Image Set
Of course it is important how one takes the images. The sets have to have a certain amount of overlap viewed from different directions. There are a couple of rules how big the angle between two overlapping images should be, but I have to confess, I don’t have them in mind right now.
The images should be completely in focus, blur adds to inaccurate results. Just keep in mind, that for example a aperture of 22 doesn’t give you the most crisp images due to the diffraction effect- hereis a nice example.
3. Lighting conditions
Ideal lighting for the object of interest is a diffuse light source. Outdoors you get the best results on a cloudy day.
Due to the low dynamic range of cameras sunlight can have quite a negative influence; strong shadows can lead to errors or to no reconstruction at all.
In my personal experience, a change in lighting is not beneficial. So taking images for some hours does result in quite a change of light direction (regarding direct sun light). Clouds can be quite unpredictable, sudden changes in density results in different brightness.
The direction of the lighting has also an impact on the final results- fine details, which are only visible when lighting the object from the side, can’t be captured if the light doesn’t show it.
4. The object of interest
For photogrammetry to work you need texture. This is essential, a white wall with little texture can’t be reconstructed since there is no information for matching and calculating a point cloud. The more texture, the better.
Also, this won’t work on very glossy surfaces or transparent ones since every viewing angle results in a fairly different lighting.
I bet there is a lot more to it, most likely I forgot half.
There a lots of tutorials and further information out there on the web.
Cheers.
btw. lucas, does PPT have a tool for georeferencing (and scaling) the reconstruction?
Sorry, I was writing a very long answer but than I notice I could not replay to the thread and I lost it. I try to summarize:
There are many ways to “georeference” the reconstruction, but there are not specific tools in PPT. This is our (Arc-Team, www.arc-team.com) way: we put near the object we want to document 4 (better more) targets (Ground Control Points, GCP), like in normal photogrammetry (2D or 3D). Than we register the GCP’s coordinates with a total station or a GPS (of corse you ca do it also “manually”, but we work on beig archaeological areas and we need to be fast). Once collected all the data (photos and CP) and elaborated the 3D pointcloud, we build 4 small cubes with the coordinates of the GCP (with Blender or FreeCAD), than we import them in MeshLab (.ply is a good file format) and then we “georeference” the 3D pointcloud with a tool called “pick up points” (more or the in the same way you would georeference and rectify a normal 2D photo with normal GCP). At this point, the model has the right dimensions and the right inclination. This system is fast and simple if you work with local coordinates systems, but is a little bit tricky if you want the model in a real geographic system (like UTM-WGS84), because MeshLab does not support geographic coordinates (are too big), so you have to cut the cifres in the GCP (better till the last 3 cifres before the comma) and restore them in the final ply surce file.
Onether way is to georerence everything directly in GRASS GIS (the way we use modt, actuay). You can read here a tutorial about it: http://arc-team-open-research.blogspot.ca/2012/12/georeferncing-3d-pointclouds-with-open.html
In this last way you van keep geographic coordinates (of corse is not a problem for GRASS), but kkep in mind that sooner or later you have to build the mesh with a mesh-editing software, like MeshLab (building the surface in a GIS is not a good idea for complex models…).
I hope it was useful. Ciao.
Thanks for those tips Scrible, they definitely help !
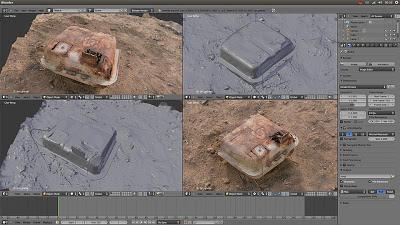
Here is another attempt using my own higher-resolution images. I had to reduce them to 2000x1500 (50% of full fize) - PPT crashes at their full size (perhaps I should be using 64-bit Python); also 3MP is the limit for 123D. Still, the higher resolution and better lighting makes a very big difference.
Here are the results using 123D (light side, dark side, textured view) :
[ATTACH=CONFIG]209690[/ATTACH]
And here is the result from PPT (same views + Mesh Lab point cloud) :
The Mesh Lab view shows that PPT did a good job of constructing the point cloud, albeit not as good as 123D in the shaded areas. Mesh Lab seems to have more problems filling in the missing data than 123D however, hence the strange lumps beneath the mouth and tail. I guess I need to a couple more light sources and take some pictures from below.
Still, getting better… and happy new year to everyone !
Hey Rhysy,
I took a look at your images and one thing I noticed, which I haven’t mentioned before is that using a high ISO does influence the quality of the reconstruction due to the additional noise.
Try setting up a brighter enviroment or use a tripod for the images. Use the lowest ISO as possible (50/ 100) and it might improve the results.