I added some new experiment to the thread http://blenderartists.org/forum/showpost.php?p=611722&postcount=53
Original post
During my recent adventure to learn 3D human body modeling, I seen a total absence (on the web) of tutorials trying to teach the relations between the principles of human anatomy and 3D polygonal modeling rules. I never found any tutorial, trying to show how to visualize the human body to approach correctly polygonal modeling.
All that I found was really high poly or really low poly modeling tutorials, both leading to awesome and sometime amazing results, but none making me understand what exactly lies beneath.
Maybe I did not search enough, but I started searching more than three years ago.
However I do not mean that the tutorials, currently available on the web, are not usefull. Two of the best tutorials I found, for example, the first for High Poly and the second for Low Poly modeling, are Modeling Joan of Arc by Michel Roger and LowPoly Character Modelling by Ben Mathis. And, in general, www.3dtotal.com hosts good examples and totorials about many aspects of 3D modeling.
What I mean is that, before reading a tutorial such those I linked above, a newbie, like me, should learn human anatomy bases, from the point of view of 3D modeling techniques.
For example, a really good tutorial about face modeling, following this philosophy, giving a synthetical view of a base human face mesh, is hosted here in Elysiun, A Better Face Tutorial V 1.1(UPDATE).
My effort is focused to obtain a base mesh for another complex region of the human body: the connection between the arm and the shoulder/breast.
I am a comics style drawer, so I used my experience in human anatomy to solve the problem.
This experiment was for my personal use, but I decided to post it for give help to other 3D modeling newbies, like me, and to see if any expert 3D modeler can give his opinion or some help to better understand and eventually correct my deductions.
In traditional arts, it exist the convincement (absolutelly correct  ) that an newbie artist should learn base concepts before doing more complex works. They start drawing schematic puppets to understand proportions of the body and so on.
The same approach should be adopted to learn 3D human modeling. Even if you come from a painting experience, like me. That is becouse 3D modeling is completly different from drawing with a pencil or a paintbrush.
So lets start.
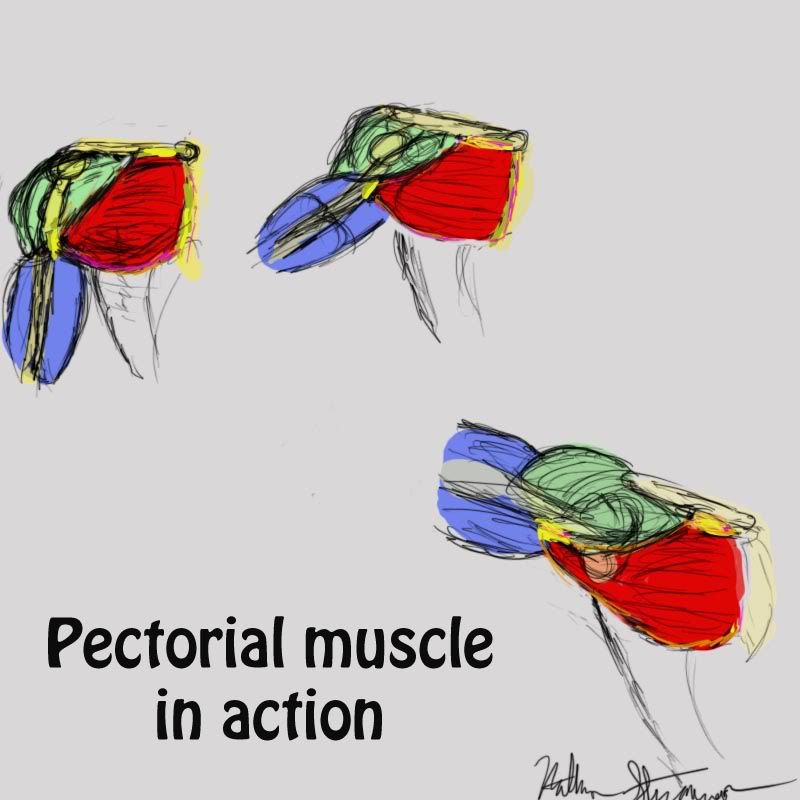
First of all, I show you schematically how really are muscles around the shoulders region. My drawing skills coming in help.

As you can see, the great chest strap muscle (magenta) is connected to the upper arm bone, exactly under the deltoid muscle (green).
When we tense our shoulder muscles and release the great chest strap muscle, we actually raise the arm. As you can see in the next image.

This group of muscles is not the only one involved in this movement, but it is the group of the more visible muscles.
The real problem is that we cannot simply connect the arm to the rest of the body as if it is a tube, like in this example.

This is because the presence of the great chest strap muscle (with the great dorsal muscle) create a concave region between torso and arm, so called armpit.
There is no online tutorial that helped me to understand the solution to this problem. Many of them simply resolve it, but do not explain WHY and HOW. And often, the more detailed they are and the technique, they use, is less understandable.
In traditional arts, teachers teach to synthesize, in mind, the shapes we see in real world. And I think it should be the same for a 3D artist.
So I started creating 3 meshes. For the neck and the breast I used a cylinder with 12 horizzontal subdivision, while the arm base mesh was a cylinder with 8 subdivisions. In Blender use Space Bar->Add->Mesh->Cylinder, and give the number of subdivisions as the parameter for the number of Vertices.
The meshes created are: one for the breast (green region), one for the neck (yellow region) and one for the arm (blue region). I also deleted back faces of all the meshes and left side faces of the breast and neck, to work better and see the interested mesh regions without obstacles.
I tryed 2 different methods for connecting them. The first mesh (upper in the next image) is the simplest one; the second one uses a single quadrangle (red polygon) as a bridge for connecting the three cylinders.
This is a rappresentation of how to connect the simplest one.

And this is the result.

Than (for a reason of appeal??? ) I have mirrored the second mesh and started to work with it.
I added one vertical subdivision to the central strip of polygons of neck (yellow region) and breast (green region), 4 horizontal subdivision to the breast (green region) and doing some manipulation (just move, scale or rotate), to obtain a draft model of the upper torso and arm.

And, the same result obtained with the mesh without red quadrangle.

I decided to go on with the red quadrangle mesh, and I deleted some faces: the red quadrangle, and 2 polygons strips (the more internal) of the shoulder until i reach the begining of the bicep.
So, probably, the use of the red quadrangle was not necessary, but remember that I was experimenting.

Than I selected 2 edges and create a face, that connects them.


I subdivided the newly created face (use Knife or Loop Knife in the edge menù).

The reason for this modifications is better seen in the pencil sketches of muscles I done. With this steps we are going to extends the breast muscle to reach the shoulder muscle, as shown in the image below.


In the next step I subdivided vertically the left most faces strip of the breast (green region).

Also I deleted a face in the middle of the bicep and connected the right most faces of the bicep with the left most strip of the breast (green region).

I selected the 2 faces, as in the images below, and subdivided them.


Than I closed the hole in the mesh, as shown in the images below.


Try to activate Subsurf button and you should obtain something like this. I think it is a good mesh, reflecting real muscle fibres structure of a human body.


For the hole, remaining in the middle of the shoulder, you can choose to simply merge the 2 free points of the blue region with the 2 free points of the yellow and green regions.
Anyway, I will try it, and I will go on later with this tutorial.
Any suggestion, critique, or phrase like «I don’t understand anything!» is welcome. 
Thanks.
To be continued…