Sci-fi Blenderguru Competition: W.Y.Corp. [uriel] >>> Final Entry Page 4

It looks awesome!!!

the interior design looks really good and the exterior too. my only observation is that the control panels looks too repetitive, you cold make other designs for other places of the ship.

Are you going to do an animation, it would be a shame if you only show one part of the ship on one still image.

By the way, how do you show the wireframe/solid model??

Thx, the control panels on the previous images are just made by copy/paste for proportional tests :slight_smile: i’m working on the new ones now :wink: (and it looks much better than my first “console” design)

how do you show the wireframe/solid model??

activate “wire” in object panel setting, press PrintScreen on your keyboard and crop the saved image in Toshop/Gimp…that’s it ! i’m using wireframe on solid mode all along my work of modelling, nice to always have the topology shown !

new preview…testing also future compositing (in case it doesn’t work anymore with the first vision)


i see that i need to work on the camera, especially with the angle, i have every thing in my view, even some close objects on the right than can make the DOF efficient, but the place of course looks wilder than it is, looks empty also…dealing with…


let’s continue the “drivers” seats and the front area…

Very cool progress you’ve made i am liking the atmosphere of it all


i’m starting my nodes stack at the same time…As Toshop user from 20 years, i can do almost everything with it, but as i have not really experenced the blender nodes, i will try to reproduce my workflow in there, and it is fun!

Anyway, i will consider any suggestions from you, members, in this matter, thanks

So, the plan is to render a set of .png image for editing/compositing, each one is representing a layer in space (plate), from front to back, starting by the closest. Then, to have different treatments on each one and finnally, to combine then in the mixer.

about the mixer, it’s maybe an obsessional focus, but i want to have a serie of image inputs (merge), a set of various settings well … accessible (all together, not separated on each node), and a set of optional views…and of course, a general output aka “Contest image”

So, here, it is just the beginning…

in here, i don’t see the way to do this, using the groups obviously, but no success…


well, it is not the end of the world :slight_smile: anyway, by playing with Bnodes, i found back my enthousiast for modular programming, i’m playing Clavia, Nord Modular G2 :slight_smile: for those who knows about Audio synthesis!

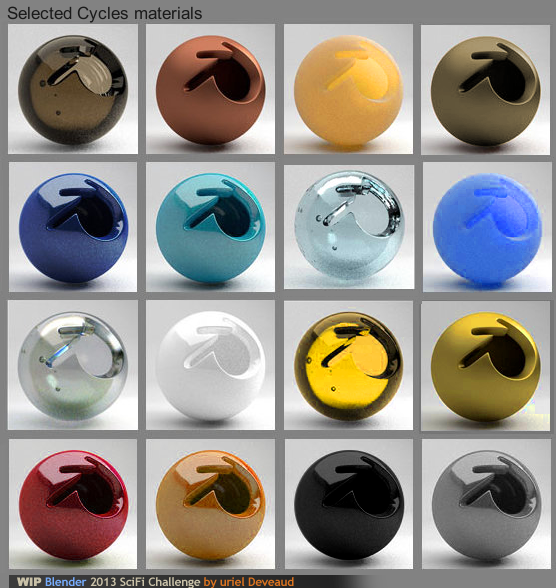
an other test: using and tweaking my reference images from Prometheus movie (because my story is about the future following of this movie, somewhere !), it shows a sample of bi-tones that can fit nicely with my image…i will keep that one, maybe i have to find my palette now …


Holy cow that is amazing

So, i come with some selections of colors and material types related to my previous observations:


i have forget to put a simple darkgrey diffuse shader and the emit ones…it’s ok! i try to limit the number of materials. There is also the textured ones, using ( as i see now), only 3 texture layers: color, displacement and emit.

workflow schematic:


I’m looking forward to following this WIP of yours. It’s looking really good so far. Obviously you have the technical and eastetical knowledge enough. The challenge as I see it from here is getting a really strong composition and a good mood and a clear story with the image (if a still is the final result?). Only thing I can say right now is I think the ship would probably look larger if you put the camera and human eye level. I have not yet understood the mood you are trying to depict fully, is the ship exploring space? Things seem calm at the bridge? Not tense? I think the body language of the crew and the amount of order/chaos will be very important in setting the mood as in exploring in a sense of fear of the unknown or just simply travelling between two points. It has not really reached that part yet. If you are planning to end this as an image I’d suggest making draft renders of different viewpoints you consider and 2d sketching the crew in to faster try different body language and levels of organization to convey the feeling you want.

Thanks for those advises, the actual scene (the one i have in mind) have some complex situations like you said. The general action is that the ship is arriving somewhere (we see the planet thru the glass bays).

So, i try to identify what is happenning here, my first vision was the capitain showing up the planet with its finger to an other officer, then the crew with a feeling of serious navigation system used by experts, it’s time to make every thing ready for landing !!!

Weyland Yutani Corp. is investigating from some times on a new discovered planet, LV-254. It seems that there are rare locations that show from space, some intelligent “ground structures”, 3 ships from the company are sent to start colonialization and exctraction, on board, the navigation crew and its passengers.

The story will not tell now at what time they will discover that, LV-254 was also the first experiment for the race of “engineers”…and for millions of years, the original dna sequence have muted into a much more advanced creature than any other known at the time … :slight_smile:

Back to present time…


of cource, my goal is to have a realistic image at the end, a large screen view and an exagerated perspective. The colors are blue/yellow tinted.

Here is my task list for the next 10 days:
[# modelling interior space ready for texturing

modelling detailed objects and characters

Final lights setup with Cycles

Final materials library with Cycles

Textures painting

Final nodes setup for Mats and RenderLayers](http://blenderartists.org/forum/)

Here is a test of Material selection:


i have to find about 14 materials for my scene, it doesn’t include the textured ones.

------------------ Shaders
White/DarkGrey/Lighgrey = Diffuse matte (plastic)
White/DarkGrey/Lighgrey/DarkBlue/LightBlue = Shiny glossy (metal)
White/Yellow/Orange/LightBlue = Transparent Glass
Brown/Darkblue = Transparent frozen (glass)

------------------ Textures
Ground floor/Walls/corridor = color/bump/emit
TerminalScreens/Controls = color/emit

Other Elements/Objects of the scene may be concerned by textures.

nice modelling and a very well documented workflow :wink:
I am curious :smiley:

Keep doing what you’re doing. This should end up awesome.

I have tried to produce a texture according to my model, apparently, it doesn’t go for it, so i decided to paint freely over the surface of the floor, and…nice one ! i have found something much more interesting. the ground gives now a better idea about the position of the screens and all. it is also better organized, well, i painted a simple UV but i will come back on it later.


still, the test render is grainy, but i work on my laptop for tonight:)
i keep a simple lighting until a i have all the textures done.

An other try for the material collection:


seems to be on the good way !
But at the moment, i fight with the lights settings…

Uriel … your WIP is very interesting, it’s one of the best one i’ve ever follow…thx

thanks for the comments. :slight_smile:
The last post on materials for today…go back to modelling and textures :slight_smile:
Nodes are genius, but you can spend you life tweaking the thing…unlimited.

But well, i’m not 100% happy with my selection, i will fix the details at the end, within the lights setup.


Man this is a great project I hope you keep it and finish it. Keep posting updates.

I had to stop for a couple of days so i didn’t really make a progress, but i have made several blend-experiments for the planet behind the glass, the render compositing and the characters modelling, here is just a new color test (using a bit of Gimp to add details):


The comic style is just to add some more (uncontroled) actions on the scene…for fun !

Here an other experiment with the poses and attitudes, using generic puppet (rigged quickly)


Based on this experiment, i’m producing a new version of the puppet, a female and a male as model with a shared poseslib, then i will apply some distinctive details to each. As i understand now, each “actors” have a specific job on the spaceship “bridge”, so according to it, i have to provide dedicated clothes.

The characters of the scene are not the most important parts of the scene, so i will not put all my time on it, but i will choose nice textures for the faces !

I saw the crew members as:

[- The captain and its assistant on the front side

  • 2 pilots and 2 controllers, sitting and at work
  • 2 general mobile assitants talking to crew’s members
  • 2 technicians checking/repairing
  • 2 operators and 2 space experts (holotable)
  • 2 lovers ? it was a joke but i still thinking about it !](http://blenderartists.org/forum/)

The scene is exactly illustrating the moment when the ship is approaching LV-254…the travel is done and everybody is ready to go.
The mission has just started for the crew…


Wow, lot of work has gone into this. Way to go. I really like the little details in that command station counsel thing you posted earlier. The overall design is really great too. My one concern as I view this project is the extreme wide angles. I would try to avoid this to much. I think there is a tendency to use wide angles so we can show off all the work we’ve done but the results can really break the believability of the shot. They have a tendency to really scream CGI. Real wide angle lenses that are that wide will distort the image. If you’re dead set on using such a wide angle, you might want to consider adding some lens distortion as a post effect. But honestly I wouldn’t go any lower then a 24mm lens. They rarely go wider in the movies unless they are going for an affect where the viewer is supposed to feel disoriented.

Thanks!

Thank you for your feedback as you are right on the camera lens distorsion…i will review my settings and find an other way to “capture” the full scene…