That’s the node for mapping vectors (its name is mapping node).
In blender : 1 - RGB value (for each value)
Or using the Invert Node.
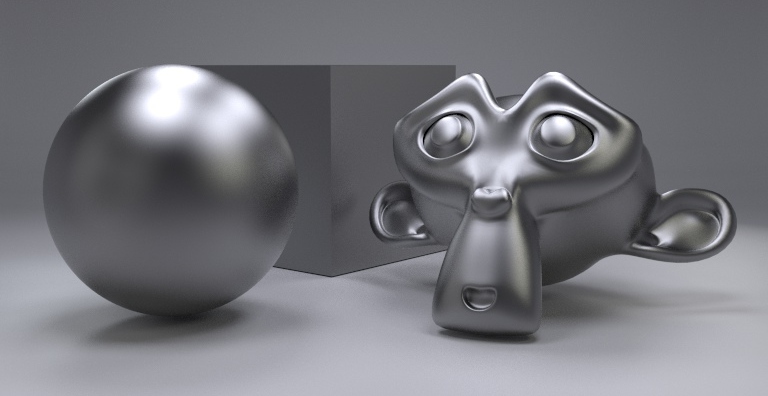
This material is made with Blender and Cycles. I tried to do brushed stainless steel material, like this coffee pot.

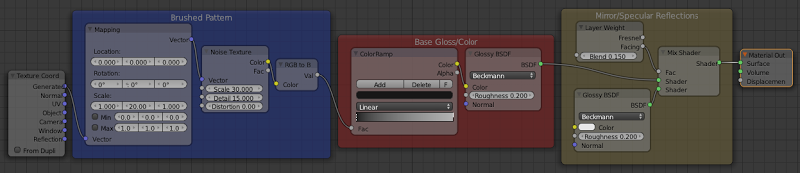
I have mixed two Glossy shaders, both with GGX option selected. This kind of glossy is recommended for high roughness glossy materials. The former is the base color and gloss. The latter adds specular and mirror reflections.

I have used a Noise Texture node to generate a brushed pattern. I have deformed it with a mapping node, by scaling it in Y-axis direction. This pattern is applied as factor for a Mix Color node (colors #383838 and #A6A6A6), producing the brushed effect.
Bye
Hi all. Now I’m going to explain another way of getting the brushed stainless steel material.
You must simply change the Mix Color node for a Color Ramp node.
This setup is similar to the material above, but if you add one stop in the middle of the color ramp node, you can slide it to change the weight of every color.
Bye
Yes, I thought that reducing the scale of noise texture node would be enough, but it isn’t. I will do some test to perfect this material.
I invite to everybody to improve my materials and post them here.
the material is good some stainless look like that
very mat no spec
but don’t know what name is for this finish
happy cycles
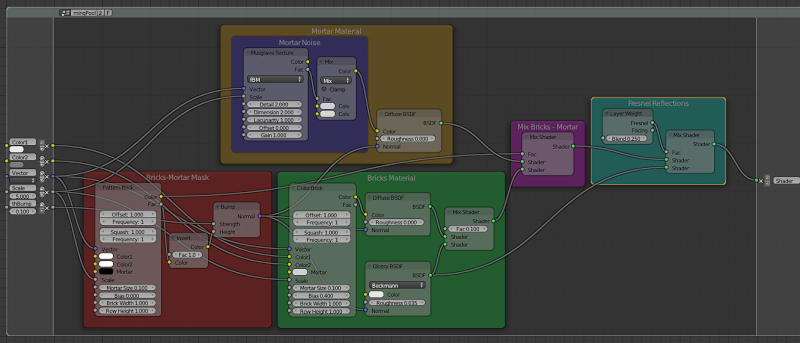
This time I’m going to try to make a material similar to the bricks you can find in a swimming pool.

I have used UV mapping and a couple of colors.
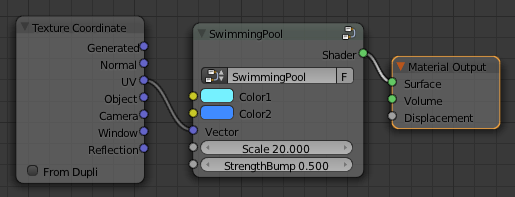
Basically, I have followed these steps:
- Create one material for the bricks.
- Create another material for the mortar.
- Create one mask for the bricks.
- Mix both materials using that mask.
- Add fresnel reflections.
This is the result:
I hope you like it.
Bye
2 Likes
One more derived Suzanne. http://www.pasteall.org/pic/show.php?id=44165
Thanks for sharing ideas! BSSMII looks great.
swimming pool material is awesome. can we randomize the brick sizes?
I can randomize the bricks depth, including another Bricks Texture Node. Now I use the same node for mixing materials and creating displacement effect.
The texture node let you to change the size to a rectangular one, but the same size for all bricks, not different sizes for each.
when you add suzanne do you use the normal size no scaling here !
thanks
I use UV map, but I don’t remember which (sphere -> sphere projection; cube -> cube projection; suzanne -> smart projection / projecto from view (bounds))
Recently I posted my test scene in another thread. If you want you can download to test materials in the same scene (uncheck OSL rendering!)
EDIT: This is the correct link
do you mean the light scene one ?
which section is it ?
like material may be or cycles ?
and what is name used for it at blendswap ?
can you upload it here if not too big !
thanks
EDIT: Forget my post before. I was wrong.
This in blendswap is similar, but I changed some lights.
This is the scene. You only need to append or create the material you want.
ok have it now
do you always use this general scene with object smaller then the standard size?
cause this affect the values if you have mapping or scale to take into consideration
thanks
I reduced them to include them into the lightbox, but I did “Apply >> Rotate and Scale”. So their scale is 1.0. I think the mapping values work fine with scale 1.0.
I just suggest that you stick with the standard size which is normally use
easier for anyone coming in and trying it without thinking to re adjust scale or mapping
use the standard plane 2X 2 or suzanne or UV sphere
then it can be scale up from the mapping node directly wihout having to Ctrl-A
cause sometimes you cannot Ctrl-a object cause of modfiiers ect…
the light box can always be scaled up to whatever size is needed to render
happy cycles
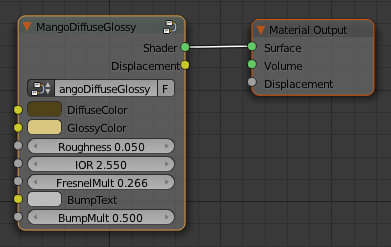
This material is made in Blender/Cycles. I’m going to make a brass material.
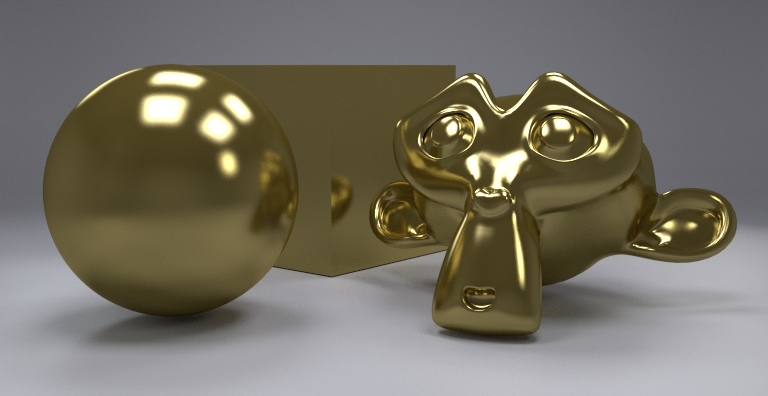
This time I have used the node setup explained in the mango blog. The node I have used is this:

It multiplies the fresnel and the glossy color by a factor, and then this is used to mix diffuse and glossy shader. I don’t use the displacement part.
The final node setup for brass material is as follows:
Bye
@elbrujodelatribu thanks for your material setup. I have a request. could you please explain a bit about different nodes, what they do etc.
Since it’s seems very complicated to me and i am sure a lot of us think same. I can do some basic node setups, but looking at your and others stuff, woow, its very complicated.
Thanks
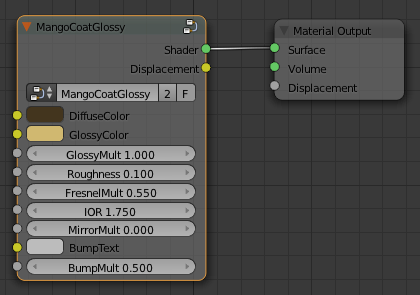
Today I’m going to make an old brass material. This material is made in Blender/Cycles.

I have used the another node setup explained in the mango blog, different to the material above. This is a glossy material with coating:

It uses a complex formula to generate the glossy factor, mixing the diffuse and glossy colors, and a fresnel node. The coating layer is white (RGB 0.8,0.8,0.8). I don’t use the displacement part.
The final node setup for old brass material is as follows:
Bye