What is CSV Mesh Importer?
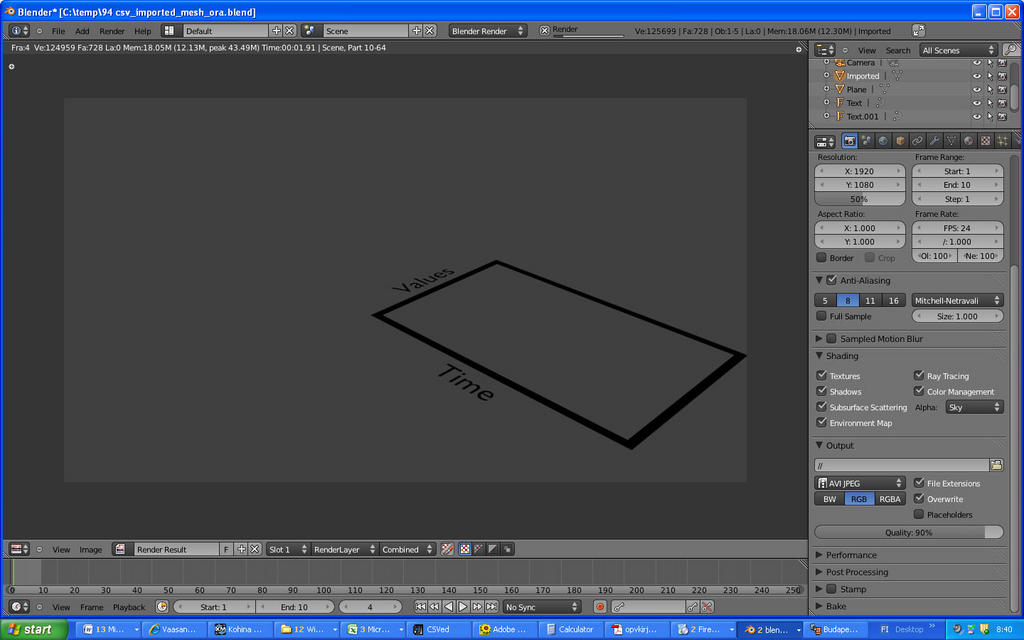
This is a Python script for Blender 2.5x or later and it imports a CSV file into Blender and creates meshes, such as vertices, edges and faces. The image below shows the UI of CSV Mesh Importer and imported meshes of a sine-curved line and a rectangle surface in 3D View window. Please watch the video to get the idea of what the script can do for your artwork.
Requirements:
CSV Mesh Importer works as a plugin on Blender 2.5x or later. I confirmed it works well on Blender 2.74.
Features:
Be able to import a CSV file and create meshes, such as vertices, edges and faces.
Be able to import two types of CSV files. (point list containing X, Y, Z columns and X-Y point 2D table (matrix))
Not Yet : Be able to import with more detailed settings of gains, bias, …etc.
Not Yet : Be able to import automatically without setting in the UI.
How to Start to Use Most Easily:
If you want to know how to use quickly, it would be the fastest way to see this video tutorial. Also you can read the instruction below.
— Installing Plugin —
Download a file csv_mesh_importer v0_7_alpha4.zip from “Download:” link above. Then unzip it and make sure a file csv_mesh_importer.py is created.
Close Blender if it’s running.
Put the file csv_mesh_importer.py to “%BlenderInstalledAddress%\Blender%Version%\scripts\addons”. (%BlenderInstalledAddress% means the address in which Blender is installed. %Version% means Blender’s version number like 2.74.)
Start Blender.
From the top menu, select “File -> User Preferences…” to see Blender User Preferences window.
In the left list, select “Import-Export” item and you’ll find “Import-Export: CSV Mesh Importer” in the right list.
Click the check box of “Import-Export: CSV Mesh Importer” and make sure a check mark is placed.
Click “Save As Default” button to keep this setting.
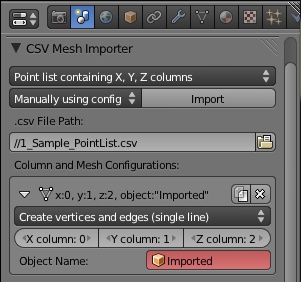
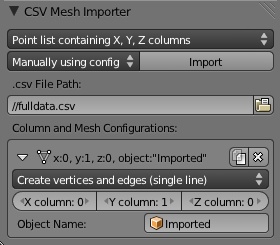
— Importing a CSV File Containing the Point List of X, Y, Z Columns —
Find the UI of CSV Mesh Importer in Scene panel.
Specify “Point list containing X, Y, Z columns” in “File Type” menu.
Select a CSV file in “.csv File Path:” file selection box. For example, use “Sample\1_Sample_PointList.csv” in the .zip file.
Click “Add” button and you’ll see a configuration box below.
Specify “Mesh Type” menu, for example “Create vertices and edges (single line)”.
Specify “X Column:” number, for example 0.
Specify “Y Column:” number, for example 1.
Specify “Z Column:” number, for example 2.
Specify “Object Name:” text box, for example “Imported”.
Click “Import” button.
You’ll see an imported mesh of a line in 3D View window.
— Parameters Explanations —
“File Type” menu means what kind of format the CSV file has. You can import two types of format which are a point list containing X, Y, Z columns and a X-Y point 2D table (matrix).
“Mesh Type” menu means whether you connect the imported vertices and create edges.
“X Column:” number means what number of the columns in a CSV file you import as X data.
“Y Column:” number means what number of the columns in a CSV file you import as Y data.
“Z Column:” number means what number of the columns in a CSV file you import as Z data.
“Object Name:” text means the name of object in which you create a mesh.
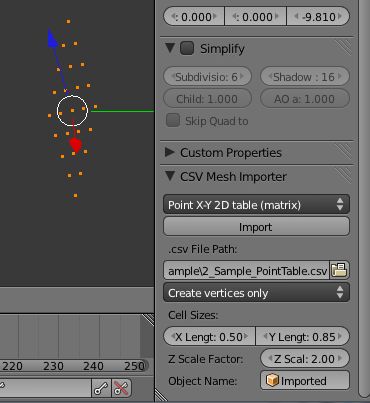
How to Import a CSV File Containing a X-Y Point 2D Table:
— Importing a CSV File —
Find the UI of CSV Mesh Importer in Scene panel.
Specify “Point X-Y 2D table (matrix)” in “File Type” menu.
Select a CSV file in “.csv File Path:” file selection box. For example, use “Sample\2_Sample_PointTable.csv” in the .zip file.
Specify “Mesh Type” menu, for example “Create vertices and faces (rectangle surfaces)”.
Specify “X Length:” number, for example 1.
Specify “Y Length:” number, for example 1.
Specify “Z Scale:” number, for example 1.
Specify “Object Name:” text box, for example “Imported”.
Click “Import” button.
You’ll see an imported mesh of a surface in 3D View window.
— Parameters Explanations —
“Mesh Type” menu means whether you connect the imported vertices and create faces.
“X Length:” number means the X length of the grid mesh imported from a CSV file.
“Y Length:” number means the Y length of the grid mesh imported from a CSV file.
“Z Scale:” number means the Z scale factor of the grid mesh imported from a CSV file…
“Object Name:” text means the name of object in which you create a mesh.
2015/05/10: v0.7 alpha4
  + added the checkboxes to select delimiter letters.
2015/05/01: v0.7 alpha3
  + updated for Blender 2.74.
2013/02/20: v0.7 alpha2
  + modified to read comments in .csv file.
2011/04/19: v0.7 alpha1
  + updated for Blender 2.57
  + special thanks to PKHG, who made this work in Blender 2.57.
2011/02/28: v0.6 alpha4
  + connect UI and the logic part
2011/02/22: v0.6 alpha3
  + add parts of UI for Line and Table configs
2011/02/20: v0.6 alpha2
  + rewrite the logic part of script to read a file and to add vertices
  + create LineMeshAdder to read a file and to add vertices and edges
  + add unit test class for LineMeshAdder
  + create TableMeshAdder to read a file and to add vertices and faces
  + add unit test class for TableMeshAdder
2011/02/13: v0.6 alpha1
  + create a UI for the mesh import configuration
The Differences from v0.5 beta3:
v0.6 series are rewritten for Blender 2.5x based on the previous v0.5 beta3. It is still under development and it only has very limited features yet. The features that v0.5 beta3 has and that v0.6 series haven’t yet would be added one by one in the future updates.
Thank you Hans once more for the example blend-file Sorry for not answering or a few days, been sick But after seeing the example, now I understand (at least I think so) how I shoud set the axises.
However, as always, I have one last problem:
The rendered movie looks like it has only one frame which lasts as long as the whole movie. This single frame has the whole graph visible (image below). So, when the movie is played, nothing happens on the screen although the movie actually plays (time code changes). Naturally it should be in a way that every frame only shows “part of the graph” and the graph changes as the movie plays. Sorry, this is really hard to exlplain here.
Could you help me once more Hans? (sorry about the unnecessary thumb below, can’t find a way to delete it)
Hi, problems with latest version of Blender SVN 36013 … (compiled today)
e.g. registering does not work.
The testsuite gives no error, that is fine.
bpy.types.IDPropertyGroup is wrong does not exist is
probably bpy.types.PropertyGroup
etc.
I think you have to find out to make it work again …
Thank you, PKHG.
I know the API of the latest Blender has changed and I guess maybe it causes the error.
I will try to get it work again by changing IDPropertyGroup to PropertyGroup that you provided. I hope it works by only changing the name. I’m downloading the latest Blender now… Thanks again.
Ok, ora. What you really want to do is not to import a curve. This is my guess, so please correct me, but you have a long curve of graph that is imported, and a part of the curve should be shown inside of the graph frame. The curve should move right to left at a constant speed as animation goes. At frame 0, the left edge of the curve is in the left corner of the graph frame and at frame 2000, the right edge of the curve is in the right corner. If that is wrong, please tell me what kind of movie you want.
Ok, ora. It seems to be easy, but you have to do something additionally.
In a nutshell, I’ll use f-curve to move the curve in Blender.
I’ll create another .blend file for that soon.
I confirmed that I could download it from SkyDrive and open it correctly.
If SkyDrive doen’t work well, it is really inconvenient because I put all files there now.


 This is really encouraging considering my project. I’ll try this method on Monday at work