1,2,3 - Vertices, Edges, Polygons

Sorry for my English, I use the Google translator.

Hello everyone.

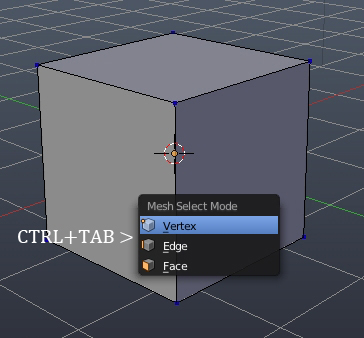
I’ve always been a little inconvenient to switch between Blender vertex, edges and polygons, I’m used to the hotkeys of 3ds max 1,2,3,4,5, and it’s in a blender ctrl+tab+1,2,3.


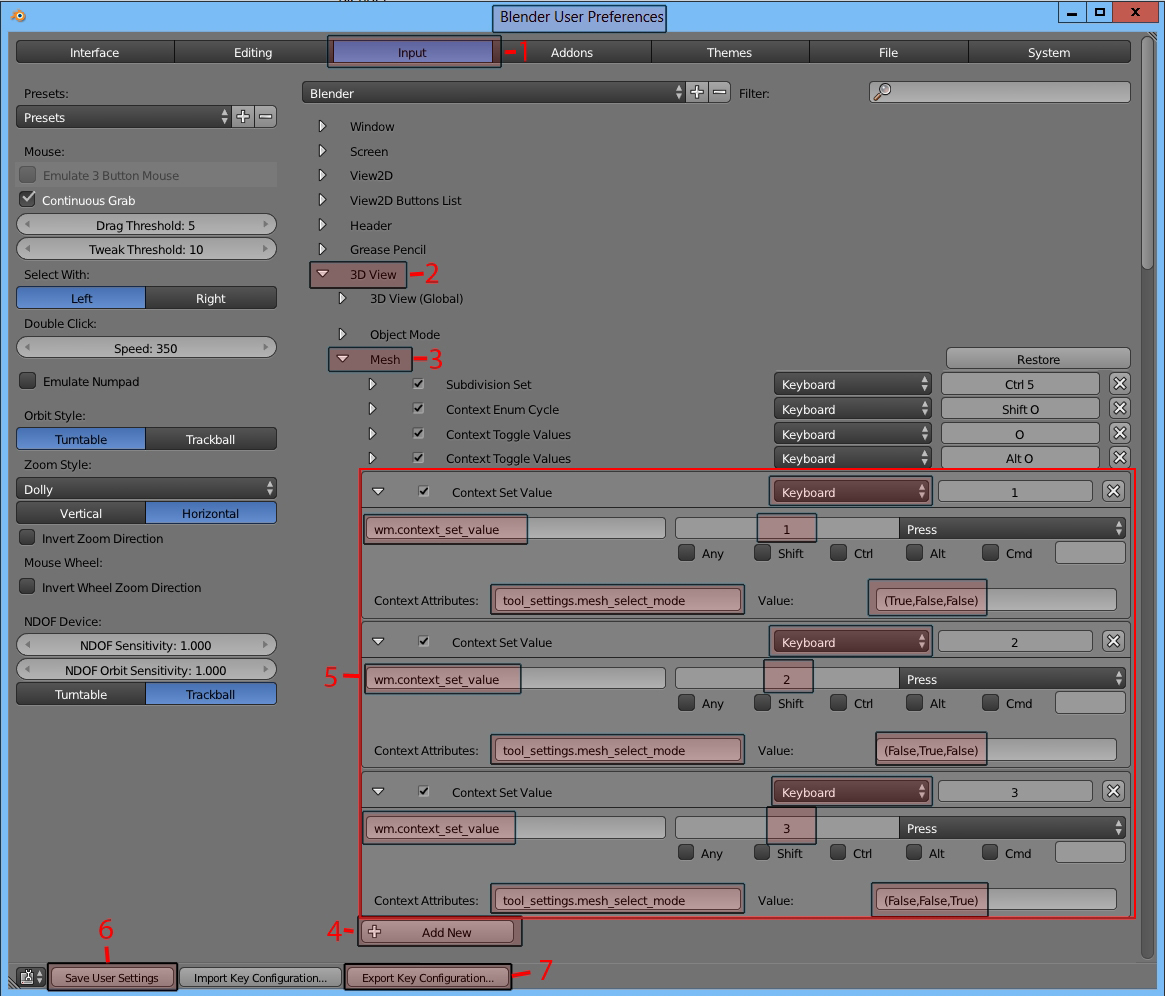
In a blender has a hotkey settings, but it is hotkeys for Vertex, Edges and Polycom, as if not, they need to establish themselves. It is not difficult to create, in turn, three hotkey, and the apron of the parameters as shown below. Then save your custom settings, and if you want to make hotkeys export the file to restore.
But there are also disadvantages of this method, you can not switch between layers 1, 2 and 3 in the edit mode.
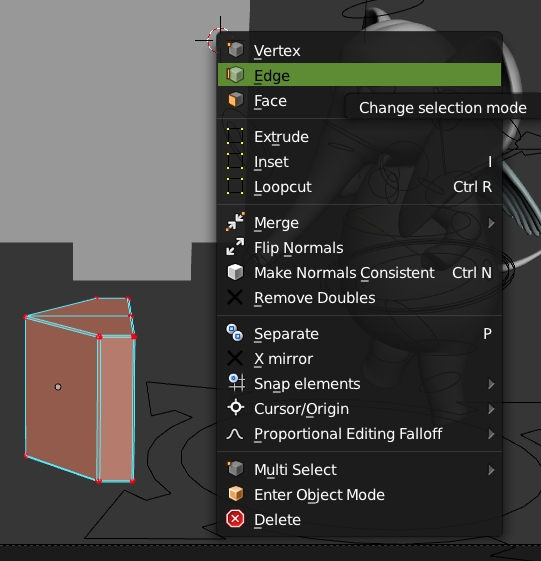

Now in edit mode enough to press 1,2,3, and switch between the vertices, edges and polygons.
I hope it will help you and will be useful.

why not shift click the icons in edit mode
then you select what you want

maybe ctrl shift 1/2/3. numbers for layer is good.

Hotkeys > Icons
they are keys that you use constantly while modeling using icons for that is a nightmare.
and enabling all selection modes wrecks your percision.

I have been remapping them every time i change versions.
mine are on qwert though w e r and the t calls for mode selection
and q is for whatever cool tool you like there.

This can be done also Ctrl+Tab > Right click > Change shortcut

thank you)
Another way to create hotkeys 1.2.3

[ATTACH=CONFIG]315388[/ATTACH]

I am sorry for my English, I use Google translator

Another proposal. Multiple Loop Subdivide

Let’s look at how it works standard Loop Subdivide.

  1. Press Ctrl + R
  2. Move the cursor to the edges. Ghost Loop sticks to 50% of the center rib.
  3. Click LMB to activate Loop Subdivide and slide over the edges.
  4. Choose a location and click LMB to position the Loop Subdivide.

To create another Loop Subdivide, you need to repeat these step by step.
What if we need to do 10 or 20 Subdivideb Loop?

Proposal. Multiple Loop Subdivide
How it should work

  1. Press hotkey (maybe Ctrl + Shift + R)
  2. Move the cursor to the edges. Ghost Loop stick directly to the cursor, not the mid-50% edge. This allows you to never place a loop where needed.
  3. Press LMB for positioning Loop Subdivide.
  4. Tool does not stop working. Repeat steps 2 and 3. MMB rotate the model and place loops, without interrupting tool works.
  5. To stop the tool, press RMB or Estsape.
    Wheel or + NumPad / - Numpad to control the number of loops.

I think it’s faster and more convenient for placing a plurality of loops.
based on 3ds max)))

I am sorry for my English, I use Google translator

Another proposal. Multiple Loop Subdivide

Let’s look at how it works standard Loop Subdivide.

  1. Press Ctrl + R
  2. Move the cursor to the edges. Ghost Loop sticks to 50% of the center rib.
  3. Click LMB to activate Loop Subdivide and slide over the edges.
  4. Choose a location and click LMB to position the Loop Subdivide.

To create another Loop Subdivide, you need to repeat these step by step.
What if we need to do 10 or 20 Subdivideb Loop?

Proposal. Multiple Loop Subdivide
How it should work

  1. Press hotkey (maybe Ctrl + Shift + R)
  2. Move the cursor to the edges. Ghost Loop stick directly to the cursor, not the mid-50% edge. This allows you to never place a loop where needed.
  3. Press LMB for positioning Loop Subdivide.
  4. Tool does not stop working. Repeat steps 2 and 3. MMB rotate the model and place loops, without interrupting tool works.
  5. To stop the tool, press RMB or Estsape.
    Wheel or + NumPad / - Numpad to control the number of loops.

I think it’s faster and more convenient for placing a plurality of loops.
based on 3ds max swift loop)))

Great idea for the multi loop cut !

For the components, I put them in my Right clic menu, it’s faster ^^


I made a script to do this a long time ago :slight_smile:

http://blenderscripting.blogspot.nl/2012/10/customizing-keymap-from-python-script.html customizing-keymap-from-python-script.html

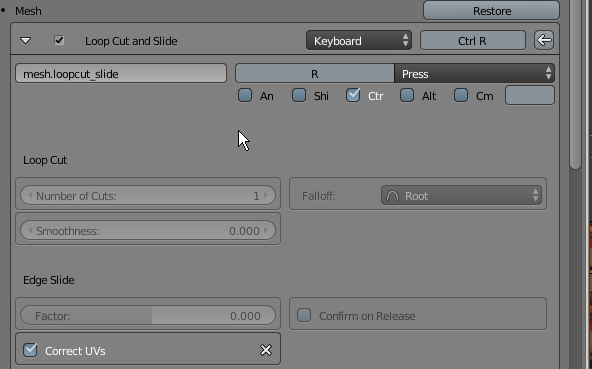
Yes, I wished there were a better loop cut method (like the one you described) for a long time. One reason for that is that, by using a ghost loop until actually cutting the edges, you don’t distort the uvs. Right now, the cut gets placed in the middle and then an edge slide operation kicks in, stretching the uvs on one side on the cut and compressing them on the other. A “preserve uvs” option would be nice (actually, this should be the default behavior).

mem: you can set “correct UVs” default to ON for edge slide.

Attachments


or create the first loop, press F6 and select the “correct UVs”, all the others loops will observe this ))