After several months of work and planning, I am happy to announce ExploreBlender.com – my new website with focus on high-quality Blender training.
I have always loved teaching and with my passion for Blender, it was only natural to combine the two.
My goal for ExploreBlender.com is to help you explore Blender and improve your skills with the best training possible.
I personally don’t like tutorials where the tutor talks about unrelated things, gets lost, or makes actual mistakes (in worst case having to pause the recording to figure out what went wrong).
For me, planning is everything, finding the most efficient way of making you learn.
My goal is to create the best possible training, with well-written scripts and edited for perfect pacing. Subtitles/captions will also be available for every video so it gets easier for everyone to follow along.
The website will go online some time next week along with the announcement of my first Training DVD. If you want to keep updated, you can subscribe to this thread (available in the top right corner, under “Thread Tools”), or follow me on Twitter
A date has been decided. The website will launch this Sunday.
At the same time, the trailer for the Training DVD will be posted, along with several free tutorials from the DVD.
The free tutorials will be posted on Youtube and Vimeo as well, helping everyone trying to learn Blender.
And finally, a reveal of the website logo.
The idea was to create a logo that reminds you of Blender. The standard font in Blender is used, and the “O” is designed to somewhat resembles Blender’s logo, but at the same time create a magnifying glass in the negative space. I kept the center blue, just a different shade, but switched the orange for a light grey (or black in the dark version).
And thank you for the critique of the logo, cekuhnen! I tried modifing it a bit to make the negative space more clear so you hopefully don’t have to see a fertilized egg but a magnifying glass when you look at it.
New Test #1
I also tried rotating it to create positive motion as you said. The lower left corner feels a bit empty now so perhaps a change like that requires the rest of the composition to be altered.
New Test #2
It would be great if you could tell me if you think either one of them is better or if you recommend that I go back to the drawing board for the logo
Or add a drop-shadow? Or a background gradient (very pale)?
Or capitalize the “E” in explore in a larger point size or different font…to draw attention to “explore”.
BTW, I think test #1 is better than #2, but think the logo should look more like the Blender logo.
I don’t know what the legal useage is of the actual logo.
It’s not so much the position of the icon as its shape that gives it that biological/chemical apparatus look. Magnifying glasses have longer handles, and the handles don’t ‘open’ to the outside.
Try this: shift “blender” to the left so the ‘bl’ is underneath the ‘X’ in explore. Then rotate the magnifying glass icon 90 degrees clockwise (referring to #2) so the handle is pointing to the lower right, extend the handle and close the far end. Taper the handle slightly, with the small end attached to the glass. Also, the magnifying glass will be in a position that a right-handed user would hold it, adding to the readability. (Are you left handed?)
Can u show your works?
Becuase i like the idea but explore blender page i mean domain is really huge responsibility, and i am just thinking are u good enought to make content to page with name will be Explore Blender.
Megacal Thanks for the suggestions! I will sure try them.
And yes, you are right about the problem with making it more like Blender’s logo. It is copyrighted, so I can’t make it actually look like that. I just thought it would be nice if the logo could somewhat resemble some of the features it has. The round center and the “spikes”. Anything more than that would be considered stealing in my eyes.
Orinoco Thanks for clarifying the problem I had never thought about the magnifying glass facing the “wrong” direction. I am right handed, but still that felt natural to me for some reason.
Also, the handle was not meant to be that short, or “open” if I understood what you meant correctly. The idea was to make it look like it is extending beyond out into space, continuing beyond, but I understand completely if it doesn’t work in practice. This is the kind of thing you need another pair of eyes for. So thanks for that.
Kramon Thank you for your comment! I agree that teaching comes with a great responsibility. The last thing I would want is to teach people the wrong thing.
First of all, I am not going to pretend like I have any artistic skill, because I don’t. But that is also not going to be the focus of the website. The website is called ‘Explore Blender’ and not ‘Explore your Artistic side’ for a reason.
I am not going to teach people how to make pretty pictures, I am going to show them different ways they can realize the images they already have in their head. Available tools, techniques and approaches. I do believe I have a good understanding and knowledge of Blender’s tools, how they work and what they can be used for. What I know will not be of benefit for expert users, but I do hope I can help many less experienced people explore blender and all it has to offer
Hopefully this will all be clearer when I release the website and the first Training DVD!
The idea was to try to give it some small exposure before the release, like how companies announce that they are going to launch/show something a certain date, by starting the thread for it a little early. I can see why if you think this is a bad decision for someone like me with no previous merits or a “name” in the community. If this turns out to be the wrong way to do it, I can only blame myself.
I hope this has at least not given you any bad feelings towards me or the website.
Gustav,
I commend you for trying to rise the bar.
The Achilles heel of Blender has always been the documentation. Learning means stumbling through a steep rocky road.
So many pages in the manual are oudated, missing or just unreadable. There are still a lot of secrests already implemented, and yet they seem quasi-Alchemcal and out of reach for us mortals…
With way too many confusing, timewasting video tutorials we’re still in the land of the blind leading the blind.
I wish you the best and I’m looking forward to learning from the new site!
Great stuff Gustav! Props for taking action and starting this project. I’ll stay tuned.
Btw, sometimes I explicitly keep a certain mistake in my tutorials so that the watcher can learn from my mistake, if it’s a very common one. It can be useful, but I guess it’s all about the style you’re comfortable with
cegaton: Succeeding in raising the bar is very difficult with websites like Blender Cookie out there, but I will certainly do my best!
richardvdoost: I agree completely! I only meant actual mistakes. Using planned mistakes to help people learn and avoid common pitfalls is great, and something I will use a couple of times in the Training DVD myself!
Update on the website
Unfortunately, I am still waiting for my PayPal account to be upgraded.
I understand if you think that I am stupid for announcing a release date before that was done, but I just never imagined it being a problem. Not until now, when I realized that it still states “in progress” on their website.
On PayPal you have a very low initial yearly receiving limit, so what I am waiting for is for the limit to be lifted. I sent all the proper information a couple of weeks ago, and I assumed it would have been fixed by now. But apparently it takes much longer than I could have imagined.
So, I am choosing to postpone the release until it has been resolved. I am a firm believer in keeping dates and deadlines, so it not something I take lightly, but as you understand, if someone sees the free videos I want them to be able to buy the complete Training DVD.
As soon as it is resolved I will release the website. Thank you for your patience!
Sure! I’ll wait with the trailer for the release, but here is some information:
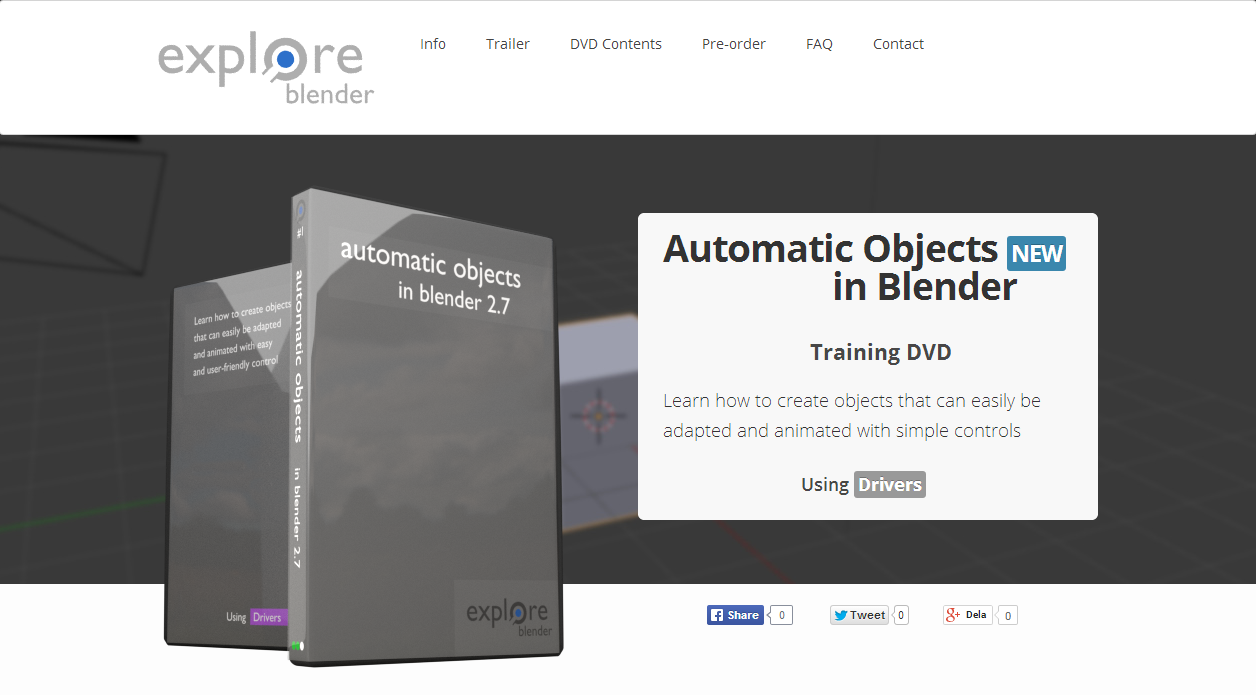
Automatic Objects in Blender - Training DVD
“Learn how to create objects you can easily adapt and animate with simple controls, all using drivers.”
The first part of the DVD consists of six preparation videos that covers the basics of shape keys, modifiers, armatures, constraints, drivers and properties. If you already know how they work, you can easily skip these videos.
The main part of the DVD is five tutorials showing the creation of five different objects.
In the preparation videos, you learn how the different tools works. Here you learn what you can actually do with them!


 I’ll wait with the trailer for the release, but here is some information: