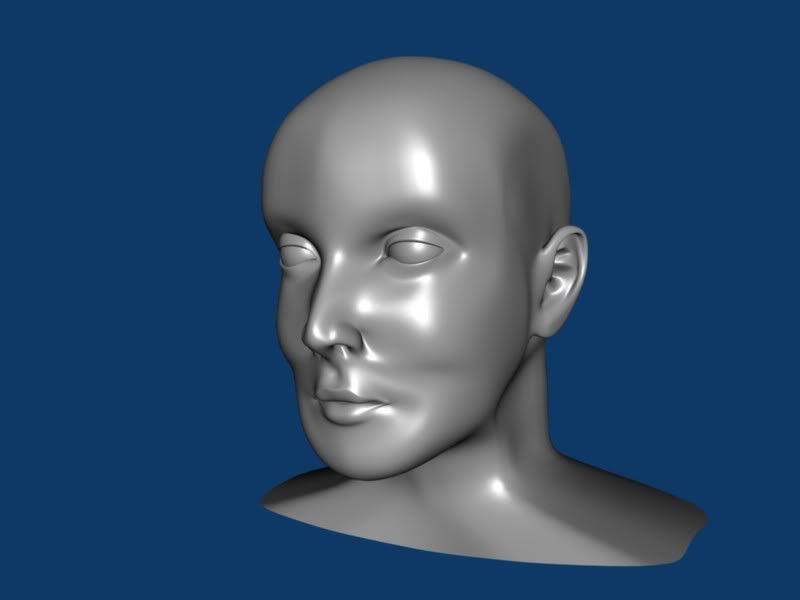
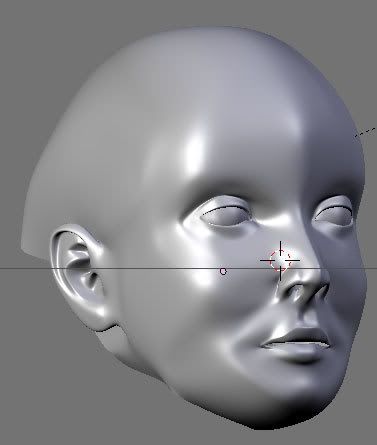
Greetings to all, I’m new to the forum and to Blender. I pretty much have zero knowledge in this thing and 3D animation although I have a background in design. I’m a Web Designer by trade but I really want to learn 3D modeling. Ive been doing self study through Wikibooks and some video tutorials and i made this 3D model.
I’m currently working on the skin/textures but i can’t seem to see the model with the texture on it when i render. Any help and comments would be appreciated.
Also are there any books and plug-in that you can recommend? I’m using 2.45 but most of the tutorials i encounter are either the lower versions or 2.50.
first post! welcome to the forum. post some wires of the model so that we can see what’s going on front, side and 3/4 perspective shot are usually helpful. the cheeks of your model seem too low perharps you should pick them up a bit. as for your material problems the first place to start would be to make sure your material is assigned to your mesh but if it is some more details as to what your problem is would be helpful.
P.S. “Riffraff” interresting alias you wouldn’t happen to be a rocky horror picture show fan?
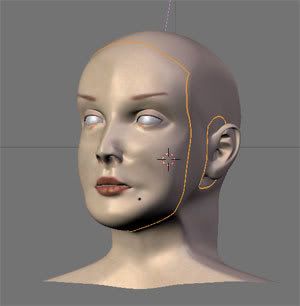
Thanks for the comment. I made some adjustments on my model (too bad i already applied the Mirror Modifier so its a little harder).
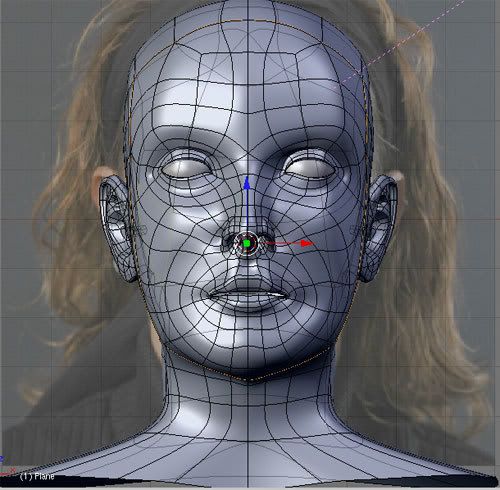
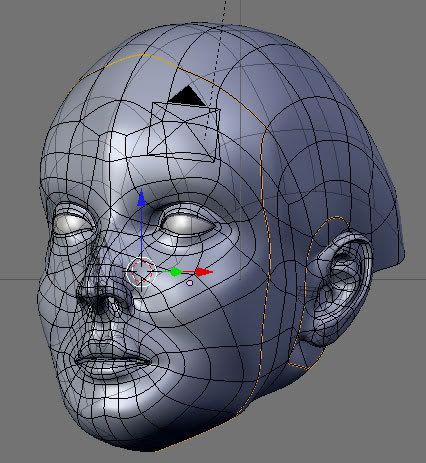
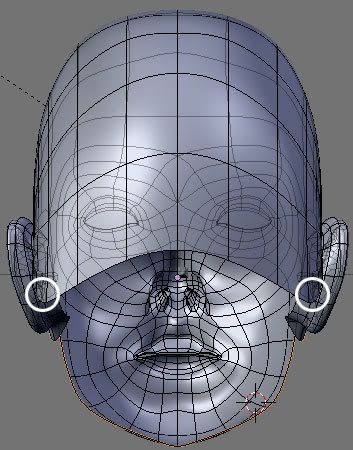
Heres the Mesh, although its not really pretty (i kinda lost the quad faces when i was making the ear and head).
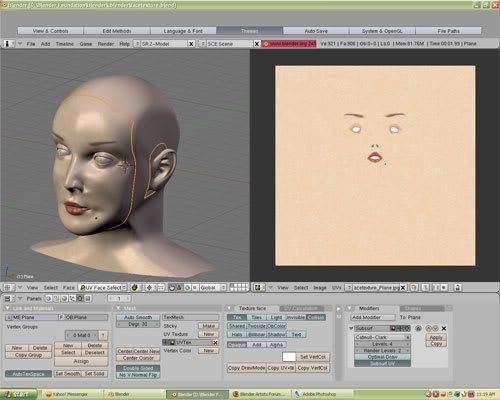
As for the material thing, i don’t really follow what your saying but ill explain what result i want. I already have made an image texture and added it in the UV Image Editor Window.
So in the Face Select Mode i get this model:
But when i try to render it to see the effect i still get the plain 3D model w/o the skin texture.
P>S> also i got my name from a Certain Character in a comic. I do love a good horror flick though.
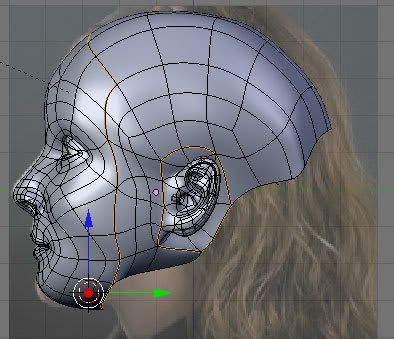
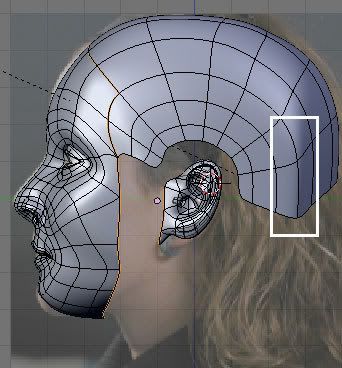
The face and the side views are looking good. You are following the facial features from your reference photos quite well. Except for the “chopped head” (beginner’s most common error). The head skull does not stop at the hairline. Watch your reference photo again. The side one in particular. You will observe that the top of the skull raises much higher than what you have there.
However, the 3/4 views look odd. If you have 3/4 views of your reerence head, then you should use it to adjust the mesh. Actually, the more different views you have of your model, the better. Once you adjusted all the views, then you have a pretty good reproduction of the reference model. If you only have side and face photos, then some good anatomy references would help.
Although this is a plausible 3/4 view, Currently, the side of the head looks like it was an extrusion of the face contour. You need to add some definition around the cheeks.
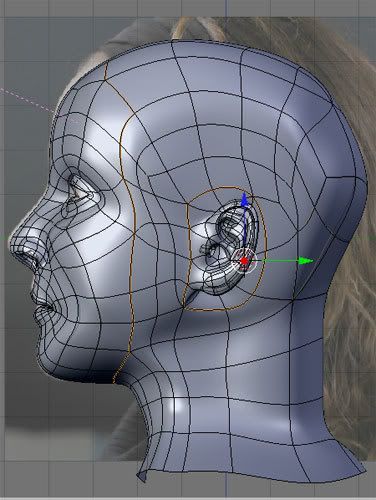
The neck needs major work. Especially the sternocleidomastoideus muscle (the muscle that extends from the joint between the clavicle and the sternum up to the back of the ear). And the neck side looks rather flat too.
By the time i was done with the head i noticed the things that you mentioned. I tried adjusting them but since i only have front and side pics plus my lack of knowledge to body anatomy it ended up like this. I might be able to fix the neck by redoing it and not by extruding from the head but for the cheeks thats kinda tricky.
For now im more concerned on getting the skin look like…well skin and not just some colored plastic plus im still confused how you guys do the hair with particles (generating it is easy, the thing im frustrated on is fixing it). Any tips?
Thanks for posting some wires. The definitely make the job of helping out that much easier. IMO I think you should put the texturing on hold for a while and get back to fixing your model. I second ypoissant suggested changes. If anatomy or face proportions are killing you, pick up Andrew Loomis’ head and hand drawing book it’s a gold mine of information:D. If you want to progress you will have to take some time off and study face proportions. Photographs always have perspective distortions and if your knowledge of proportions is not up to scratch you won’t spot them.
Though you say that you have already applied your mirror modifier, if you haven’t moved your object centre since you did, getting it back is pretty easy. Delete one half of your face and than reapply your mirror modifier and just stack it above the Subsurf one. Just a small tip for the future, you should make incremental file saves. They are extremely useful for when you want to backtrack, I do this a lot. If you name you file for example as face-01, when you use ‘save as’ to save your work pressing the ‘+’ key will automatically increment your file.]
[Your neck should be fairly easy to fix. I use box modelling to model my heads so what I do to get rid of the boxy neck is to select an edge loop(ALT+LMB), hide the unselected part of the mesh (SHIFT + H ) go into top view where its easy to spot the boxy corners and then flatten them out.
Your mesh also has a lot of misplaced poles plus its general topology could make it harder to tweak in some of the details of a face. Try and get a hold of some good meshes pictures and just study where they have placed their poles. Poles always reveal the topology of a mesh.
Thanks for the tips, i do have a backup file of the face, i might redo the neck and tweak some of the head. The cheek bones would be the problem since the vertices are limited (i might add more).
I do have some background anatomy but its more on comics anatomy (where proportion isn’t really a big factor).
I kinda rushed the rest of the head and the neck (typical newbie error).
I might head back to the books once i buy a Blender related book.
you have extend the back of the head to where its just about right. don’t try and replicate what you had before at the back i noticed a nasty 6 edged pole that you seem to have gotten rid off which in IMO is a good thing. Personally I would get rid of the one at the front but I have seen faces modeled with it in place so you can just live with it. you just need to push vertices around so that you get the form of the head right. Here are some links which I have found quiet helpful. There might be a bit much for someone new to 3D but there are lot of pictures of head meshes which you could look at to study. http://blenderartists.org/forum/showthread.php?t=93651
this is a longer version of the above material http://www.subdivisionmodeling.com/forums/showthread.php?t=907
this should give you a good idea of what you should focus on when learning to model http://www.subdivisionmodeling.com/forums/showthread.php?t=482
The 3/4 view looks better but there are several rough planes. You need to smooth the whole surface. I see an obvious plane on the cheek and a ridge on the front of the forehead.
You took care of raising the front of the skull (forehead) but that is not what I was refering to. The back of the skull is way too low. Again, observe your reference photo.
If you intend to animate the head for expressions, then the way you modeled the naso-labial furrow is going to give you troubles. You must get rid of the 5-pole there and move it somewhere else where it will be more controlable.
I got the sides of the read rounded by extruding and scaling it. Im still getting that sharp edge at the back of the head which i can’t figure out how to get rid of, i tried merging vertices adding more loops but its still there.:spin:
You lost me there during the getting rid of the 5-pole. Are you saying i need to smoothen the bridge of the nose (i did notice its a little sharp). I was planning to test animate too but only the eye lids (blinking) and maybe the mouth.
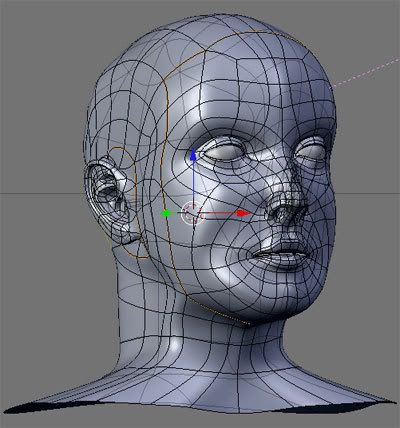
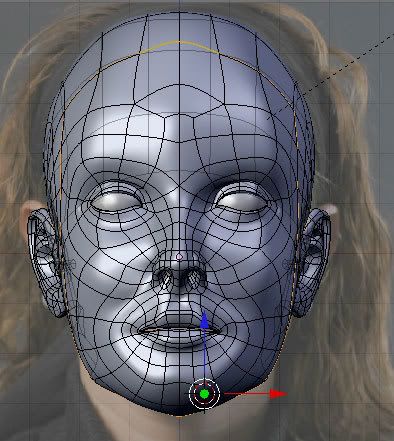
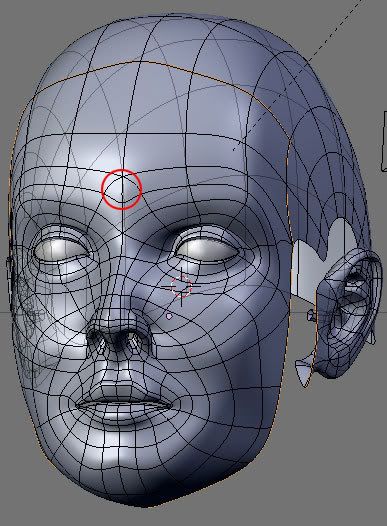
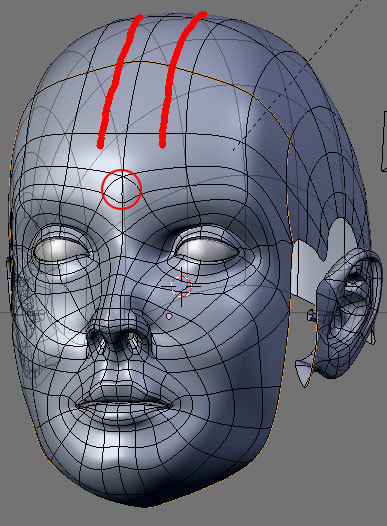
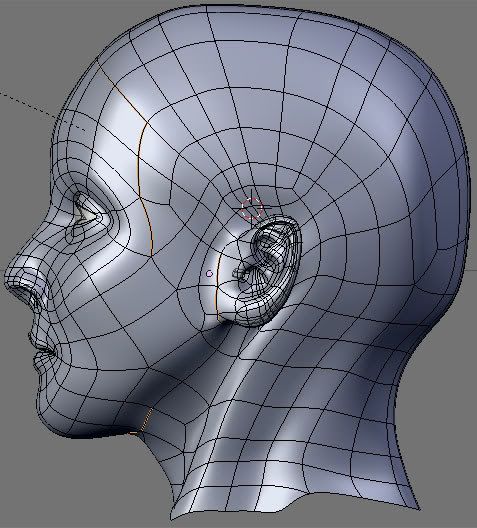
I circled the 5-poles (red) and the 6-pole (orange). And I circled the 5-pole I was talking about (yellow). This 5-pole will give you troubles when you will want to animate the mouth, especially if you want to express a smile or any emotion that creases the naso-labial furrow (the crease that descend from the nostril to the side of the mouth). You want this furrow to be made of nice smooth face loops. You want to place your 5-poles in places where the skin will not deform much. In this case, that means higher into the cheeks.
I was trying to get rid of that 6 pole (orange) this morning but its becoming more trouble some to get rid of than to just keep it. I made some adjustments to the mesh but i have to post them later since im still at work.
The more i get feedback, the more im beginning to think to redo everything from scratch with all the poles i need to take out/ fixed.
Read the first few pages of Someartist’s pole thread, the second link I gave you, he goes into a technique he calls ‘un-pole’ master that and you will be able to move poles around and better yet understand their effects on a mesh.
I also recommend reading the threads supplied by tyrant monkey.
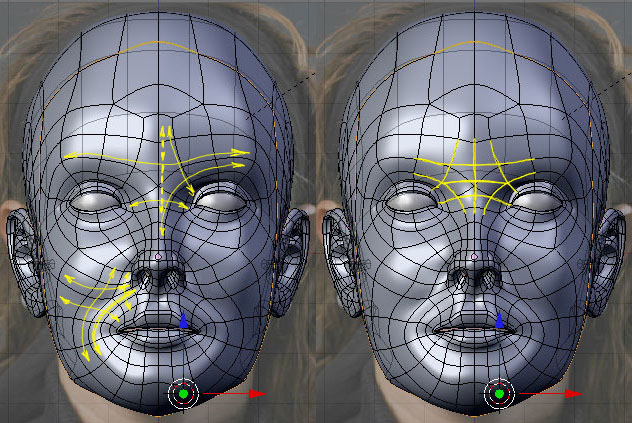
Your mesh is too low density right now to allow you to choose where you can put your poles. For example, the 6-pole can be converted to two 5-poles. I give you one solution in the right paintover. This solution is not optimal IMO because it places the 5-poles on a high curvature area but it can work if you are going for a low poly mesh. Ideally, This said, you can get away with the 6-poles at this position because it will not deform with animation. At least not with the mesh density you have there.
Converting a 6-pole to two 5-poles will always require that you add loops. You cannot avoid 5-poles because 5-poles are flow splitters and organic forms have a lot of flow splits. I’ve indicated the flows around that 6-pole and around the naso-labial 5-pole in the left paintover. So you will always have 5-poles around the eyes and the mouth and the nose and the ears. The craftsmanship is to place the 5-poles in a place where they will not cause issues and use the minimum number of 5-poles and 3-poles.
Starting over is a good learning strategy. Sometimes, it is better to stop hammering a model and start a new one using a different strategy. This said, in the end, you will always have to tweak your model in order to get a good mesh tolopogy no matter how you start it. Learning techniques such as unpoling will help you get through the tweaking steps.
I might try and edit it again, if it still giving me a head ache ill scrap it and redo it again (possibly with a different face sample with a 3/4 view). Thanks for the links tyrantmonkey, i kinda understand the concept a little now.
Ok i made some revisions ON THE MESH. Big thanks to tyrantmonkey for the links, it helped me fix the point on the naso-labial furrow that ypoissant mentioned. Now i run into a snag on the forehead as the image implies.
i tried ripping the mesh, adding another loop and cutting but every time i do that it still ends up the same. Also can you give any tips n how to fix that sharp edge at the back of the head.
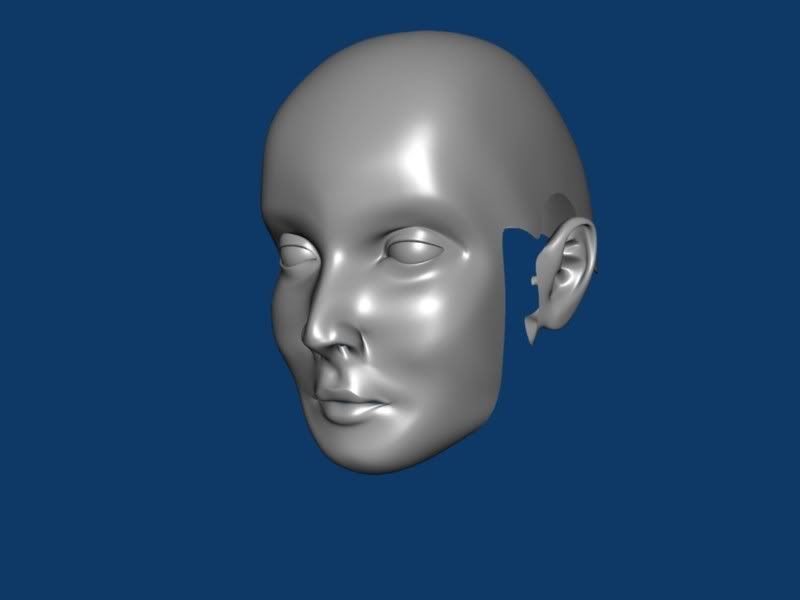
heres the render of the edited version (compared to the first rendition, i think it’s an improvement):
K im taking a break its already 4am:eek:
Further cleaned the mesh, aside from the triangles on the ear (i didn’t bother cleaning that since i wont animate the ear).
m not sure about the neck though, theres something weird to it. Also a how do you hide the grids that are not in the view? Its hard to see in 3/4 view with all that see through lines.
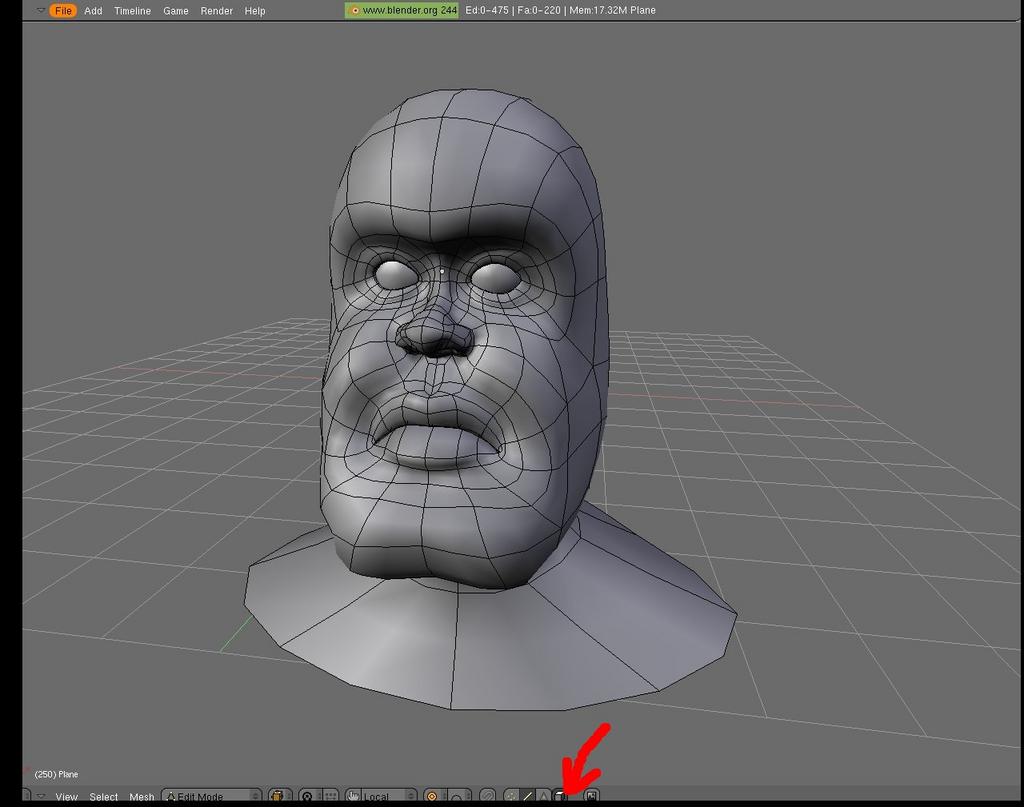
Sorry about the large screenshot in your WIP thread, its the latest one I’ve made. Notice the arrow. Click that button and you’ll solve the problem I believe you’re having.