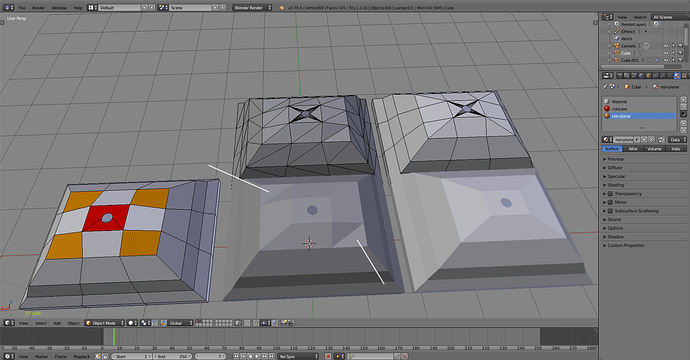
You have created a non-manifold mesh and the slicing program probably corrects it automatically. It’s non-manifold because you’ve opened the surface, and it now has open edges.
This is polygonal modeling, which is surface type modeling paradigm. What it means is that you’re supposed to model a surface that confines a solid. The surface itself has 0 thickness. For example:
- A glass has one surface, it’s the shape of the form that holds the liquid
- Same with a coffee mug with a handle
- If you didn’t have the hole in your original, you’re describing a solid block which the printer would print as solid block of plastic, unless altered in the slicer
- If you don’t have a hole but put another surface inside, opposite of the original surface, you’ve described a hollow object
- Adding the hole connects the two surfaces in a hollow object with the hole walls, so it’s one continuous surface again. It’s the form that holds liquid if you pour something in, just like a glass.
What you need to do is add thickness so that there’s an inside surface, and surface for the hole. Easiest way to do that is with a solidify modifier. Put it after mirror if you want both, modifier order is top down.
Red: concave polygons
Orange: non-planar polygons
With both, automatic triangulation and triangulation in export might fail to make clean results. It has done so in your .stl, pointed with the white lines. Both can be fixed by adding triangulate modifier. You don’t have to apply the modifier if you do that in export options.
You could also select the concave faces and mesh menu → clean up → split concave faces. Then select the non-planar faces and ctrl+T to triangulate. More destructive way but works.
