A few questions concerning Gamma correction

A few questions concerning gamma corrections

I want to setup what is called a “linear workflow” environment. I’m pretty sure I once read a web page that described how to do that in Blender but now I can’t find the page. What I want to do are:

  1. Apply a gamma correction to the Blender:Render window and in the render Preview window so I can adjust my lights and see what will be the end result.
    1b) BTW, I don’t want to apply the gamma correction to the output file because I am saving in an OpenEXR file and I want to keep the light data linear in that file. I will apply the gamma corrections as a post processing step.

  2. Apply the gamma correction to the views.

  3. Apply the gamma correction to material preview.

  4. Apply the gamma correction to color selection palettes and such.

Is there a way to do that in Blender and if so, how?

So… I understand that setting up a “linear workflow” environment in Blender is either not possible or nobody knows how to do it.

or no one saw your post. like me. or was inclined to answer. try giving out cookies; i find that helps.

look for it in my signature

Thanks Alvaro. I think we are on the same wavelength. That is a fine tutorial. You may find my tutorial on the subject interesting. In my tutorial, I explain how to color correct a render so it mimicks the way a digital camera color corrects shots to produce renders that looks more like photo shots…

I have yet to try YafRay. But what I’m looking for are not render related. Actually, I like to render without any Gamma correction and apply the correction as a post processing especially if I need to do additional post processing steps before applying gamma correction. As you probably know, any color correction should be done in linear color space. And one color correction I like to do is desaturate the dark spots in a render to mimick the way human eye perceive light in low illumination condition. Then, after the color correction is done, I apply the gamma correction.

The issue, with linear workflow, is to be able to adjust lights and textures in a scene with proper preview feedback. This means being able to preview the textures (maps or procedurals) with gamma correction and being able to preview the renders with gamma correction. Otherwise, one needs to render to file with gamma correction, then examine the file and make adjustments to the scene and start over the process of rendering, examine, adjust. Being able to preview the whole workflow with gamma correction accelerates the whole process.

In your “linear workflow” tutorial, you don’t touch on the issues of gamma correcting the previews (materials, 3D views and preview renders) in Blender. You mention that Gamma correction in shaders are not implemented though. But that’s all. Isn’t there any “Color management” widget in Blender?

I your tutorial, you show how to un-gamma correct bitmap textures in The Gimp. But you also mention that this makes texture very dark. The Gimp have a sort of color management feature in the “Display” menu called “Display filter” where you can set a gamma 2.2 correction so that when you un-gamma correct your photos, you can still see the textures as they will look after gamma correction is applied to them. This is the sort of color management widget I was looking for in Blender.

PapaSmurf,
So far, I haven’t found any hint about any sort of color management feature in Blender. And all the search I did on Google on that subject brought nothing. That is why I concluded that this is probably not available in Blender. Sorry if I sounded spiffed. I appreciate your help. I noticed that you are always there answering my noob questions and I thank you for that.

BTW, You advise I should try giving out cookies. What would that be?
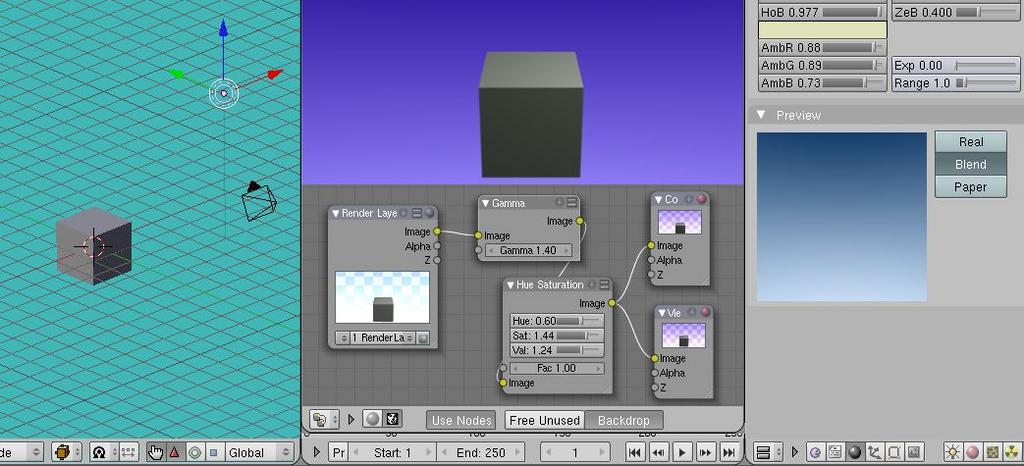
Well, regarding color adjustment and tuning, I wrote this tutorial on enhancing emotion into images post-pro, but it is not what you want i think, if you are looking for correction to some standard or to reflect reality of recording devices. In SVN I am using, there are new things to help you:
Lens correction
Glare
HSV (like to de-saturate)
Bright/Contrast
Gamma
Tonemap

But those are nodes. Now you can keep do a real-time from render to backdrop in the compositor, you know, so if you do your noodle, you might get what you want; where you like adjust the lighting and can see the compostied effect. I had a crappy digital camera and wrote how to adjust colors to correct/enhance phots for color/lighting defects in the collector.

Attachments


Well, OK. I can live with that setup. A few more questions:

  1. I don’t see a way to render a half or quarter size image this way though, to act like a sort of preview. I guess I need to temporarily change the render settings for that?

2a) Do I require to open the UV editor to view the composited result? Can I not use only the node editor with the backdrop?

2b) Is there a way to position the backdrop in the node editor? There seems to be an automatic backdrop placement algorithm that does not take into account the actual viewport of the node editor window and the backdrop goes under the 3D views.

a way to render a half or quarter size image th

2a) Do I require to open the UV editor to view the composited result? Can I not use only the node editor with the backdrop?

sure. set UV window to display rendered result.

2b) Is there a way to position the backdrop in the node editor?

shift mmw

I have yet to try YafRay. But what I’m looking for are not render related. Actually, I like to render without any Gamma correction and apply the correction as a post processing especially if I need to do additional post processing steps before applying gamma correction. As you probably know, any color correction should be done in linear color space. And one color correction I like to do is desaturate the dark spots in a render to mimick the way human eye perceive light in low illumination condition. Then, after the color correction is done, I apply the gamma correction.
Yes, in fact exposure and gamma correction settings in yafray are things that can be done in as a post process in a HDRI editor, if you save your render using a HDR format.

The issue, with linear workflow, is to be able to adjust lights and textures in a scene with proper preview feedback. This means being able to preview the textures (maps or procedurals) with gamma correction and being able to preview the renders with gamma correction. Otherwise, one needs to render to file with gamma correction, then examine the file and make adjustments to the scene and start over the process of rendering, examine, adjust. Being able to preview the whole workflow with gamma correction accelerates the whole process
You should really ask someone more expert than me. Maybe inverse correction of gamma can be done using Blender nodes system.

I your tutorial, you show how to un-gamma correct bitmap textures in The Gimp. But you also mention that this makes texture very dark. The Gimp have a sort of color management feature in the “Display” menu called “Display filter” where you can set a gamma 2.2 correction so that when you un-gamma correct your photos, you can still see the textures as they will look after gamma correction is applied to them. This is the sort of color management widget I was looking for in Blender.
I made the inverse correction of textures with the Gimp because Blender could not do it in the shader. With colors I did it manually, looking them up in a color table such asthis. The problem is that if you do an correction of 0.45 in a dark 8 bit texture, you can loose range than will turn into absolute black, which later Blender can’t gamma correct it.