Acrylic/Glass Block with Photo???

I’ve just discovered blender as I was looking for a way to create graphics for a website. It looks like it would be easier to learn the control panel on the space shuttle :wink:

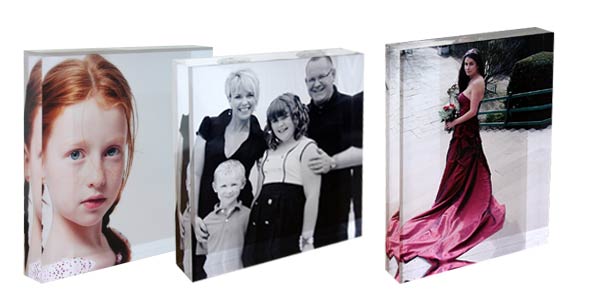
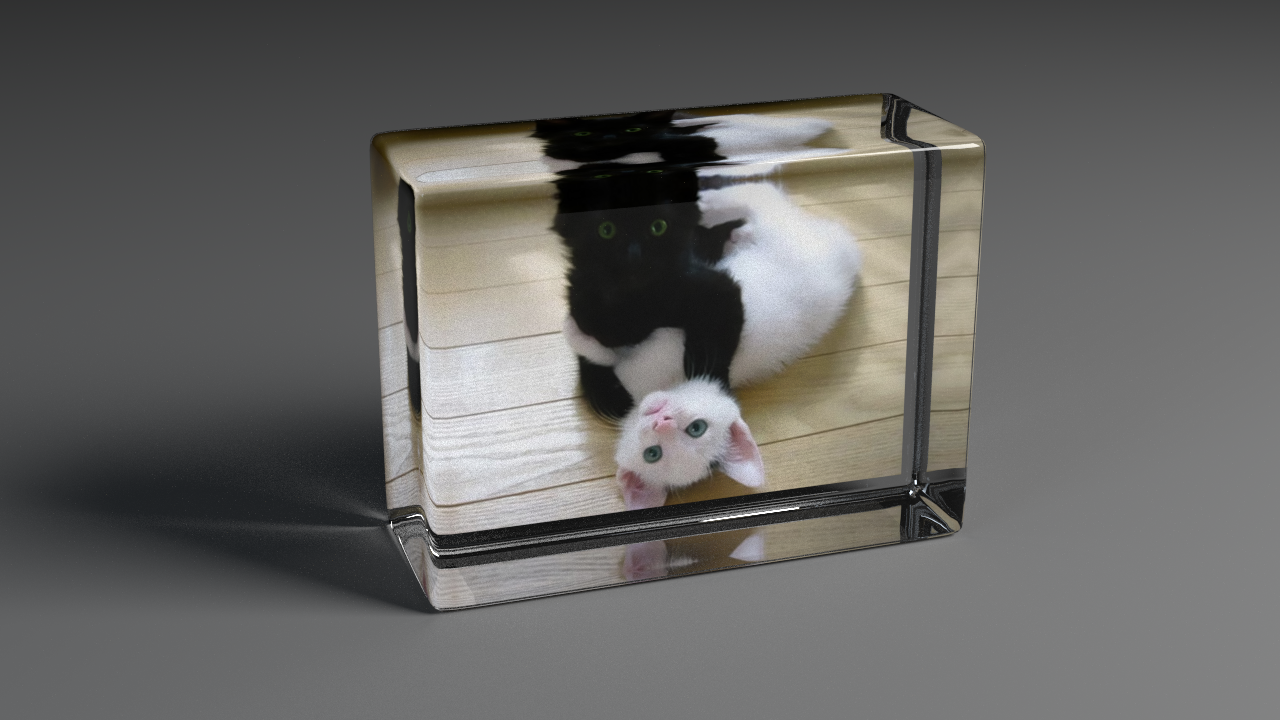
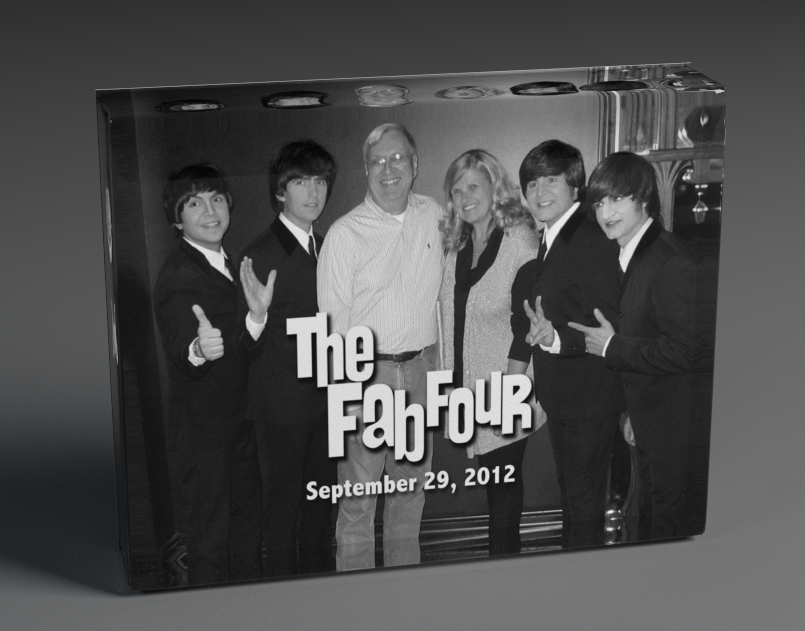
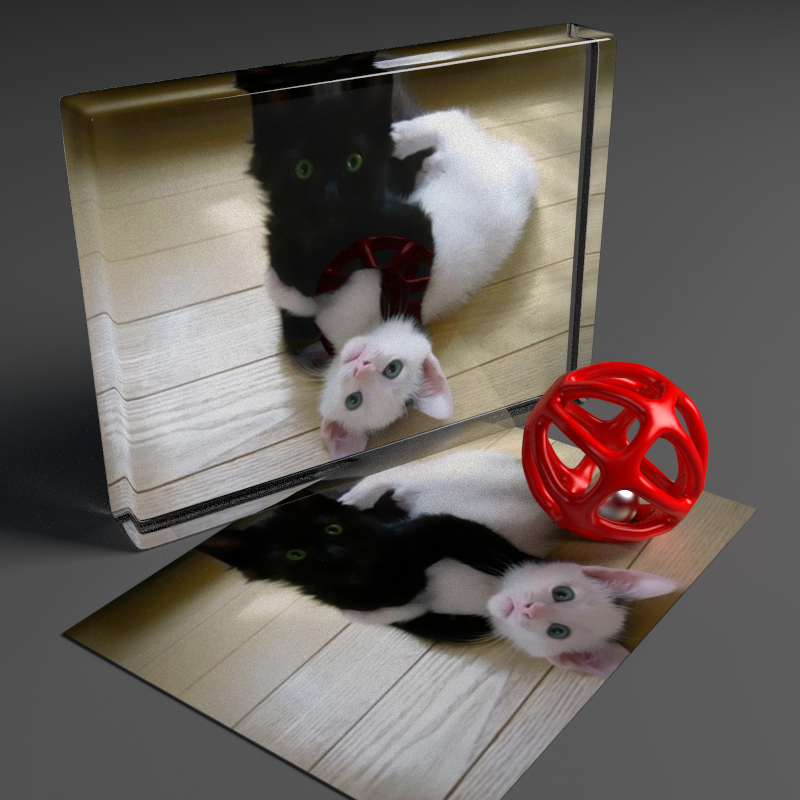
Anyway, all I want to do/learn is to paste a digital image on one face of a cube pointing toward the cube, make the cube a thinner block, and magically turn the block into a transparent, reflective, refractive clear glass/acrylic object so that the image would be seen through the glass (and not on the outside). See attached image of how I would want the final rendering to appear.

So, I’m thinking since each project starts with a cube, someone who knows blender could could probably tell me how to do this in less than ten steps or could please point me toward a tutorial/document that would point me in the right direction?

I would also eventually want to round the corners of the blocks to specified radii.

Thank you so much.

10 steps… A challenge! :smiley:

Switch to Cycles, resize the default cube, make it smooth, add a sub-surf modifier, edit it to add edge loops close to each face so that it looks like a rounded cube instead of a bubble, duplicate the back face, bring it a little forward, flip its normal, set its crease to 1, make it “flat”, unwrap it, create 2 materials (“glass” and “photo”), set “glass” to glass, find the IOR of the plexiglass (1.488), apply “photo”, go into the Node Editor to add a Texture and a Texture Coordinates nodes to the “photo” material, plug them, load your image, add some lights, a camera, do some settings in the Renderer panel, press F12.

Wait, wait, wait, wait…


I think I forgot how to count… :wink:

Seriously, it takes 5 minutes to do (plus 3 min. 41 sec. to render) but a very long time to explain to someone who don’t know the basics.

Start here: http://wiki.blender.org/index.php/Doc:2.6/Manual

The minimum you really need to know is how to select, create, and delete things… and what these things are: Objects, vertices, edges, edge loops, faces, the 3D cursor. Knowing how to navigate in the viewport (rotate, pan, zoom) is also essential.

When you know that, we can show you the icons, point you in the right direction and make courses step-by-step thanks to the shortcuts.

I suddenly feel the urge to do a tutorial: Absolute Beginners. :smiley:

Nice caustics too. Or are the Cat-sticts?

Thanks for the many tips! I am an absolute beginner and spent much of the day trying to learn the vocabulary and basics (http://cgcookie.com/blender/category/getting-started/ seemed pretty good) and I have a book on the way from Amazon. But at the same time, this project is only necessary till I have real products that I can take pictures of ;). I’d love to have a year or so to learn blender to your level of expertise.

I’ve been fighting the navigation and selection options on my Mac with touchpad all day, as I’ve never had a middle button in any application for the last 32 years. But that’s the standard.

I’ve also spent much of the day trying to figure out what I would consider a basic function, i.e. rounded corners (not rounded edges) with a specified radius. It looked like v2.63 solved this with BMesh bevel but took away the needed recursion option because of instability. Other ways to do rounded corners seem complicated and beyond my comprehension.

Maybe there is a revenue opportunity for experts here to formally list steps (for a beginner) in text or a video for focused projects like this. I wonder what would be a fair PayPal price for 20-25 minutes of expertise and processing???

Again, thanks, as I will spend more hours decrypting every single word of your advice.

BTW, I have ten year old black cat “kitty” but with hazel eyes.

You don’t happen to have your .blend file still around do you? What you created in 5 minutes is beautiful and exactly what I need. Maybe I can figure out the settings.

I’ve managed to do everything (except edge loops) up until using the Node Editor (which seems like another program to learn).

Checking… Yes. I still have the blend file. To distract me from my work, I made it ready to be re-used.

You just have to click the icon to replace the picture. You enter the dimensions divided by 1000. (For example, the picture I use is 1000x750.)

Select the PhotoCube which is a separate object and which display is set to wire. [TAB] to edit. Stay in front view. ([1] on the numpad.) You move the sides around the photo. (Select spearately all vertices on the 4 sides and push.)

[TAB] to go back to Object mode. You select both the Photo and the PhotoCube to raise them over the floor which is the X axis. (The red line.) The camera and lights have constraints to keep focusing on the PhotoCube. No need to worry about them. That’s all. [F12] to render.


PhotoCube.blend (992 KB)

Of course, since I worked for you, this file comes with a 50% license. Meaning that you owe me 50% of all the benefits gained with my file. :wink: Just kidding… Kissing my feet is enough. :smiley:

@ Kaluura

edit it to add edge loops close to each face so that it looks like a rounded cube instead of a bubble
… and since it might be handy - recent blender versions, from buildbot at least, come with Bevel tool - Ctrl-B; mouse move, then scroll to add some roundness. Add subsurf - done.
No need to struggle with Ctrl-R for such a task.

@ drmiller

to round the corners of the blocks to specified radii

In edit mode with default cube delete all vertices so that you’re left with thick orange dot representing Centre Of Gravity of object - Origin point.
If that’s done in default new file view, hit 1 and 5 on numpad. You’ll be in Front Ortho view. Now Ctrl- left mouse click add one vertice some distance Z up (that’ll be your radii from now on) and look on Toolshelf for Spin button. While at Toolshelf, down, set how many vertices you’d like to have.
Next, almost final part: on numpad - 7 - Top view; A, A will select all vertices and Spin again.
On this 1/4 sphere (if all went ok it should be there) Alt- right click (mouse cursor on edge between any 2 vertices) will select edge - E extrude that on appropriate axis.
I’ll leave you here with a task to apply mirror modifier to get the rest of the corners and further extrusions.
If done without pauses for reading, it’s actually pretty fast, precise and round ;).
Hope helps a bit.

Thanks for the tips! I really want the corners, not edges, rounded substantially. I’ll get the hang of it - eventually :wink:

Again, thanks. It took me a while to realize (on my Mac) why I couldn’t select things (user preferences travel with the file???).

Anyway, after about a half-hour I produced this!


(I know I raised the floor a little too high).

Now that I’ve played with this, and have made the block flat instead of smooth, I still haven’t figured out how to have a reflection appear on the face of the block. I just mean a “shine” with a line across the face with a lighter shade of white below the line. I’ve tried putting a plane with emission right in front of the block but the face does not seem to reflect that object (like light from a window).

So, what’s the trick for a glass BSDF material to reflect an external light source? Thanks!

There’s no trick, it should just happen.


(I still had the blend file.)

I put a copy of the photo and a cat toy in front of the cube. They don’t even emit light but, with the right angle and a not too bright background, the reflections start to appear. You should be able to do the same with a light… altho I don’t think it’s such a good idea. It’s usually a trick used in 2D drawings to stress the idea of reflection.

Any way, if you really want to do it, add an object emitting light flat on the floor in front of the cube, move it until you see a reflection. Then you can pull it away and make it stand. That should do the trick. Just don’t expect a curvy reflection to appear by magic, it happens only so in the comic books.

Thanks! (Again)

Bit of a material problem? But anyways, here is this example…


with antoher glossy on bottom it shoudl add some spec but you need some good HDRI or outside objects or light sources
to reflect on your ob

Note: Eppo you box is filled up for a week right now

happy blendering

Thanks Eppo for the glossy trick. I never thought about increasing the reflection of the glass with some gloss. Facepalm

Wow. It seems there’s always a way (and I’m getting to really like nodes).