[AddOn] RE:Lay (Updated For Blender 2.66)

You only have one object in the list. Just break the text apart into individual letters then add them to the list. An object per character. When you use the little arrow icon on the side of the target list it will populate the list with all object in the current selection. During the population process it calculates offsets for each object in the list. These offsets are what cause the delayed motion.

In the current release at the top of the page I have not included RE:Phrase+. RE:Phrase is a separate AddOn (available in the link of my signature) that breaks phrases into characters. In the original tutorial I was mixing the use of two addons to demonstrate how they can work together.

Here is a BLEND file already setup with RE:Phrase and RE:Lay together again! Select the RE:Phrase font object to edit the text. Select the RE:Lay cube to edit the motion.

Attachments

261_relay_rephrase_starter.blend (1.01 MB)

Atom,

I had it working okay, and I created this mini-tutorial for myself and any other novices.

…But then it just stopped working. I can’t figure it out. I’m following the steps laid out here, but I cannot get the Re:Phrase to work at all anymore. If you could see these steps and tell me where I’m going wrong, I’d appreciate it. It’s just not working at all anymore. I’ll change this “tutorial” once I see what went wrong.

RE:Lay and RE:Phrase

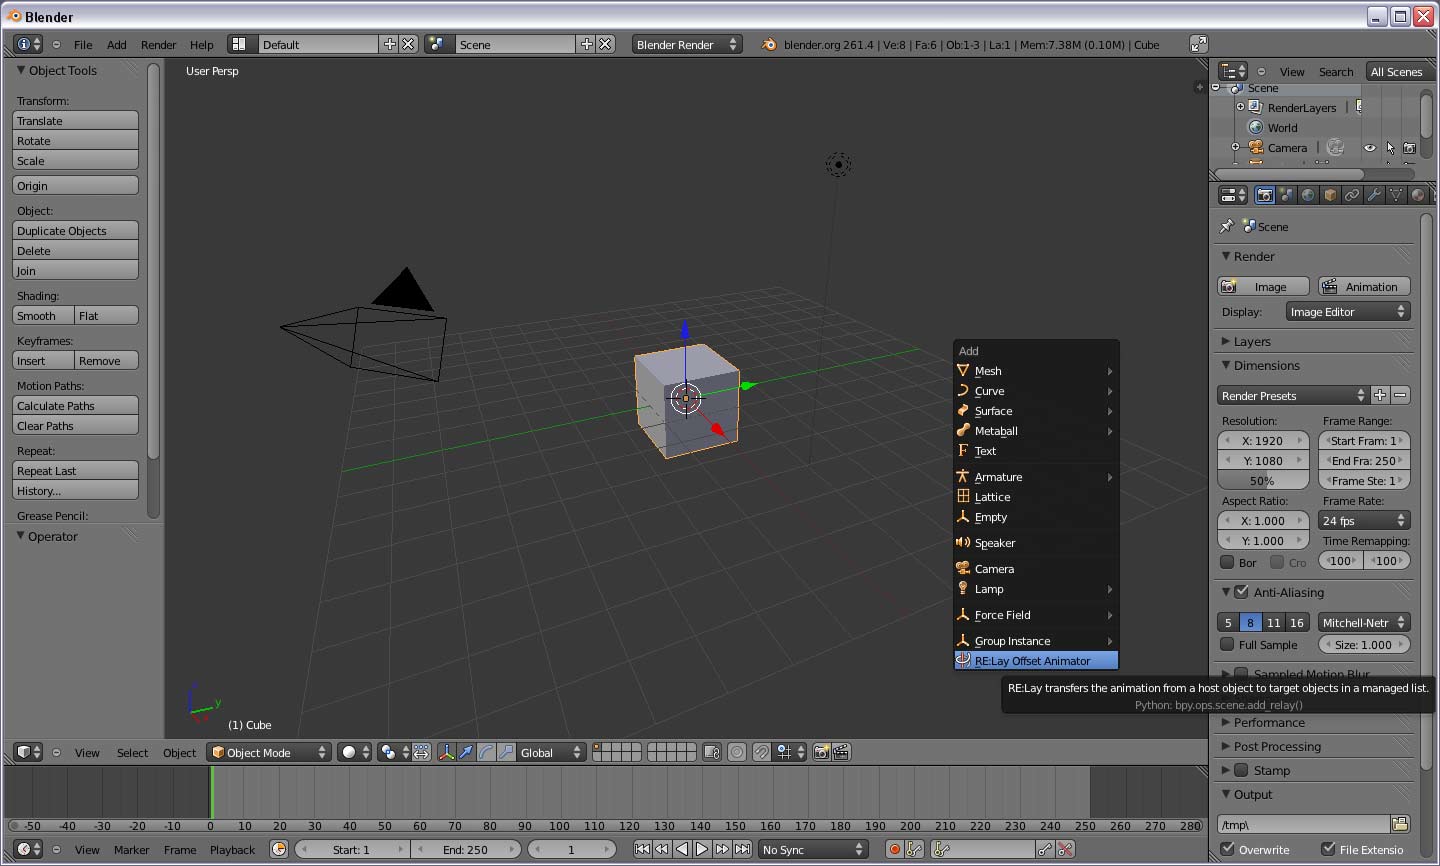
-Add a Re:Lay controller (after the add-on has been enabled, Shift+A > RE:Lay)
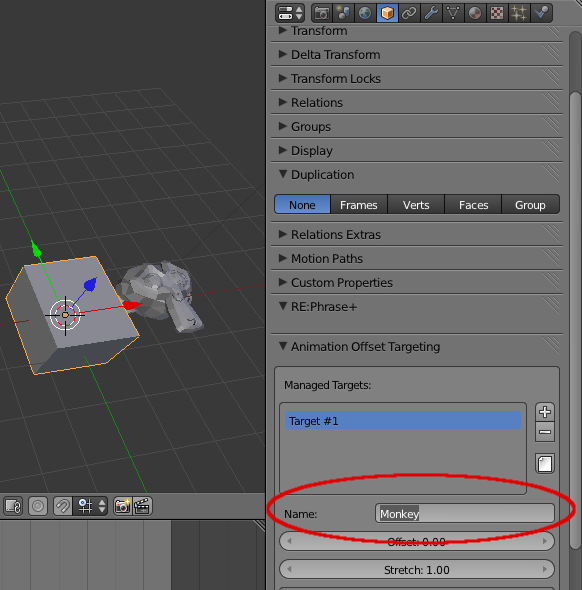
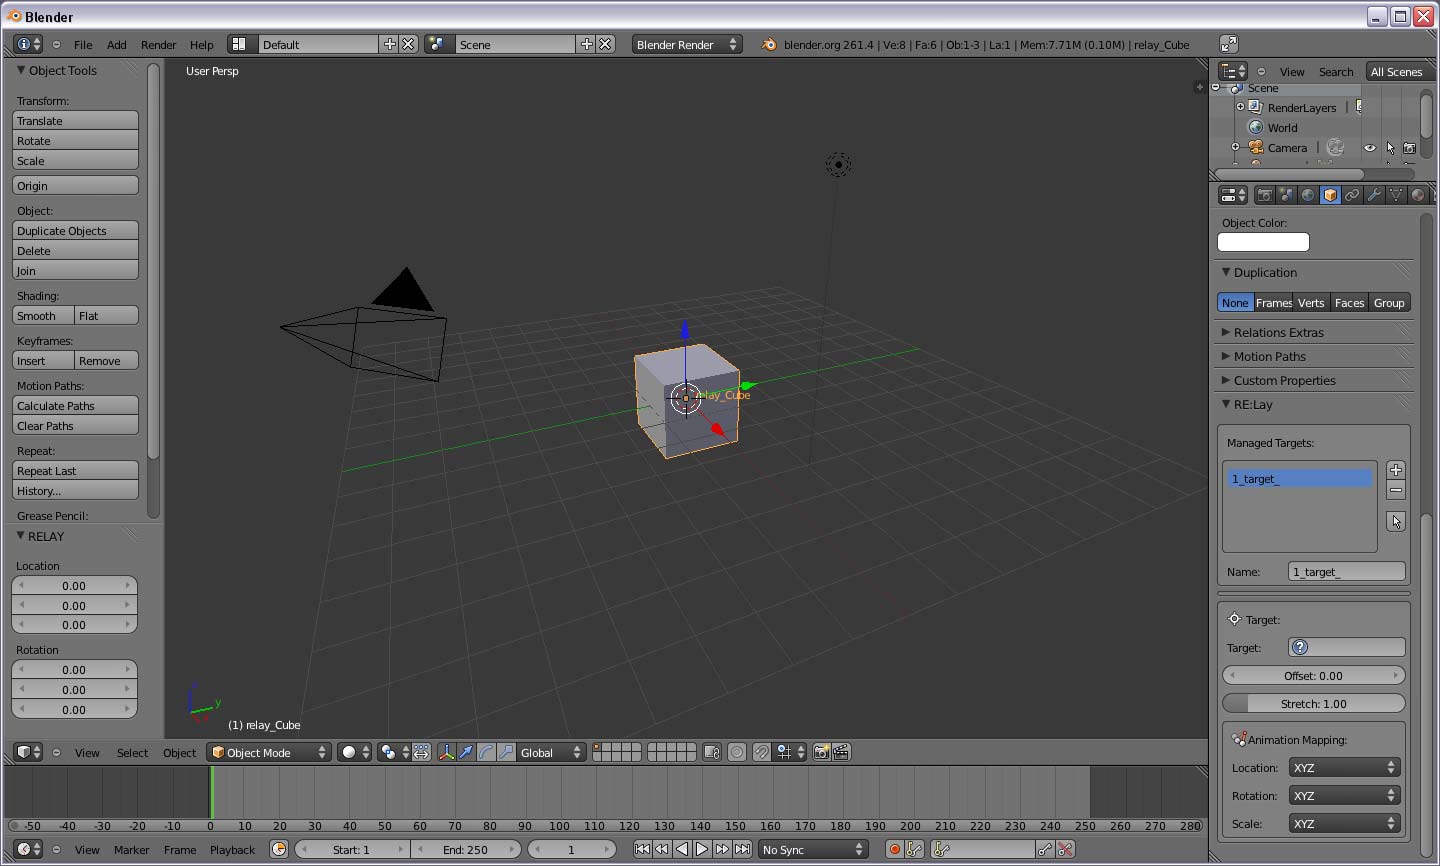
-Add the Object that you want it to control or get the precise name of an existing Object that you want it to control
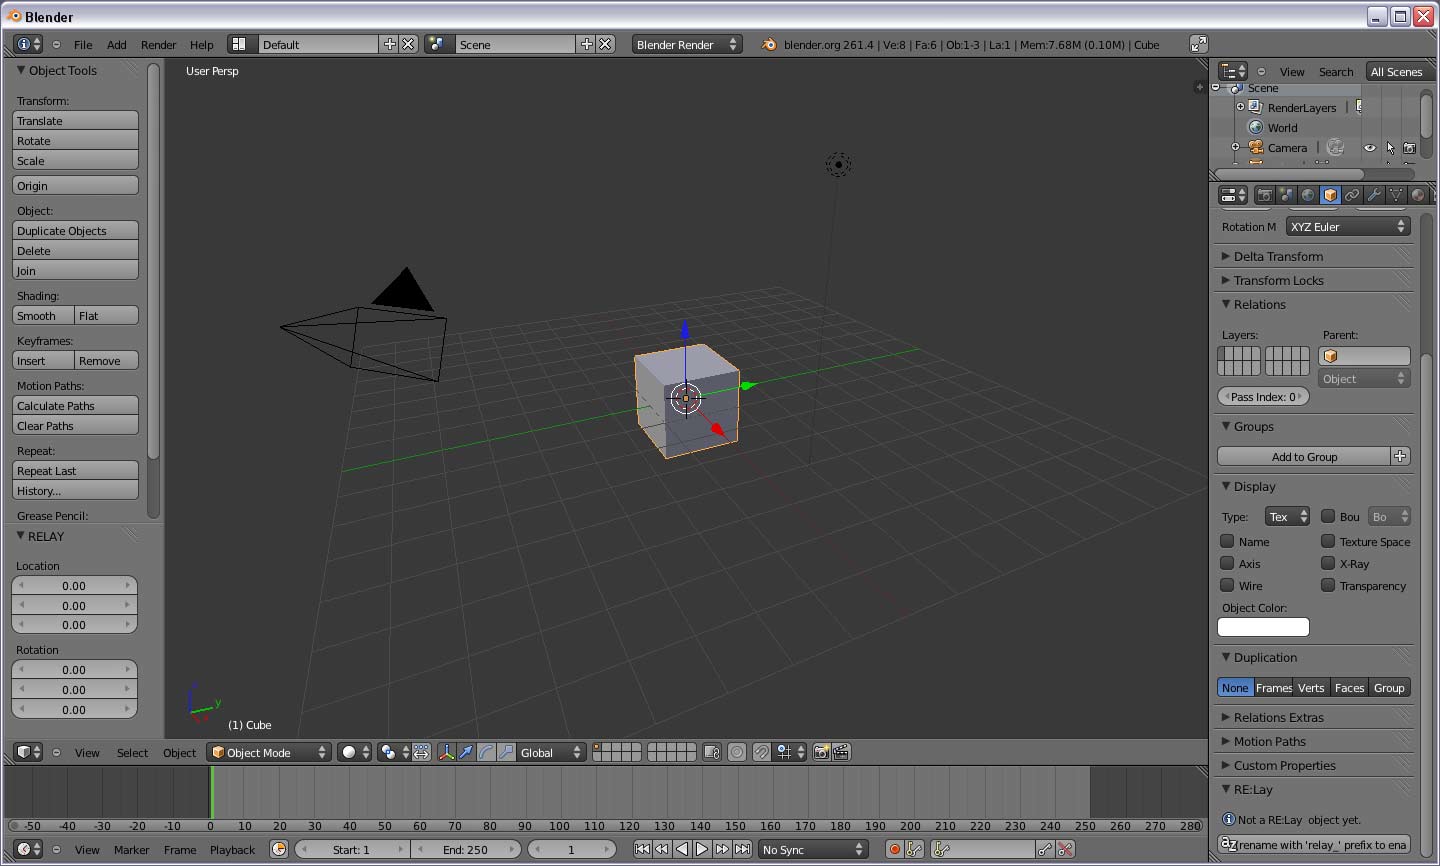
-Go to the Re:Lay controller (cube’s) Properties > Object panel and type (or paste) that slave’s name into this box:


-Animate the cube how you want the slaved object to move
-Control the amount of time you want the slaved Object to lag behind the Controller with the Offset in the context panel as shown above (though partially blocked by the red circle).
NOTE: This offset can also be in advance of the controller Object by setting a negative frame figure

FOR TEXT:
Follow the steps above save but adapt them in the following ways.
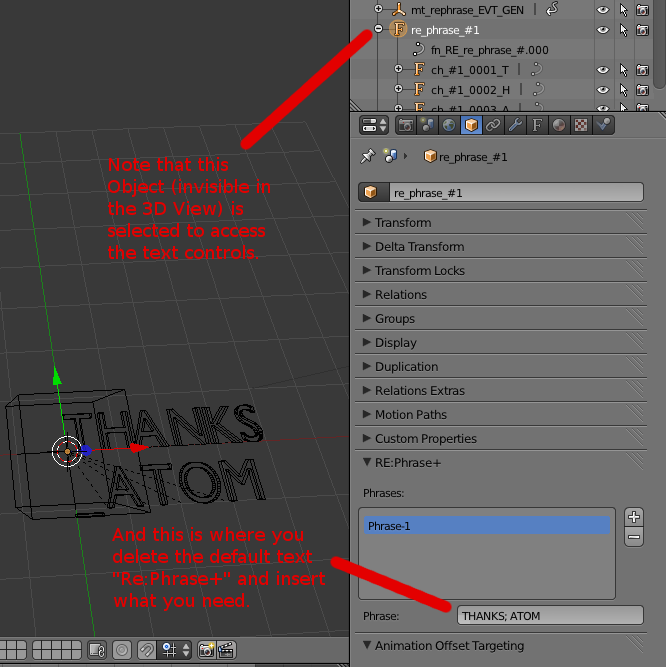
-The slave Object is added by Shift+A > Re:Phrase.
-Go to the Outliner to select the controlling box for the Re:Phrase text, as it is not visible (and therefore not accessible) in the 3D View
-Once that controlling object is selected, go to Properties > Object > Re:Phrase+ > Phrase
-Delete the default text (which are individual Text Objects it has generated) which is “Re:Phrase+” and type in whatever Text you want.


NOTE: Line breaks in the text are marked in that box with a semicolon - “;”. There are some odd rules about this and the spacing before and after the semicolon. Still, just playing with it for a few seconds should reveal the correct spacing and placement of the semicolon and spaces.
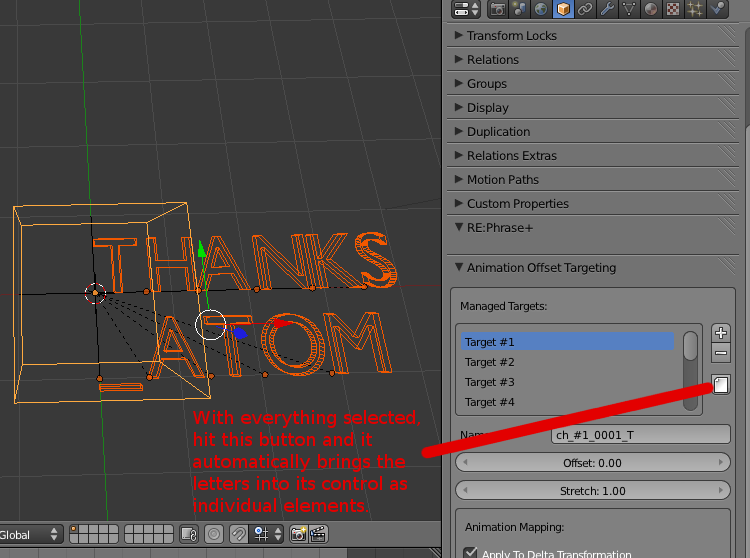
-Shift-select all of the individual Text Objects. (In the example here, this means the “T”, “H”, “A”, etc., etc., etc.)
NOTE: Don’t worry about the underscores “_” which show up in the 3D View. They don’t render.
-While still in shift-select, also select the controlling Re:Lay Cube.
-In the Properties > Object panel of the Re:Lay object (not the “Re:Phrase” one), go down to the “Animation offset targeting” and click on the little paper icon. This, then generates controls for all the text Objects


NOTE: Most people will also want all the Text Objects to have the same Material. This is achieved the same way it’s always achieved. Create the Material > select the Objects > Ctrl+L > Materials

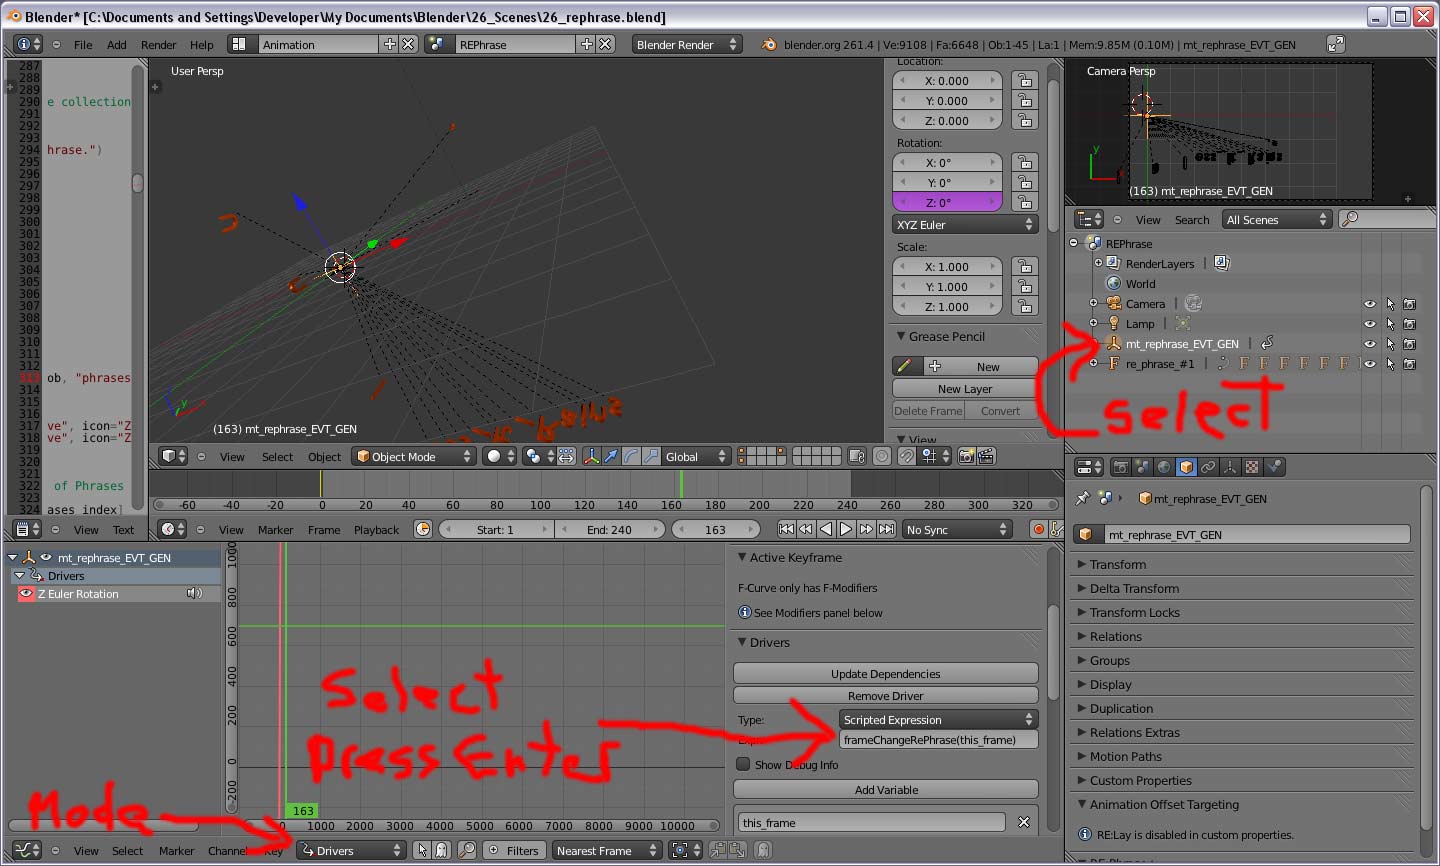
Well, I’m new at this myself (in fact, I wrote this out more for myself as much as others) and so this might not be perfect, and I can tell that there are some other funny rules and things with it. But this is the skeleton of the process, I believe.

Glad you are getting some use out of it.

NOTE: Most people will also want all the Text Objects to have the same Material. This is achieved the same way it’s always achieved. Create the Material > select the Objects > Ctrl+L > Materials
RE:Phrase manages the material for all the characters that it creates or displays (even if they are being animated by RE:Lay). So all you have to do is edit the single material applied to the RE:Phrase font object. Other font properties are transferred as well when the frame changes. Like extrude, font and size.

Atom,

For some reason, when I animate some Text and then close out the program (or, it seems really do much of anything outside of the text), the Re:Phrase just stops working. The Re:Lay controller still animates, but it doesn’t control the text anymore, no matter what the heck I do.

So, I just set up a huge Scene, over 3000 frames, and have it all topped off with some cool text roll-out. It looked great. Well, now I rendered it, and the text didn’t go, and now it’s not doing anything in the 3D View, either. Note that this was happening before, too, as noted at the top of my last post. I just wrote that off as a fluke, but it’s not. It just stops working, and then I don’t know what the heck to do to make it work again.

Hi, Atom!

I’m glad that you’re developing such interesting and useful addons!
Thanks a lot for this! :slight_smile:
Just tried your Re:Phrase+
build is r43830 for win32.
I think maybe something was changed in API so I can find only these properties in Custom:
Relay list @10 items@ (greyed out)
Relay index list @3@
Enabled @1@
So I couldn’t find any options to speed up letters. Unfortunately
I’m not a coder and really weakly understand Python.

Re:Phrase+ panel
Phrase is changing only after I start playing (it stays the same after enter new).

I would be cool also if you’ll add “Shear” for fonts and other things (if it was not).

Thanks again!

Please, tell me what was the revision of 2.61 that is working with Re:Phrase+? Official?

Also it will be cool if you’ll make a little addon that will be just breaking the whole text to single text objects (letters) and the root object will contain this phrase to change if necessary. Without animation :slight_smile: Actually - you’ve done this already.
Just wanted to use your addon with Liero’s “Parent to mesh”. It will give more freedom for different effects!
Oh, I forgot - Parent to mesh will parent these letters to it’s own object called “Padre” (to it’s triangle-faces by “hook to 3 vertices” as I understand). So is it possible to link your addons properties in such way that it can be used with “PArent to mesh”?

Moolah,

Are you having problems with the Re:Phrase not animating after a certain amount of time? For me, no matter what I do, it always just stops working.

If somebody could please help me out with this, I’d appreciate it. I just worked like heck at it for the past two days, made it the climax of a long animation that I wanted done before the Super Bowl…and now it’s not working (again). If somebody who’s good at scripting or work-arounds or whatever could please assist me - maybe on Skype or whatever - I’d appreciate it greatly.

David, unfortunately I didn’t used Re:Phrase a lot yet. Seems like it’s working (on that build I pointed on) but some things like auto re-target of letters doesn’t work.
Maybe you should try on the official 2.61 release, I guess.
Now we can just wait for Atom man :slight_smile: or somebody who deals with Python as good as he does.

That’s okay, Moolah. Thanks anyhow. I’m just keyframing the letters now.

RE:Phrase+ is on my ToDo list for the next AddOn update to the 2.6.1 API.

@David: RE:Phrase can quit working if it encounters an unhandled error either do to my bad coding or an API change. When an error occurs the mt_rephrase_EVT_GEN (event generator) becomes unhooked from the driver. To re-enable the event generator select the empty then open a graph editor and put the graph editor into Drivers view. Click on the Z Euler Rotation then press the N-KEY with the mouse over the graph editor to bring up the additional properties for the driver. Click on the Exp field to highlight the function call frameChangeRePhrase(this_frame). Press enter and Blender will re-evaluate the expression and re-link the driver. If the expression returns an error there is a little warning icon. If no error is encountered the event crank will, once again, activate when the frame changes.

Attachments


Hi Atom,

This one is niggly especially with custom drivers. Might pay to have an operator function that reenables the drivers by doing what you explained in script. like the revive disabled fcurves operator.


    driver.expression = driver.expression

does the job in a script as long as you know where all your drivers are.

Atom,

Thanks for getting back to me. I’ll give this a shot and report back.

Atom,

I followed those steps and, I hate to say it, but it still didn’t work. (In this particular instance, what I did was set up the Text and the animation in one file, then Append that Scene into another .Blend.)

As always, everything looks fine superficially, but the Re:Lay’s animation just no longer controls the Re:Phrase text.

It’s also worth noting that the main Re:Phrase control no longer controls the Text’s font or Materials, whenever this bad switch occurs. So maybe the problem is with the Re:Phrase’s controls?

Sorry it didn’t work.:frowning:

I have not done a lot of stress testing with appending AddOns from one scene to another. Have you checked the text window in your new scene? Perhaps the frame_rephrase.py just did not get appended? The Blender append function may not recognize that the script was actually operating upon the scene you imported, thus it did not append that text/script asset. If it is missing, try appending it manually then try to re-link the driver again.

If you post the scene somewhere, I can pull it down and take a look.

Atom,

Well, first and foremost, there is an acceptable work-around, and that is the old Bake Action. (Select Letter > Space > Bake Action > [select all options - Pose, Object, etc.]). Obviously, that’s not ideal because, the more letters you have, the more times you have to do that (although I didn’t try Bake Action on multiple Objects simultaneously, so that might work), but it is still relatively simple.

The issue isn’t ONLY with Appending the Re:Lay and Re:Phrase. It just seems that, basically, anytime you do really ANYTHING away from the Re:Phrase and then come back to it, it will just stop working. The Re:Lay always animates, but the Re:Phrase connections just get disconnected and, like I said, the Re:Phrase controller thing loses all its effect on the individual letters. I’ll attach a .Blend of the specific instance where I Appended it all to a new file, but please note that that was just one of many different situations where the Re:Phrase just stopped working.

Both the Re:Lay and Re:Phrase are now add-ons in my Blender files, and so I just assume that that means that all the script things are okay? I really don’t know much about that, really. When I attach the .Blend (it’s rendering right now, I’ll wait until afterward), please take a look at that, as well.

Thanks.

Atom, I just watched this video and it remember’s me the Re:Lay add-on that you wrote here:


It’s called “anim transfert” and it’s for max. I like to use you add-on, Re:Lay.
Is it possible to transfer the animation of an object to others respecting they local position and with the offset option?

That is interesting. It does look like the 3DSMax version of RE:Lay.

RE:Lay transfers the animation from a source to a list of targets. When the OBJECT based f-curves are transferred the new animation is applied to the DELTA transformation of the target. This leaves the local position alone. So yes, the local position is respected and left for you to animate or reposition as needed.

How do I install this add-on? Do I need to install booth scripts: frame_relay.py and addon_relay.py?
I installed just the addon_relay.py and enabled it in the add_on list. When I use Shift+A to add a Re:Lay Offset Animator nothing happens… even if I already have an animated object selected with others in the list of targets…
Am I doing something wrong os the script is broke again? I’m using Blender_43930…

When I use Shift+A to add a Re:Lay Offset Animator nothing happens
Correct, nothing visibly happens in the scene. But the internal RE:Lay processor is now setup to convert existing objects in to RE:Lay source objects. For instance, lets assume you have the AddOn installed and it shows up in your SHIFT-A menu. Once you have added it to the scene, select the default cube and activate the Object Properties Context TAB. Scroll to the bottom and you should see a button that will allow you to convert the default cube into a RE:Lay source. Once an object is converted to a source additional panels options become available.

Step 1: Install RE:Lay into the scene.


Step 2: Convert a selected object into a RE:Lay source by clicking the button.


Step 3: Add targets to the list which will receive the animation of the source, altered by the parameters for each target entry.


Keep the timeline rolling to edit on-the-fly.