I’m hoping some of the more experienced users here will be able to help me on how to make a facial rig like this is:
Was that made with bones or shapekeys or maybe even both?
I’ve made facial rigs of only shape keys with drivers attached to bones and my experience with these is that they very very limited. Shape keys just go from A to B in the most effective way as possible unlike an Action, which means that you can’t create complex facial features with shapekeys unless you have like 1000 of them and how do you even add those keys to bones? A bone can only have a few shape keys at a time, yet in this clip I see the user moving those bones around, specially around the mouth that seems to activate way more shape keys that is possible. I assume it’s just bones right?
I generally think a facial rig made of entirely bones is something far better then shape keys because I think it allows to make a rig like that. I mean, I’m not sure, that’s why I’m here.
As per usual there are no tutorials or courses that I could find that focus on an advanced facial rig like this, but I truly want to learn how to get a rig like this for my characters. My character which is just a head is done and I would like to try and create a rig like this, hopefully someone can shed some light on this and help me along the way.
wiill first i think it,s done by both shape and bones,
i made a short review of a face character that i did, using shape keys and bons ,
you can add as much as you like of sheps to one bone, and it depends on how wil it control it,
ROT LOC or even SCALE ,
i didnt upload the full videos yet but i am in the way to.
sadly i dont have a good internet to make tuts ,but if you have any question just ask,
also i uploaded the model in a blend file if you would like to check it out
run this name out on youtube (Creating Facial Shapes in Blender) by CGMASTER
If you want to watch someone create a nice simple face rig, starting with the mouth and working through the other parts, then I would recommend this tutorial. It’s a little advanced but not so much you can’t slow it down to see what he is doing and MSMD it. I have used this rig a few times. As a side benefit, you will see how he manipulates auto weights so he really doesn’t have much to do when he is done. Well worth going through.
If you want to get into more advanced, suggest you just look at the PitchiPoy head rig in rigify. Or even more advanced, the BlenRig has really nice facial features as well.
Although he starts with the mouth, he couldn’t resist putting in the rest of it. It is also in spanish if you prefer that.
If I were attempting what you are now I would strongly suggest going a hybrid route. Shape keys but augmented and enhanced by bones. This is simply because this is always the way I’ve known it to be done on most animation projects I’ve worked on.
These many purely bone driven face rigs are impressive to look at often. But in a normal studio schedule they would normally be impossibly time consuming. And it is not exactly an artist friendly workflow either. Its far more straightforward and quick to have somebody ( … normally the original character artist …) model and sculpt a list of mouth shapes and brow expressions in ZBrush. Rather than a rigger TD/animator, trying to fight with joints and skin weights in Maya. I just recently riigged a whole cast of characters for a TV pilot using this workfkow. We used
an auto rig app for the bodys but all the face rigs needed to be custom. We used Maya’s blend shape node to combine two rigs into deforming one master render face mesh this case. Its not really possible with Blender shapekeys as they dont run moving deformations . ( as far as I know ) But its still possible to make a good straight forward hybrid rig in Blender with bones and shapekeys.
When combined with some broader bone based control these hybrid rigs are very flexible and expressive. And for most small mouth shapes and other subtle facial shapes the straight A to B nature of shape keys is not noticable. And there is far more control and ability to swap and change when simply sculpting them.
I really like this information you decided to share. Although I’m confused, how do you mean sculpting shape keys? Won’t that require a very high poly mesh or atleast something with multiresolution on?
You would model and sculpt with the same base level mesh you plan to skin and rig.
But of course with a sub division modifiier on top for accurate feedback and reference.
You can do this just as well in either ZBrush or Blender’s modeling and sculpting tools .And best of all you can work in symmetry mode too. At my last place the Character modeller preferred ZBrush for this. I love both programs but I normally use Blender for modeling shape keys when working in house with Maya and co… You could use Maya for modeling them too but … Its not as nice. At least not for me.
Use separate control bone sets for driving the shape keys and the bone deformers so its always obvious what is getting animated. Normally is best to use shape keys for fine precise poses.Lip shapes etc. Then the bones to augment and enhance them with broader facial movement. So at its !ost basic level. Some fairly simple lip and mouth bones can make an endless variety of asymmetrical poses for the mouth when combined with the standard speech shape keys. As in … Ahh eeee Ooooh Mmmmm.
Hmmm…The problem I have with shape keys, I’m never sure where to start. For example lips, I always do shape keys to pull them down/up, to the sides, and that’s it. I tried to do shape keys that would be activated diagonally but I just can’t figure out how to do that. And another problem I have is that after the shape keys are done, then they don’t seem to work well with eachother, requires endless tweaking to make them work with eachother.
sometimes i upen the most commen shape keys at 0.5 and work to let them mix, of course its hard but i think the results are going to let you forget all the pain you got into
I always think the best way of starting to model shape keys for the lips is to skin and rig in a jaw bone first.
If you are just starting out doing this I would suggest first creating some classic speech shapes. These would be … Aaaah … Eeeee … Ooooo … Mmmm.
Just look up a traditional animation speech guide. You can animate any dialogue with just these four basic shapes. Using Shape keys these four basics also will create a multitude of other shapes as they mix together. Personally this is how I have mostly preferred it in the past. And others might have different opinions. I started in CG before a lot of established patterns were set in stone. So tried lots of methods.
These days it’s become more the trend and most common working practice to have many controllers around the lips and many subtle Shape keys or bones controlled by them. The basic speech shapes are then mainly saved as poses. Most of the rigs I’ve done in recent years followed this method. But for starting out I would suggest try the more basic method first to get a good grounding in it. But is up to you.
If I am doing my own projects where speech is required I would probably go the basic route. I can’t bare setting up all those tiny shapes. I always think there are too many key frames on a lot of lip sync I see anyway. If there are to many keys and too many Shape keys all working across each other the lip movement can look quite choppy. I’ve always Preferred to keep it simple. But that’s just me. I originally started out in traditional 2D animation so learned it all the traditional way.
I don’t necessarily need them to talk, but I need to be able to do facial expressions that are natural and convincing on a photorealistic human face which is what i’m trying to do on most of the time. Not sure if there is a major difference between doing it with cartoony or realistic characters. Or if those methods work the same way for both styles.
I never really saw that much difference between the two ( … realistic vs cartoon … ) rigging wise. Set up is the same in most cases as far as I’ve known. But others might disagree. But I’ve been dragged though the time and money rigging fire many many times now.
I personally always look for the most sensible solution. I can’t bare anything that is more complicated than what it needs to do. What’s most important is the visuals and animation. The rig only needs to do what it needs to do in service of that. No more and no less. A rig is what the name implies. Simply a rig. And if a special case comes up during the project. Then it can be adapted , or a one off custom rig quickly set up.
One of the most important things is also that a rig and character set up be reasonably easy to fix and trouble shoot. Also quickly re jig and customize. A lot of times that gets forgotten. But it’s so important on a production rig.
I suppose I over complicate things on my rigs a bit, specially the facial area, but it’s something I aim to change. Do you mind me asking I you also rig spines?
I’ve tried using an IK Spline spine on my characters but I’ve never managed to get it fully working, so I use a system that has bone parents controlling the spine bones trough copy rotation constraints.
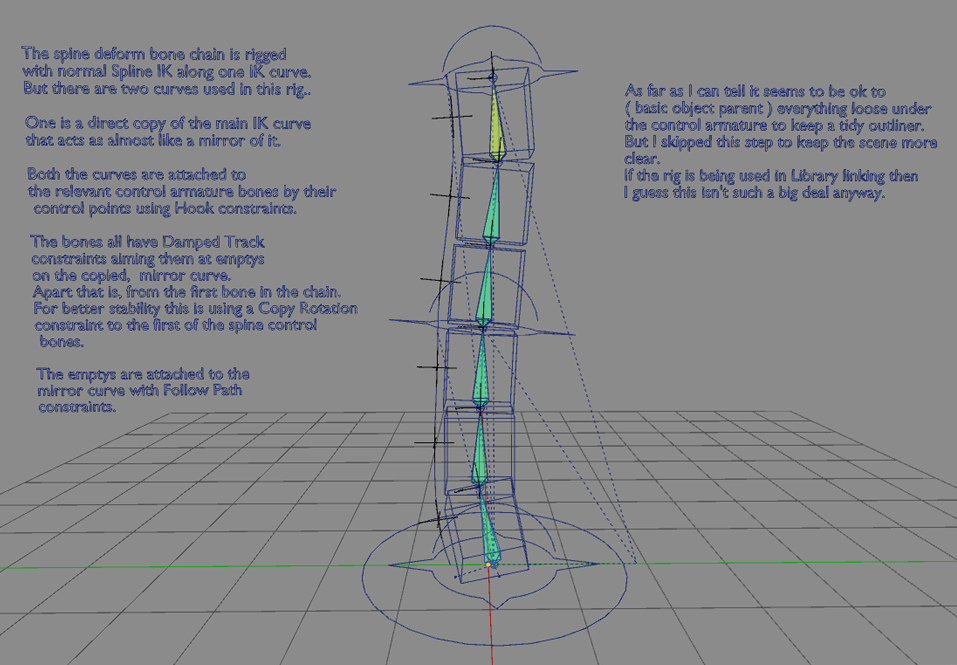
Well I used this method in Blender. I have a demo scene and used to have it in my signature. I’m not sure how to do a signature in the new forum or how to publicly post a file anymore. I’ll see if I can directly upload it here.
This method is based on one I used in 3DS Max for many years. It gives you a very stable and robust spline spine set up similar to the classic Ribbon Spine method in Maya. So it’s really great for quadrupeds especially.
I started using this method before all the new bendy bone development though so I’m not sure how much they can replace this method now. So worth looking into bendy bone options as well.
You do need to use two rigs because of legacy dependency graph issues. ( … Although this should be fixed in 2.8 … ) So the way I approached rigs like this was to create a pure deformation bone rig driven by a pure control bone rig. In a way it makes the working a lot cleaner. It runs fast too. At least does in my rigs. You would probably often need to use this sort of Deform and control rig set up on a game engine rig anyway for export.
I used it on this small dinosaur rig when I was starting out with Blender. All the way down the spine, tail to head.
Hmm…I think I remember coming across this or atleast something similar to this some time ago. What I didn’t like about it, is how it stretches, which for non cartoony characters could be a bit strange no? I could be wrong.
Hey it might have been this one. I posted it a few times in the past.
As for the stretching. Stretching is cool. Both for cartoon and realistic characters.
Spines in real life flex and move in very dynamic ways. Especially something like a running and leaping cheetah. Its very hard to create the full dynamism of a real life organic and elastic skeleton with connective tissue and muscle in a rigid simple jointed rig.So having stretching built in is becoming a popular and desirable feature now for all types of character.
Also extreme poses are often exaggerated and overtly sqaushed and stretched even in realistic looking animation.
Besides the stretching also helps keep the IK spine more stable and prevents pops and glitches. The amount of stretching is entirely down to the animation though. If you don’t want any excessive stretching. You don’t have any excessive stretching in the poses.
This example in the file is just the basic raw IK set up though. Which might have caused some confusion. In a humanoid rig especially … Ideally you would want to rig it up to a first layer that is just FK rotation control. So you also get the nice FK arcs.
Perhaps I should have a version of the file that includes this ?
If it isn’t too much trouble, I wouldn’t mind seeing an example of a fully functioning spine rig for a humanoid or a creature of some kind like your dinosaur.
I honestly had no idea that stretching was so important for rigs of all type. I just imagined it being only for cartoony characters. There isn’t a whole lot of information about rigs available outhere sadly.
Here you go. This is pretty much a classic style Maya FK and IK spline spine but in Blender. I had the more basic IK only set up before to make it clearer. I made the original file for anyone already familiar making these sorts of rigs in other 3D apps who might want to do it in Blender.
So this was done very quick and rough on my old mac laptop I use for the internet. So not super tidy. The main controls are now a basic FK hierarchy, So you would animate them first for your main poses using rotation. Although I left the option to move them too. But really you would mainly animate these with rotation.
Then you have a secondary control layer under that which is the IK one. This is the basic IK control rig from before which has now been directly parented to the new FK controls I made on top of it all. So now keying in IK using the cube shaped controls you can go in and move around the spine even more. Squashing and stretching it. Do a hip wriggle whatever. No limits.
Remember that the controls or bases for the neck and head and clavicles and arms need to be parented and moved by the IK level controls. So when you move the IK controls in the spine the rest of the body comes along for the ride.