I’m wondering how it is possible to cleanly model a plane windshield …
I have the shape of the joints correct, now, which tool should I use ? Some already advised me to use the Edge Toold addon with Splines, to control the number of segments and shape, but don’t know how to use it at all ( and tried several time … )
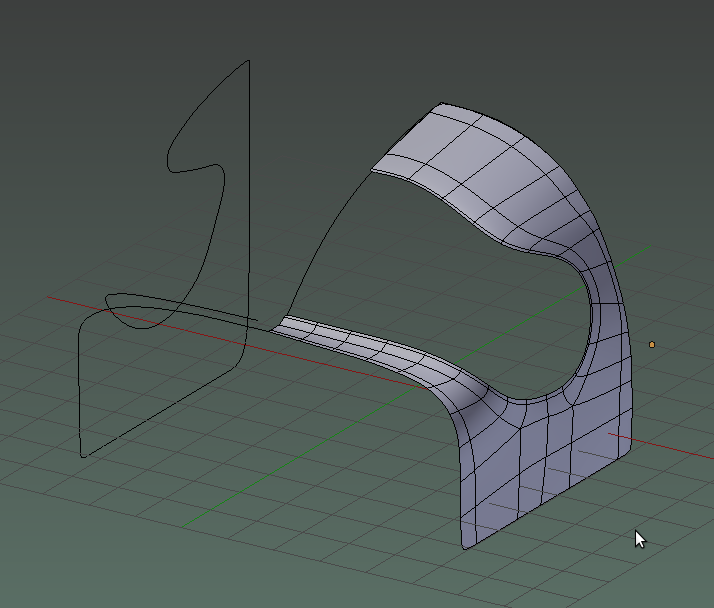
No, actually I got the " metal parts " correctly done, just want to model the plexiglass transparent windshield now, a kinf of bubble that is linking all edges : http://imageshack.us/a/img811/7994/neix.jpg
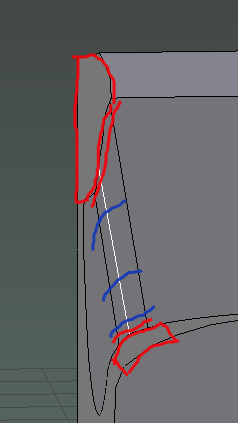
Yeah, that makes a difference. Again, from what i see and half imagine (frontal view needed) upper part where front part of the wing is, this can’t be straight - it needs to repeat curvature (blue) from the front corner (red double lines). Bsurfaces might help - add some bezier curves and try to ‘skin’ using Bsurfaces addon.
Select curves, when done, in Object mode, join them. Shift select cabin and switch to edit mode. Then, if you’ve added Bsurfaces there will be Buttons on T-panel. Add surface, see what happens.
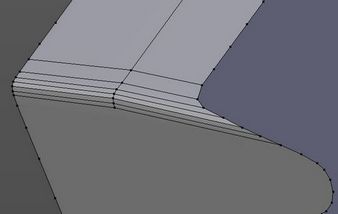
This is with some duplicated front loop converted to bezier curves.
It might sound… however it’s not so hard, really. Bsurfaces has one tutorial - feature row on vimeo. Jaw dropping stuff.
Meanwhile here’s the blend, hope helps. All thanks to LoopTools and Bsurfaces addons. And Blender of course ;). http://www.pasteall.org/blend/22993
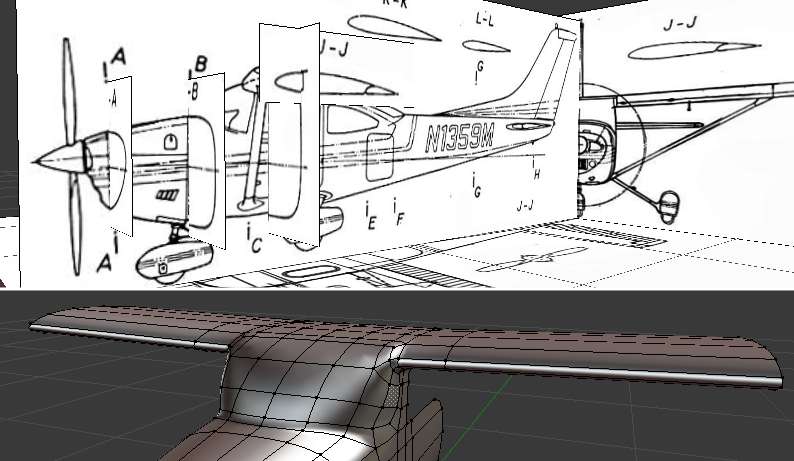
Canopy is part of aircraft form. You really need to start from defining detail around the canopy. Get blueprint views. Lay them out in 3D space using Empty image objects. Use Mirror modifier along the centerline to reduce work. Use Sub division modifier to round out forms from minimum amount of mesh creation.
Thank you very much Eppo, that is a good start but, even with watching tutos on BSurface on Vimeo ( two great ones ); I am not able to use them as I want … they use grease pencil but it is not really precise, I would really want to use the lines of the plane ( metal windshield joints ) to shape it, but after I don’t know …
If you have time and you agree, would you please make a little video tuto just to let me understand how to use BSurface… in a purpose of such windshield ?
You have a lot of verts! I don’t believe that NGon will ever shade nicely. But you have probably taken that into account.
Bsurfaces is the way to go, but you have to be pretty deft at drawing curves in air with the grease pencil! Here’s a slightly different not so good way…
Make a face. With the edges you want to be the windshield. Even though it’s impossible geometry you need to in order to join vertices with either J or the knife.
Use the join verts to make a couple of lines connecting opposite edges that define the curvature of your windscreen. This is up to you unless you have the actual airplane to look at… That curvy bit at the top is a huge problem, and I can’t quite wrap my head around a real life equivalent made of glass, it seems very stressed at that point… I would go as far as to say its impossible to crease glass like that, but you are more of an airplane expert than I. This is what I thought would be more ‘real’:
You can also use the knife tool to ‘draw’ lines on the face but I did not go this route. It might be easier, though!
3. Add or subtract verts to make opposite edges have the same number of verts and use the face>gridfill to fill these in sections.
4. Separate the section.
5. Without selecting the edge, use the smooth vertex to try to fix the crease at top left. This is the problem with that geometry…
To get the mesh to be even I also used looptools to space vertices evenly before gridfilling. Oh and I deleted several edge loops…
6. To really do it up in style this would be a good time to use Bsurfaces! Now that you have a surface you can draw on it will be much easier than trying to draw in air.
DruBan, noone is hand drawing thin air there. Part of image with orange 1 in it is to get idea into the air and only for that. Think of green and red as a representation of curves that would form that surface: x,y, like Gadget colors. The rest should be fairly clear i hope.
And, thanks, you described well what’s in video, including spacing evenly vertices using LoopTools addon. I can only add that if you select excess loops in edge select mode they can be deleted in one go. Just in edge select mode.
Eppo, I didn’t mean you, I was just talking about my own use of bsurfaces… I had to learn the very useful skill of ‘drawing’ in air as I put it. That would be drawing at the cursor and rotating the view repositioning the cursor rotating a bit etc, and then lofting those grease pencil marks, quite fun and fast when you get the hang of it but a steep curve to that point, anyway not referring to your video which I shamefacedly admit I did not notice the link to until just now…
Later edit: Having finally (sorry) looked at the reference image of the airplane I definitely read the sides as not vertical or flat, which would make a much smoother windshield…
Thanks DruBan, will try both " methods " and see what is the best
But I do not understand " too much verts so bad shade "
Sorry if I don’t get everything, I’m French and English is not my native language at all. I know it’s a high poly but within reasonable, the finished plane should be within 600 -800 000 polys for a plane with detailed engine, cockpit, mechanical parts and such
Anyway, I have work in front of me with what you did for me friends, THANKS !
Peace then, DruBan, i for some second thought you really meant i suggest freehand…But my native also isn’t English.
Imho there is nothing bad if you have a lot of geometry; rendering wise- take any of these well known 3d scans and if you have RAM enough you’ll get nice render, close to the real thing.
What can be bad is that this excess geometry takes effort to “level it”: 3 points in space give flat surface always while more points could come out “bumpy”. Still, there are tools in blender to smooth things out. This for example: wings were attached using “welding” by dyntopo sculpt. You can imagine how that looks initially.


