I’ve been looking for a way to move and rotate one object so any chosen face on the first object matches up with any chosen face on a second object. This question seems to crop up here every now and then, but there never seem to be any adequate answers. At least I haven’t found any. Since I also need to do this occasionally, I’ve spent some time and worked out a method that’s reasonably satisfactory. It’s a little bit cumbersome to read, but once you’ve done it a few times it’s not so bad.
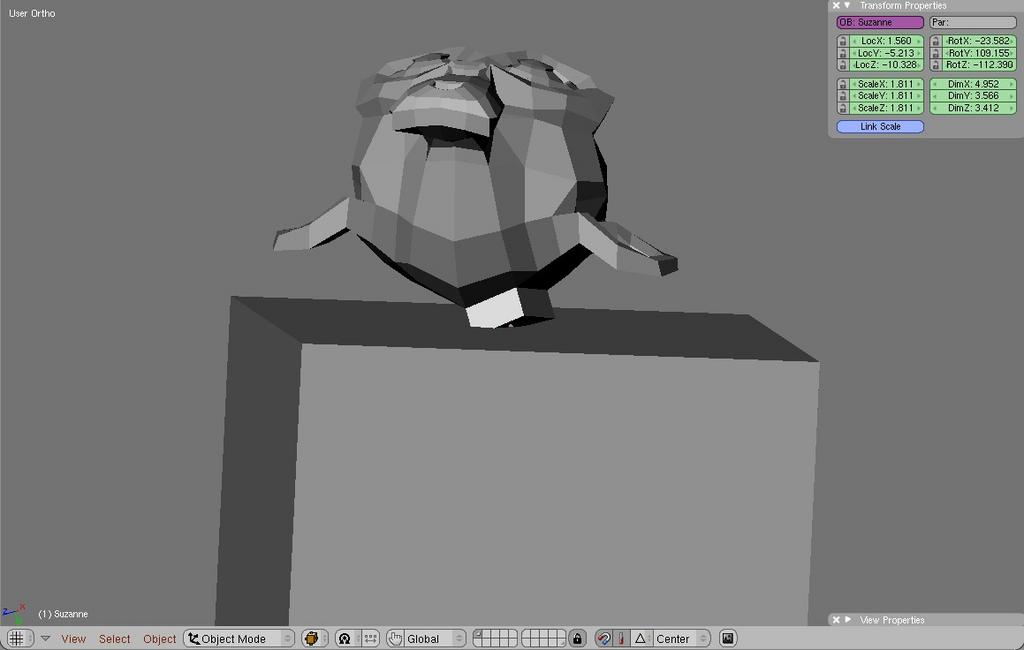
Start with two objects, each with a random orientation. I used a cube and Suzanne, intending to attach one face on Suzanne’s forehead to one face on the cube. To help identify the target face on the cube, I subdivided once, and moved the center vertex of one face to create a depression. The target face would be the one opposite that.
Create a plane that’s parallel to the chosen face on Suzanne: A. Select Suzanne and edit
B. Select the chosen face on Suzanne
C. Cursor -> selection (Shift-S,4)
D. Align view to top (Shift-V,1)
E. Object mode: center cursor
F. Deselect and add mesh plane
Adjust Suzanne’s axes A. Select Suzanne, then the new plane
B. Scripts->Axis Orientation Copy
Move Suzanne A. Turn on magnet snap, align, face, center
B. Select Suzanne and move to desired face on cube, holding control key
C. Suzanne should flip around with the desired face either parallel or perpendicular to the desired face of the cube.
D. Rotate Suzanne around the appropriate local axis to achieve the correct orientation - usually +/-90 or 180 degrees.
At this point Suzanne could easily be moved to the center of the cube’s face using Shift-S snaps. From there, her position could be adjusted parametrically, as desired.
Note that although this should result in the two faces parallel and touching, Suzann’s rotation around the face normal may not be exactly what you want. I don’t know of any way to make an exact snap for that. All you can do, as far as I know, is rotate by hand to achieve the desired result.
I don’t know how blender decides what orientation the object being moved should take, but more often than not it seems to be either upside down, or at right angles.
If anyone has any thoughts on easier, or more precise ways of doing this I would enjoy hearing them.
Yes, that is easier, however it won’t necessarily align the object the way you wish. Which is the difficulty I’ve always struggled with. Until I figured out the sequence involving the Axis Orientation Copy script. Unless you’re playing around with regular shapes like cubes, the face you choose to snap to another object probably won’t be aligned correctly, so you’ll get a result like the attached image. I extruded one face of Suzanne to make things clearer. That’s the face I wanted flat to the surface of the cube.
No need for the script. Looks like you just missed the last step,… see attached. You need to click the sphere with the normal icon to get the alignment portion.
Well, I’m using 2.49, and the icon for that looks different, but I’m pretty sure it does the same thing as 2.5’s “ball and stick”. I looked up the tutorial mentioned, and got the results as shown in the image in my previous post.
As I’ve played around with this, I’ve finally understood that the object you’re moving gets rotated so its local Z axis is normal to the face you’re snapping to. If you’re moving a cube, chances are its local axes are lined up with its faces, so this works just fine. If you’re moving something like a sphere, or Suzanne, the face you select on the sphere, or Suzanne, probably won’t be lined up with the local axes. So when you do the snap the face on the sphere, or Suzanne, won’t be flat to the face you’re snapping to. The only way I’ve figured out around that is to realign the local axes. Does that make sense?
Here is a screenshot from 2.5 showing what I am getting. I think this is what you are trying to do. All I need to do is duplicate any of these boxes and move them, and they will follow the surface of Suzanne, so placing all these took just seconds to hit Ctrl d a couple of times.
I also just checked and this does work in 2.49 as well with the same results. The difference is that the icon looks different. It is right next to the snap icon, and the tooltip says “align rotation with the snapping target” Also, in 2.49 you have to hold control for the snapping to work, while in 2.5 it will snap automatically.
Hope that helps. I may have to start making videos to explain this stuff though,… seems like it would be easier than typing!
Yes, you’re absolutely correct, and that works for me also, just using the snap as you describe. But what happens if you try moving Suzanne instead? Try to snap an arbitrarily selected face of Suzanne flat to any face of a cube, moving Suzanne instead of the cube? Suzanne will snap to the cube with Suzanne’s local Z axis perpendicular to the face of the cube. Which won’t necessarily make your originally chosen face flat to the cube’s face.
Ahh,… I see your issue now. Somewhat dense head here,… takes a while to get through.
Here’s my solution:
align a cube to the face that is at an odd angle. (using the same method discussed above)
now you have 2 options,… you can permanently make the object have the same alignment of the cube, or just temporary.
-for the temporary version,… just parent the object to the cube, now align the cube as before and the object will follow… Once you are done you can unlink the object from the cube (but keep transformation)
for a permanent solution, select the object, then the cube. Press Ctrl J to join them into one object. Since you selected the cube last, the object will merge into the cube, keeping the transforms of the cube. You can now delete the faces of the cube and continue on to align your object, which now has the axis aligned to the correct face.
Yes! Your second method, using Ctrl-J, is basically the same as the first solution I came up with for this. Except that I was using a plane instead of a cube, and I was aligning the view first (I have “align to view” turned on for new objects). I guess that gives the same result as snapping the new object (plane or cube) to the face of the object you’re moving (Suzanne). There was a slight disadvantage to using the join method, though: the original object’s name (Suzanne) gets changed to the aligning object (cube or plane). Not a very big issue, but I was looking for something a little cleaner.
I had played around a bit with the parenting method, but couldn’t quite get it to work. I’m not sure why right now. That method comes close, but if you have to rotate the moved object (Suzanne), because it snapped pointing in the wrong direction, there will be difficulty because Suzanne’s local axes aren’t aligned with the object you snapped to. It can be done before removing the parent by judicious use of the 3D cursor and “center cursor” before removing the parent.
It is difficult to put all this into words, but if you turn on manipulator display - local, it all starts to make sense. I usually work with it off, and things didn’t start making sense until I turned it on.
I hope this helps for align two similar objects.
[I hope to have well understood the needs, is not the same situation maybe but as in description of the post it fit]
On Blender 2.92 but I think this works properly also with other previous releases.
My objects, a Spoon and a Fork.
OM [Object Mode]
Sel Obj1 [the template one]
SHIFT S | Cursor to selected
Sel Obj2
Properties Panel | Object Properties | Relations - Parent->Obj1
SHIFT S | Selection to Cursor
Sel Obj2
ALT P | Clear and Keep Transformation
Done
Let me know if you find this useful or there’s a better way to do it!