I am working on a small project that involves drawing a curve over a set of misaligned teeth then aligning them accurately along the curve. So far I have only managed to segment the teeth but having a challenge tracing the curve over the teeth from a reference image then moving the teeth to their final position. After the above task, I would like to animate the object showing the movement.
Aligning bezier curves isn’t too hard. Start by placing all controls in the center of your reference curve. Then rotate each set of handles to follow the tangent at that curve (which can be done most quickly be changing handles to automatic.) Assess for any changes in curvature, see if you need additional controls. If not, select handles one by one and scale about individiual origins for fine tuning.
For animation, use 1 curve for both healthy and bad, use hooks to empties or bones to deform it from good to bad.
To prevent the teeth from deforming from the curve, a number of possible techniques, but I’d probably use spline IK bones, each tooth weighted fully to a single bone. If you need to use curve tilt, I’d maybe consider a different technique.
If you need to move the gums, it would probably be best to mesh deform them from simplified, ballooned, non-rendering copies of the individual teeth, followed by a corrective smooth on the entirety of the gums.
Hi
You can place your teeth aligned, and then deform them with some bezier curve (curve modifier)
Then just use a shapekey to unaligned them. Then animate the shapekey to go from non-aligned to aligned.
Here is a quick gif I made for you :
See you ++
Tricotou
Hi bandages, this is the most help I have gotten from anyone on the online community, thanks for taking the time to respond.
This is the sample blender file of crooked teeth that I have already segmented:
This video shows exactly what I am trying to achieve:
Hi Tricotou,
Appreciate the gif you put together to give me some ideas.
Kindly check out the sample blend file with the segmented teeth that I have attached and watch the two short videos that I have posted on this reply and give it a go then let me know how you worked it out.
Hi Tricotou,
Appreciate the effort in putting together the gif and giving me possible solutions to my challenge.
To make it easier I have attached the exact blend file with the crooked teeth that I am working on.
I have already segmented each individual tooth and posted two videos in my reply to show an example that I came across on youtube.
Kindly download the blend file and let me know what steps to follow to achieve a similar final result.
I look at it and say, meh it could be done in a few hours. But to try and explain the steps to a newcomer to blender would be tough and frustrating. In a nutshell you need to create shapekeys for each of the teeth, as well as for the gums, the full shapekey would not only repair the overall shape of the tooth but also rotate and move it to match your new aligment guide. You would then add keyframes to animate the strength of those shapekeys (2 keyframes really, 0, and 1 strength) and create camera movements.
One issue I see is that in the video you wish to replicate the gums have separated into discrete objects, that has not been done on your file. The teeth have been separated into separate objects but the gums remain one mesh.
Hi Photox,
Appreciate you taking time to look at my query. I believe the best form of learning is from those who have your attitude without being contemptuous.
Yes, the file in the video is indeed segmented including the gums. This is the stl file of that exact segemented file:
Do you mind downloading this same file and working on it then post a screen cast of you working around it?
The u2 stl is pretty much ready for that kind of animation. There’s a lot of planning to do before even firing up blender though. The first caveat is getting the alignment guides overlayed at the proper scale so that you can start moving the teeth. Are you doing just one of the curves (trueform, biofrom?) or do you need the animations to be able to switch between multiple guides?
I just started working on version 2.8 but spent a good amount of time on 2.79 before 2.8 was launched. I prefer 2.8 though because of the cleaner User Interface.
Yes, the u2 stl was just a reference for you to look at.
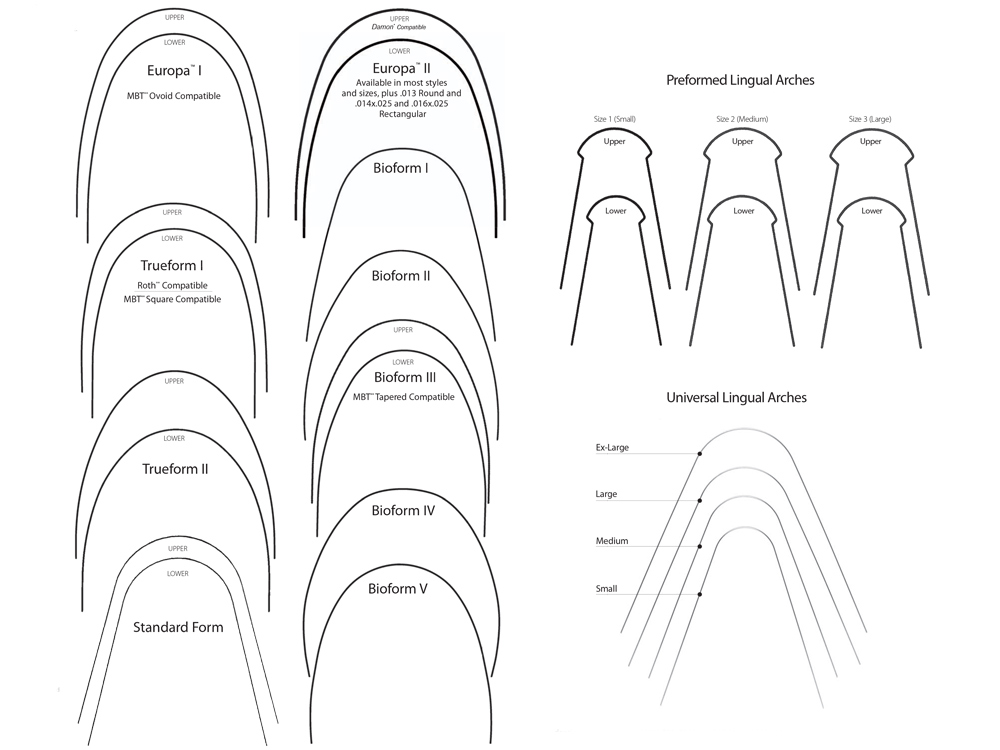
For the different curves(trueform,bioform), different teeth models will have different arch sizes, therefore, the curves are a simple diagnostic tool that you can move around and use your judgment to estimate which curve best fits the specific jaw model then align along that curve. Therefore one jaw model cannot be aligned along two different curves.
The guide overlaying at the proper scale is super important to remove the guesswork around how much tooth movement to make to get a perfect arch for either the upper jaw teeth or lower jaw teeth (hence the curves are labelled ‘UPPER’ or ‘LOWER’)
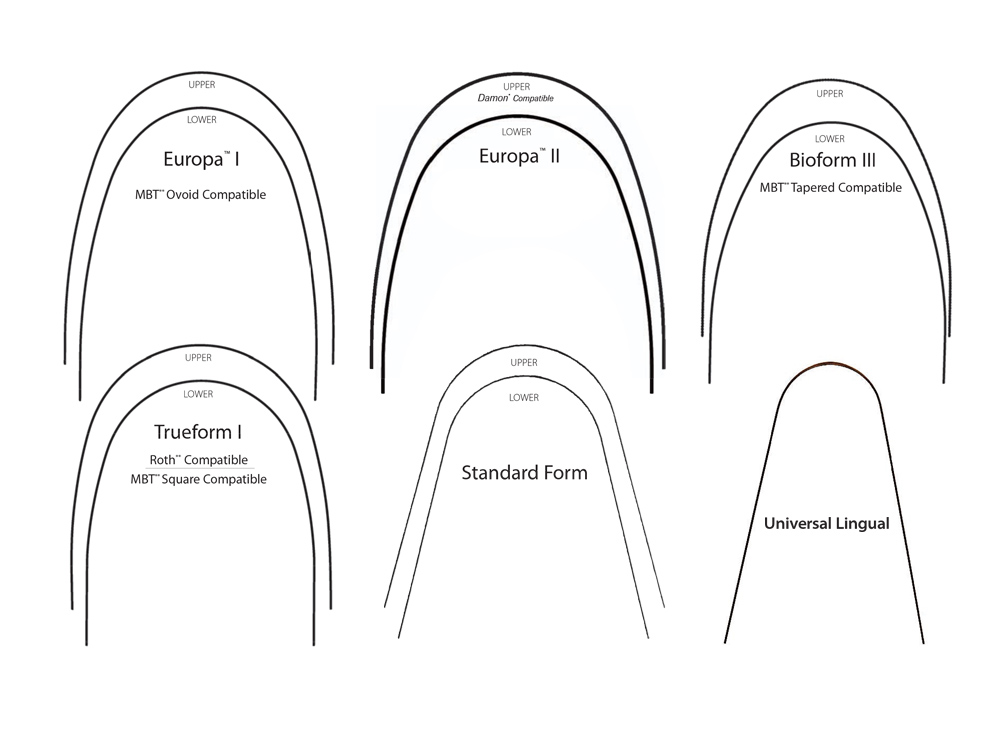
Here is a less cluttered guide (IGNORE THE ‘LINGUAL’ CURVE):
OK, Stick with 2.8, I’ve switched to it for about a month and it’s really painful to go back and forth. A few questions:
so we just look for the curve that best fit the existing teeth and use that one?
Which curve is best for the maxillaryincisors? to my eye the front teeth are more flattened like the Europa II.
can these curves be scaled? I mean does the europa II come in 6 cm, 6.25 cm, 6.5 cm… ? do we need to match some fixed real scale. currently the maxillaryincisors are large by blender standards, with an x dimension of 67 meters. The scales should be changed in the very beginning either by changing the units (to say mm) or by scaling everything in object mode (to an exact size) and then applying the scale (Ctrl a)
This video shows at minute 5:45 that the curve for upper curve Europa II is about 6.50 cm from tip to tip so we can work with that.
Also the teeth need to be scaled down to the original scale of the stl file and be measured in mm.
Hi, I don’t see any messaging option on your profile after clicking on your username.
What am I missing? I think I don’t have that option yet since I have only been a member for three days?
My apologies for the inconvenience.