Animation with an extruded cube

Hello to all,

I would like to animate an extrusion of a cube.

For this, I set a keyframe to 0 (i+location, rotation and scale on the cube).
Then I set the keyframe to 20.
Then I extrude my cube upwards.
And I do an i+location, rotation and scale again.
I go back to the beginning (keyframe 0) and I launch the animation, but unfortunately nothing happens.

https://youtube.com/shorts/owk7HlUuv1U?feature=share

Waiting for a precious help,

A+

You’ll need a shape key to do this- LocRotScale only keyframes the LocRotScale of the object in space. Mesh data is entirely ignored, it has no part of this. Make a Basis shape key and a second key. On the Basis shape key, extrude a tiny bit (e >z > .001), and then on the second, move your extrusion where you want it. Press I over the influence to keyframe it.

By the way, mesh data can’t change during animation - you can’t add vertices between frames and have your animation behave as expected, hence why the tiny extrusion

1 Like

Hi,

You wrote “Press I on influence to frame it”.

I don’t understand what you mean by influence.

Very thanks for your help,

A+

The shape key influence slider

This looks like you are making another thread for the same problem you had here:

In my answer I linked a Blend file with an animated shape key that does the basic movement you are after.

Edit:
See my next post!

Hi,

Sorry but your blend file shows me a blank file.

Indeed, we see a simple cube, without shape keys and without animation.

I would be happy if you could upload a blend file, but not a blank file.
I specify that I am under version 2.93.5

Moreover I am modeling my animation, but with half a torus.
I tried with H and Alt+H to make bits of arcs, but it doesn’t work in object mode.

[url=https://zupimages.net/viewer.php?id=22/43/8q9a.png][/url

If you have any ideas to animate this torus they are welcome.

Thanks for your help,

A+

Hi Julien,

DNorman did not upload a blank file, but he used a newer Blender version. His examples (both) work, in the old question and here.
He cannot know that you are using an old Blender version, because you didn’t tell us until now.

What about downloading a newer Blender version, then download his file and open with the newer version, then “learn” how you can do it and create it on your own with 2.93?

Thank you for your help,

I did have an earlier version.

I am full of questions about your animation.

Is the animation of the cube done with keyframes made with the letter I + position, rotation, scale or not?

What is the purpose of shape keys 2 and 3?

I seem to have realized that I need to look at half of the keyframes in the timeline (because there is a kind of back and forth movement).

But I have difficulties with the timeline and the dope sheet.
If someone could help me with the keyframes?

Thanks to you.

IMPORTANT EDIT:
I have just realised that the follow path constraint does NOTHING AT ALL!
You can delete it, the curve modifier does all the work, (sorry for the confusion.)

Here is a file without the follow path constraint. THIS IS THE MOST CORRECT ONE (edited)

Cube3.blend (98.6 KB)

Sorry for the delay, I was working this weekend.

To do the animation you ONLY NEED 2 things.

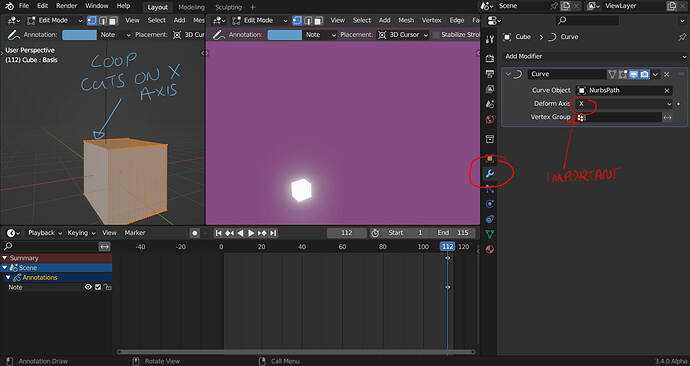
1 A “curve modifier” to deform (curve) the cube along the curve. For the curve modifier to deform nicely I had to add some edge loops to the cube (you can see that if you look at the cube in edit mode.)

The curve modifier deforms the cube along its local x axis. (that is why the loop cuts look like they are in the wrong direction when you look at the cube in edit mode.) The modifier aligns the cube along the curve on its x axis.

To get the cube to move in the animation you have to key frame the x location of the cube. with the I key (you can choose just location)

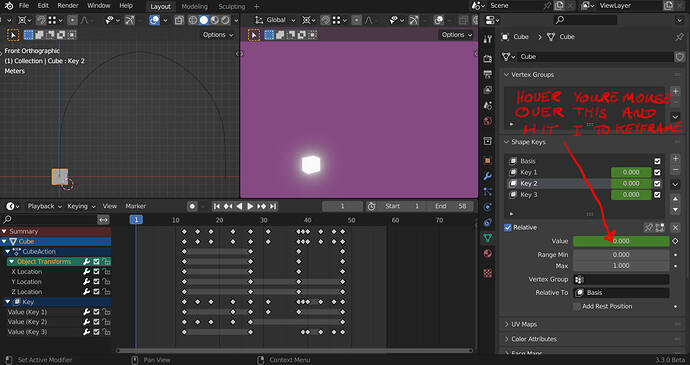
2 the “shape keys”.

If you mute the shape keys (by clicking the arrows), you will see that the cube just goes along the curve and deforms but does not “stretch”.

The shape keys animate the stretching of the cube.

To key frame the shape keys value’s you have to hover your mouse over their value field’s and hit I.

If you mute all the shape keys and then turn them on one by one you will see what each one does.

Shape key 1 stretches the cube.

Shape key 2 squashes the cube at the beginning (from its top towards its bottom)

Shape key 3 squashes the cube at the end (from it bottom towards its top) This is necessary because when the cube is at the far end of the curve (where it lands) it is upside down.

Part of it is (the cubes movement) along the curve. By keyframing the x location of the cube.
Part not: the srtetching and shrinking, this is done by animating the shape keys values.

To recap you have to key-frame the cubes x location ( hit I choose location) to get the cube moving.

Then you key-frame the shape keys to stretch and shrink the cube, ( hover over the value field and hit I ).

Yes I duplicated the keyframes and mirrored them just for fun, sorry to confuse I w3anted it ito jump back :rofl:

I hope all that helps.
If you can not work it out I recomend you search and watch 2 tutorials
One for the curve modifier and one for shape keys.
You will understand it all better once you understand these concepts.

Latest edit! Sorry to bump the thread again.
I deleted the follow path channel from the keyframes of the file aswell so as not to confuse.

Last edit (I hope)
I have now stripped the file to the minimum keyframes necessary, and deleted the rotation and scale key frames (they did not effect the animation).

1 Like