Applying Alpha Textures

I’m trying to make a photorealistic rubik’s cube to practice my material skills. I’ve run into some problems though.

I’m trying to apply very faint fingerprint marks to the model, but it isn’t going very well.

I UV unwrapped the 9 squares on each side, and in an attempt to randomize where/when the fingerprints would show up, I spewed the UV’s all over the place.


I’m trying to get the fingerprints to be faint, show up only on some squares, and look realistic to a “fingerprint-on-plastic” look. I’m a bit in over my head as to how I should set up all the nodes to achieve a good result.


That image texture node is my fingerprint (with alpha) texture. The diffuse/glossy is my material (this is the red side), and I’m not sure that the noise texture is doing anything because it’s plugged into a Volume slot…

Any help you could give me would be appreciated, thanks.

You could try this. Use the fac value of the last mix shader node to control how visible the fingerprints are.


Also if the wrong part is transparent, flip the transparent and diffuse nodes.

This is a more advanced texturing task. Do you have an example of your current skill level so that we know where to start from?

In the mean time, I will see if I can help. First, you need to decide what material you want for the fingerprints. You will probably want them to be a light white color (more like 80% grey). Then, you will probably want the fingerprints to be less glossy. (EDIT: That is from my observation of a Rubix Cube that happens to be right next to me. If you feel differently about how it should look and if you want help on how to achieve it, just ask.) This will require two things:

  1. Texture coordinates, such as an UV unwrap, although you could probably do it using a Mapping node.
  2. A black and white image of the fingerprints, with the fingerprints being the white parts. If you only have an image with white and transparency, you can use an Alpha Over to give it a black background or Add it on top of a black color.

You will need a RGB input node for the Diffuse shader’s color. Using a Color Mix node set to Add, place the fingerprints over the red color that goes into the Diffuse shader. Set the factor to 1.0.

For the glossy part, add a Color Ramp node and put the fingerprint image into it. Set the left-most color in the Ramp to 0.1. Set the right-most color in the Ramp to something less than 0.1. Use the Ramp output for the factor on your Mix Shader.

Decrease the factor on the Color Add node to make the fingerprints more transparent and decrease the right-most color in the Ramp to make the fingerprints duller.

Here is an example image:


ImmortalZombie’s idea of using the alpha of your image is a good idea. If your alpha is setup correctly, it would be the black and white image I described in my post.

However, you do not want to use a Transparent shader as ImmortalZombie proposed. That will make the final material 50% transparent in areas without fingerprints. His setup also locks the opacity and glossiness of the fingerprints, not allowing them to be tweaked individually.

I don’t have any examples of my material/texturing skill, I kinda planned to make this the first. But if you’re concerned about me being able to follow along with what you’re saying, don’t be. I understand nodes fairly well, just struggle with implementing them correctly.

I used your setup Austin, and it did this. The fingerprints apply, but the background they’re on should be bright red. Instead it’s turned grey for some reason.


Use the alpha of the image for the color of the fingerprints that goes into the Add node. The Add node does not work with alpha channels.

If that does not work, we need to verify what you are working with. Add an amision shader with a strength 1.0. Then, put the image textures alpha output into the color of the emission shader. Then, connect the emission shader to the material output. That is a good trick for checking what an image actually looks like.

I just realized that you are using a Math node, not a Color Mix node. Add a Color Mix node and set it to Add instead of Mix.

[EDIT: That needs to be in addition to the change mentioned in the previous post. However, it should also work if you leave the Color Mix mode set to mix and tick the button that will cause the Mix to respect the alpha channel of the bottom input (which would be the “color” output from the fingerprints texture).]

I just want to clarify that this method may not be ideal for some cases. It restricts you to white fingerprints and only allows you to control their opacity (with the factor). Using a Color Mix node set to Mix instead of Add would be better since you can change the color of the fingerprints before putting them into the Color Mix node. I don’t have time now, but I will upload a picture later. (EDIT: I modified this for clarity regarding the edit above))

Alright, I found the other add node and plugged it in. Everything seems fine now. And to clarify, the picture I’m using is a white fingerprint/black alpha background. No need to worry about that.

I’m not quite sure what you mean about the alpha/color output. They both work just fine.

My next question is how I would go about making these transparent. No matter how I put them on the cube, right now they’re 100% white. A transparent shader seemed obvious, but I only want it to apply to the fingerprints. They also, in some point in time, need a sort of fresnel affect. The fingerprints on my own real cube are only seen if you view them at an angle to a light source.

“Decrease the factor on the Color Add node to make the fingerprints more transparent and decrease the right-most color in the Ramp to make the fingerprints duller.”

I was just being thorough, not knowing exactly what the fingerprint image was like. Your image could have been just a pure white color with an alpha channel.

Are you familiar with the “layer weight” node? The emission shader trick I mentioned helps in that you could see what the fresnel looks like by connecting it to the emission shader. Are you familiar with how the color ramp works?

Okay, here is an example for the fresnel. I did not bother with the setup for changing the fingerprints’ color.

Note that I replaced the color map with multiply and subtract color nodes (the first multiply is for the fresnel, and I will talk about it later). The color for each is a HSV of 0,0,0.100. The multiply makes the white of the fingerprints a value of 0.100 while the black remains 0. This is subtracted from a color of 0.100. This means that black areas in your fringerprints image will be 0.100 glossy while white parts in the image will be 0 glossy.

The first Multiply color node is for the fresnel. Note that its output is also connected to the Add node for the diffuse color. It multiplies the fingerprints by a value of 0 to 1, where 0 is when looking straight at the face and 1 is when looking at it from the side. The Blend factor changes the rate of transition from 0 to 1 with respect to the viewing angle.

It works like this. Let’s say the fresnel is a value of 0.5 at 45deg. That would multiply the fingerprints by 0.5, halving their brightness and dullness. Looking at it from the front would result in a value of 0 for the fresnel, making the fingerprints 0. That means the color will be 0 and the dullness would also be 0.


I’m not very familiar with layer weight. I’ve only been introduced to it recently, and I’m not sure how it works differently than the basic fresnel node. I’m familiar with the color ramp, not so sure about the mechanics behind how it works other than laying the defined colors across a variant.

After some studying I understand how the first node setup works. Thanks for the explanation as well, I’m trying to wrap my head around some of this more complex stuff.

I understand how fresnel itself works, but your fresnel node setup here is kind of confusing. You said the HSV value is 0, 0, 0.1 on each of those nodes. When I set my nodes to the same values, the grey is much lighter than the grey in your photo.

But I’m getting to the point where I’m being a copycat. If I don’t understand the actual nodes I’m working with and what they do and how they work, I’m not learning anything.

You’ve been extremely helpful so far, but if I might ask you again, can you break this setup down a bit more so I can understand?

Sure, and I love that you are interested in actually learning.

The layer weight has the “back” output that I prefer over fresnel. Moreover, the Layer Weight node gives you more control, due to the Blend factor.

If the Hue is 0, the Saturation is 0, and the Value = 0.100, the color is probably fine.

Here is a deeper look at the thought process:

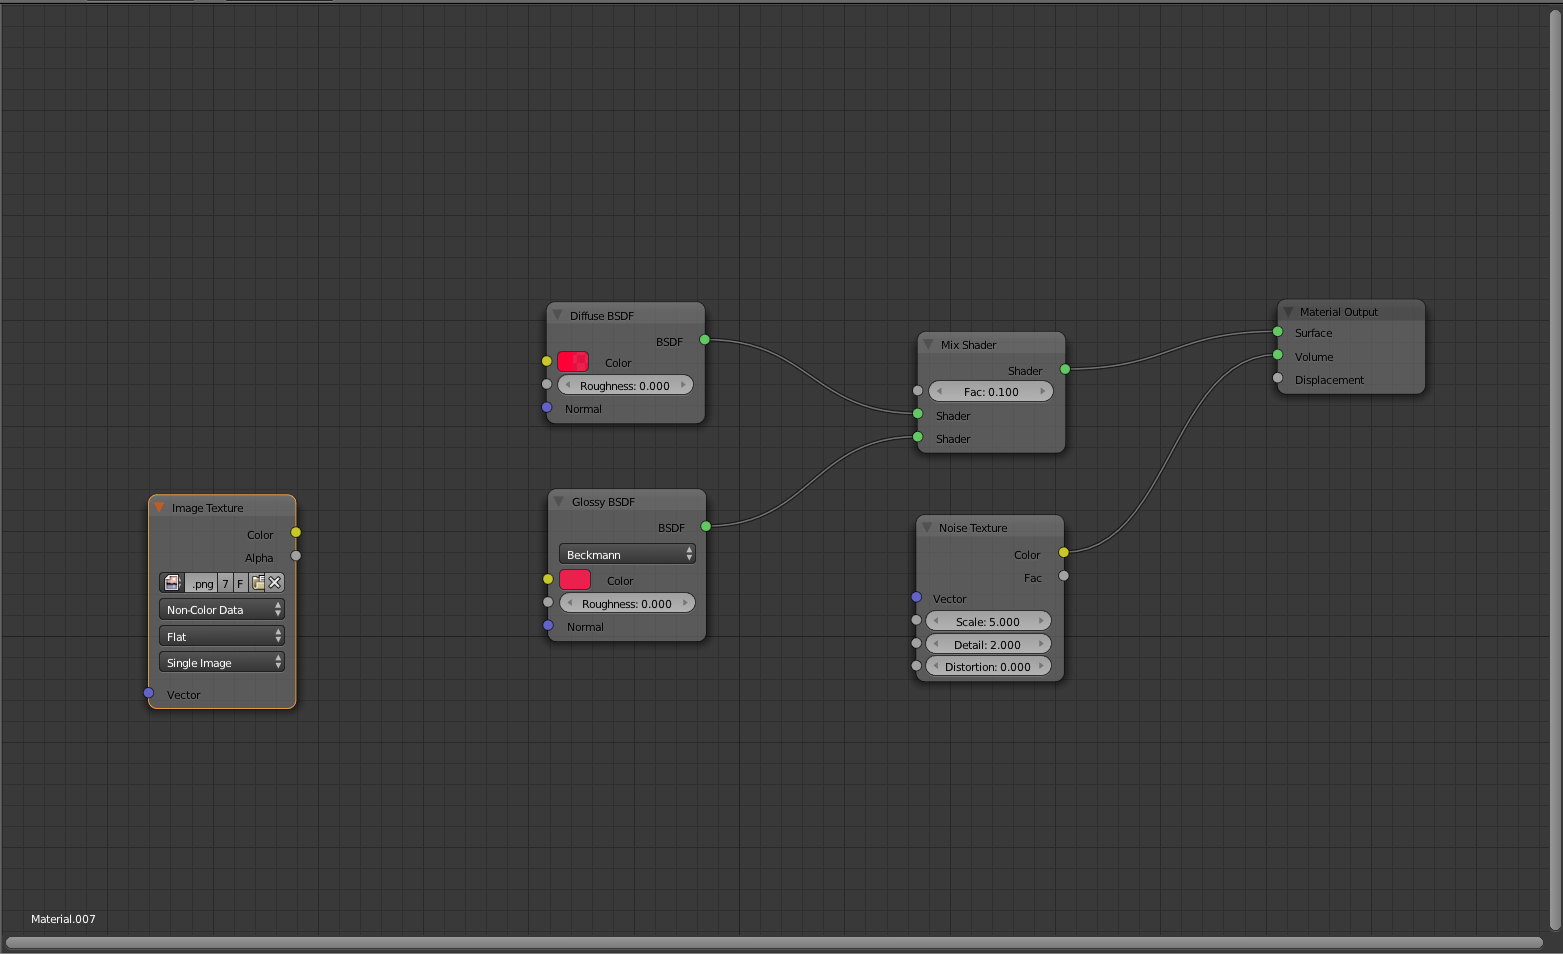
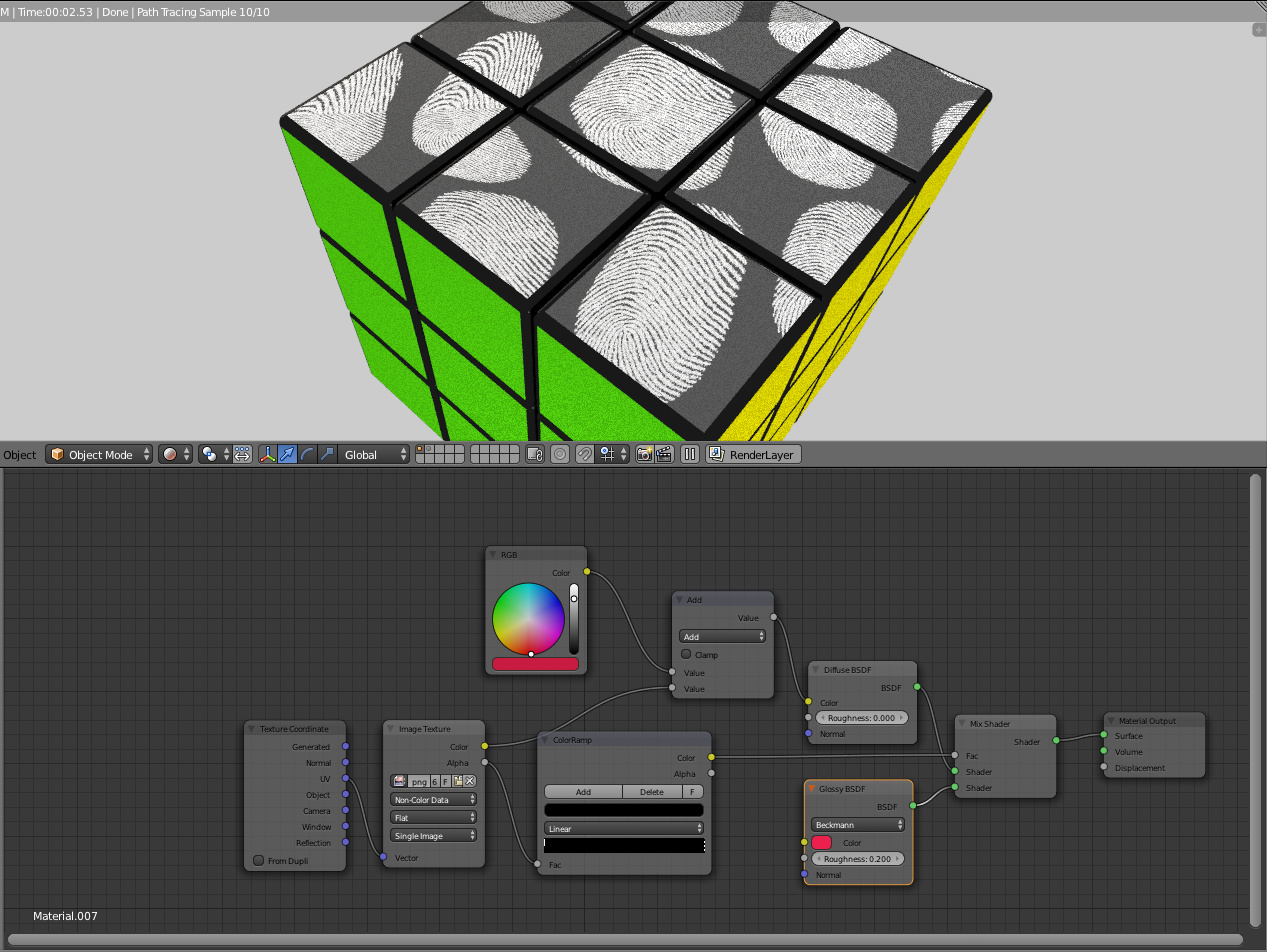
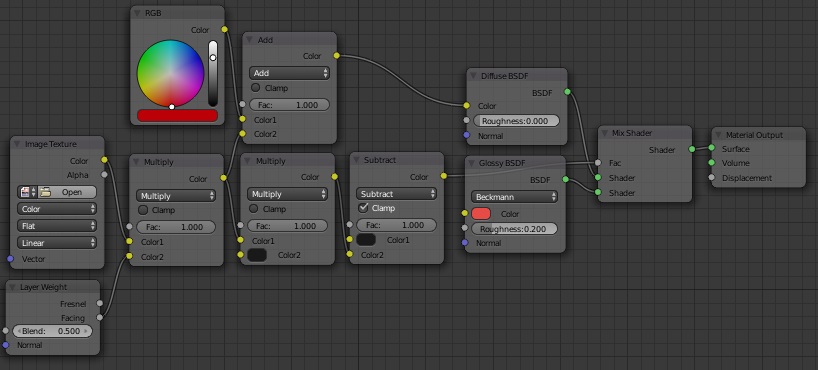
First, I will explain the nodes that replaced the color ramp (although the ramp followed similar logic). In your original node setup, you had the mix node set at 0.100 for 10% glossy (the shader in the bottom input). To retain that same mix, I want the factor to be 0.100 everywhere that does not have a fingerprint. However,

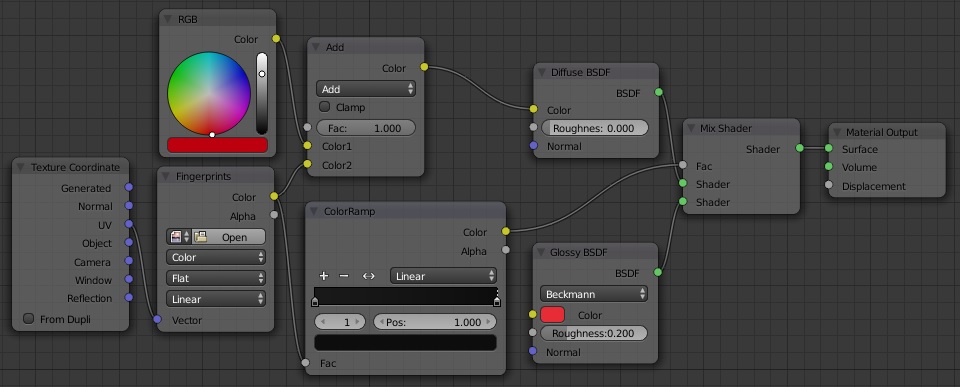
I want it to be somewhere between 0 and 0.100 where there is a fingerprint. So, I need a solid color that has a value of 0.100. I am not sure how the factor would interpret a color like gold, but greyscale works fine. I expect that it would use the V part of the color’s HSV. Anyway, I place this color in the top of a color subtract node. I do this because I plan on decreasing it where fingerprints are, which is a subtracting operation. I tick the “clamp” check box to ensure that the factor does not go lower than 0 (it bounds the output to a value between 0 and 1).

Next, I need something to subtract from it. For this I need to scale down the value of the fingerprints. If I subtract them directly I will get 0.100-1.000 or 0.100-0.980. The results would be clamped to 0. However, that will cause most of the anti-aliased pixels (the 0.980 in the example) to be clamped to 0 as well. This may result in a jagged texture. To avoid this, I want to scale the fingerprint image so that all values of 1.000 become 0.100, the maximum amount that I can remove from the glossy factor without getting clamped. That will prevent color clamping (aka color clipping). Now, the fingerprints texture will subtract 0.000 where there are not prints and only 0.100 where there are prints, with a smooth transition between.
I achieve this by putting the image into a color multiply node. I set the other color, which sets the maximum value of the fingerprints texture, to be the same value as the glossy factor. That way, I can never subtract more than the glossy shader’s factor, which would cause color clipping. I was using the ramp for this purpose before, but I had to switch to this method for a reason that I will get to soon.

For the fresnel, I want to also restrict the value of the fingerprints texture. For this, I need another multiply node. The output of this will be used for the diffuse and the glossy since I want fresnel to affect the color in addition to the glossiness. I use the “back” output of the fresnel node, which outputs a color that transitions from black to white. The “back” output is 0.000 if the face it pointing directly at you, and it is 1.000 if you are looking at the side of the face. By multiplying the fingerprints by this they are multiplied by a smaller value the more directly you are looking at them. You can see what the fresnel looks like by connecting it to an emission shader at 1.000 strength that is connected into the output node. That can be extremely helpful if you want to use the Blend factor or a color ramp to tweak the fresnel.

This multiplication reduces the color of the fingerprints so that white is now, say, 0.500 instead of 1.000. When this goes through the next multiply node it will become 0.050 instead of 0.100, preserving the fact that I want the fingerprints to be half as visible. If I used a color ramp, I believe it assigns the right-most color to the highest value in the image and the left-most color to the lowest value in the image. This would destroy the multiplication with the fresnel.

I think that covers it. Let me know if you have any oher questions or need something clarified.