I’ve been watching tutorials and searching and reading but I’m still not quite understanding Masking.
I have the following scenario.
I’m working in 2D orthographic mode
the z-axis represents in and out of the screen
the y axis represents up and down
the x axis represent left and right
I have a background plane or image.
I have a thin object, call it “bar” (a horizontal bar) positioned in front of the background (higher in the z-axis)
I have another object (a text object) call it “text” between the “bar” and the background (in the z-axis)
I want all parts of “text” that are above the “bar” (in the y-axis) to be visible but all parts of “text” that are below “bar” (in the y-axis) to be hidden.
I intend to animate “text” so that it starts (hidden) beneath “bar” in the y-axis and rises up to be revealed as it rises above the “bar”.
because the text is tall and the bar is thin, the bar doesn’t even come close to covering the bar. In fact, I could replace the bar with just a single horizontal line in my example.
If not for the background, I could use a plane in a masking layer, which properly masks the “text” but of course, it also masks everything beneath it in the z-axis which includes the background.
Is there a simple way to make a mask layer (or better still a mask object on a mask layer) apply only to a single object? Or can I make other objects immune to a masking layer (or object in a masking layer)?
I’ve seen some tutorials on masking that do some seemingly complex things with the compositing editor but I’m still trying to figure that out.
The other issue is that eventually I want to save my objects and animation with the masking in place so that I can append or link the objects + masking effect + animation to future blender projects. The idea is to create a fancy text animation effect and then re-use it and edit the text again some other time in the context of a more complex scene.
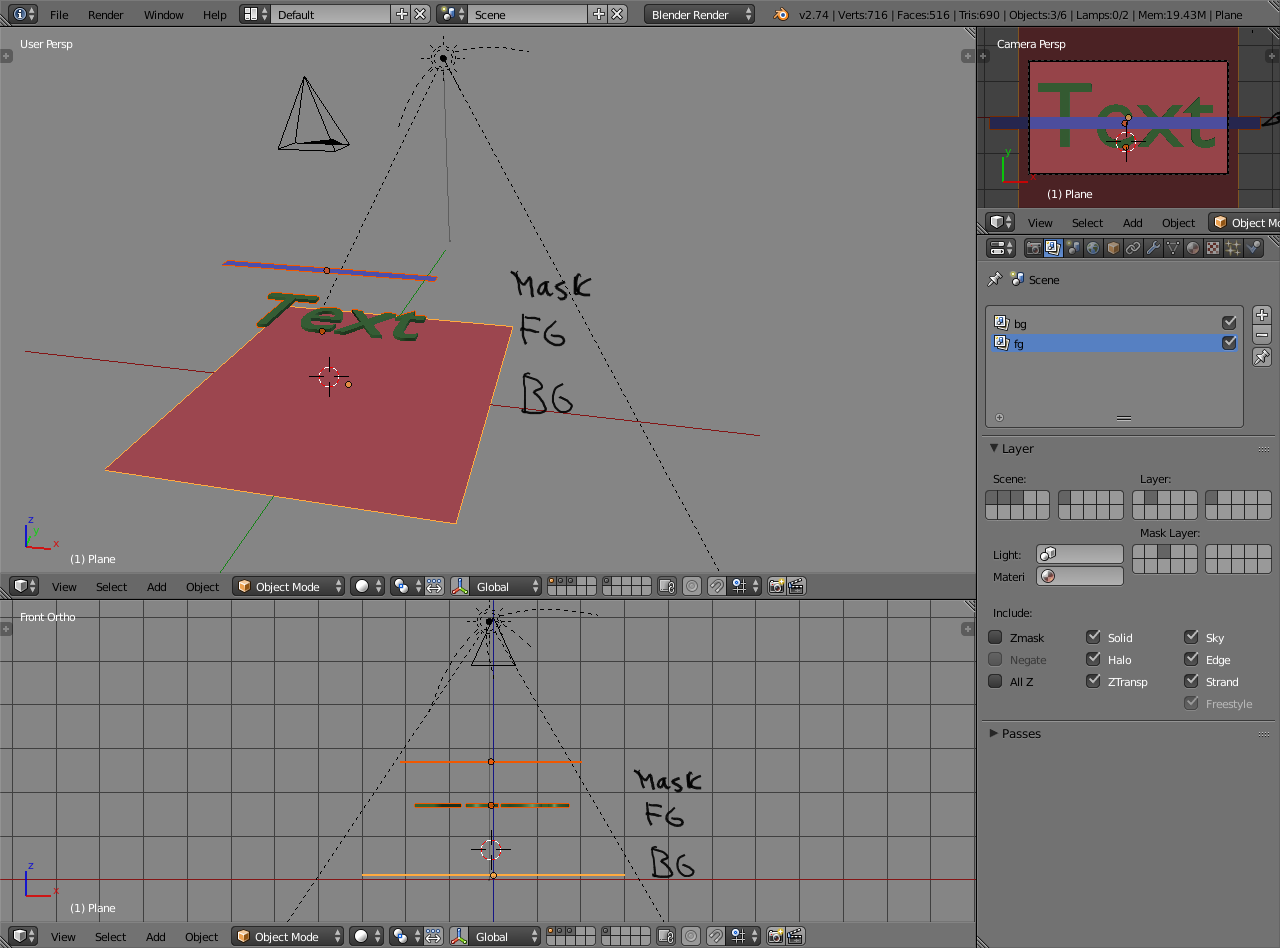
This image might help. I want to mask the green text that is beneath the blue bar while not masking any of the orange rectangle.
The three objects, (RGB) background, foreground and mask are on their own scene layers. BG on layer 1, FG on layer 2, and mask on layer 3. Lights and camera are on layer 6.
Render layer setup is then set to include matching scene layers. Render layer BG includes layer 1, render layer FG includes layer 2. Foreground render layer has layer 3 set as masking layer because that’s where the masking object is. Both render layers also include camera and lights.
Render is set to have alpha transparency which allows to easily combine the objects in one image. Transparency can be set from render properties -> shading: alpha: transparent, or uncheck sky on render layer if Blender render is used. Those are then combined in the compositor with alpha over node
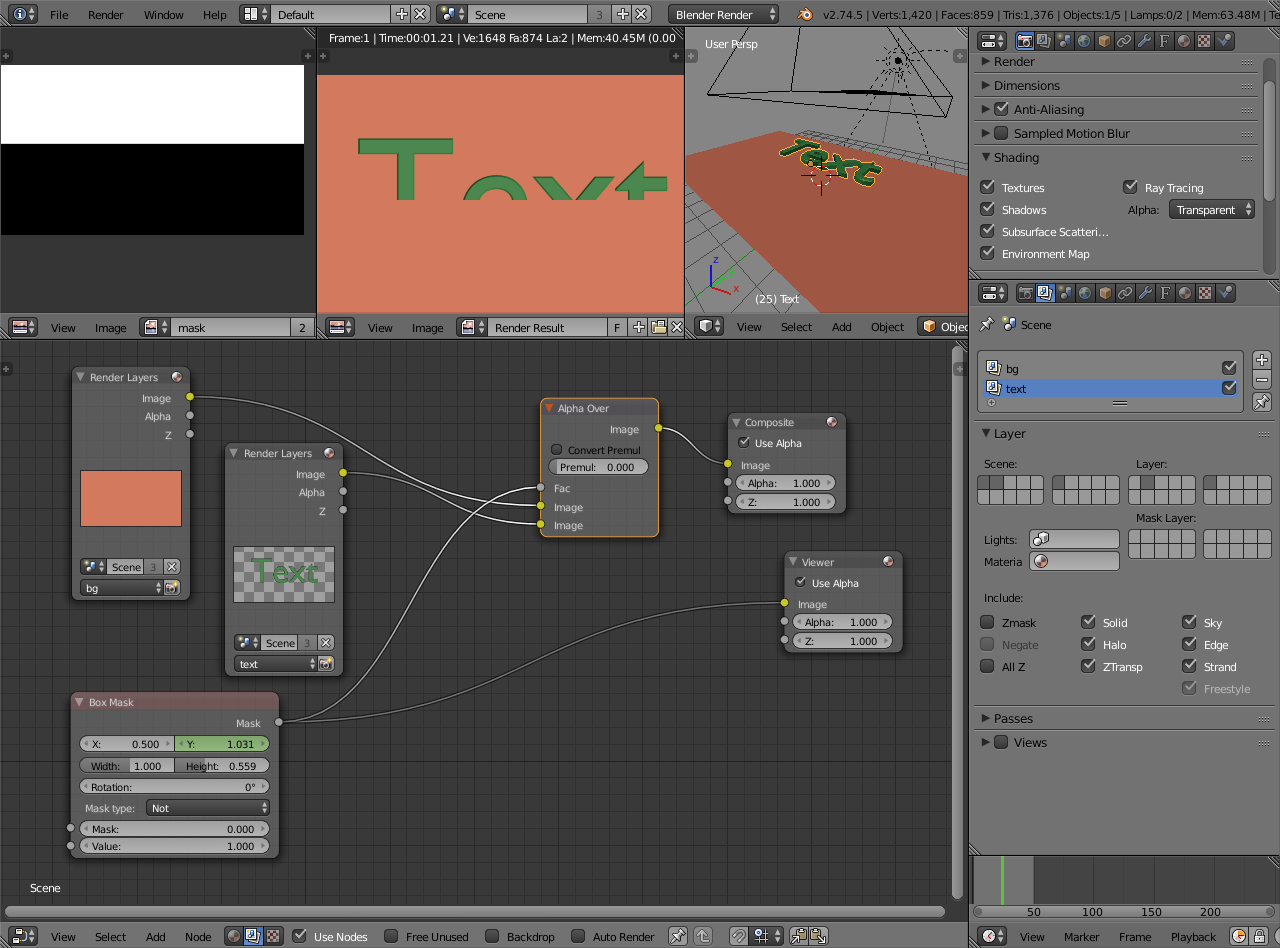
A blocking 2D mask might not be enough but depends on the effect and animation you’re going for. But if it is, separating the key elements with render layers gives the control to mask them how you like. It’s also possible to do some of that even without actual masking object. Compositor for example has box and ellipse mask nodes that could be used to create the mask and could also move it over the separated 2D elements for the same effect.
That isn’t quite what I meant but it’s probably close enough. The blue bar is not supposed to be the mask. The text lower in the picture than the blue bar is to be hidden so you’d see the top half of the text poking out above the blue bar. Either way, if I understood the node editor, what you’ve shown me would probably lead me to the solution I need. I have to go learn about the node editor.
Background and text are put on separate render layers. In the compositor there’s a box mask node which was set to cover the whole area with white and then offset that mask so that everything is black. The offset, position along Y, can be keyframed by right clicking on the field and choose insert keyframe, then advancing in the timeline, chaging the value and inserting another keyframe.
Using that mask as a factor when combining the text with the background gives an animated effect for revealing the text box_mask_ja12.blend (108 KB)
After watching some more tutorials, and a little experimentation, I was finally able to use and understand your two examples.
I will mostly be working in 2D orthographic mode, so I think using render layers as you’ve described in your first example will work for me. I can just separate things out into a background layer (objects that will never be masked), a maskable layer (objects that need to be masked) and a mask layer (planes, that will perform masking duties) and then move masks in and out of the scene on the mask layer as needed.
Thanks for your help. It was what I needed to get a grasp on rendering layers and the node editor.