Armature Clothing Rigging

I have been through a rabbit hole and absolutely “NO” YT tutorials cover this issue…

Attaching a Jacket to a character…

Go to Mixamo… Download Character animation with Character clothing

Import Character .fbx into blender file.

Go to FAB… Download a trench coat

Import trench coat .fbx into file.

(I traditionally do CTRL A for scale on assets just in case)

Select Coat… Shift select Armature… CTRL P … Armature with automatic weights.
This Happens…
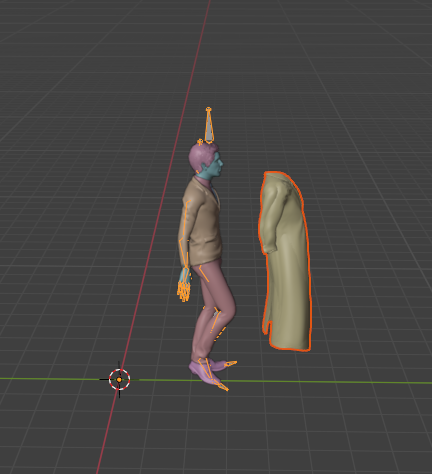
Screenshot 2024-10-28 085146

(I have tried to put origin at same as armature AND tried origin to geometry)

Second Tutorial… Select Coat… Shift select Armature… CTRL P … Armature Deform
This happens…
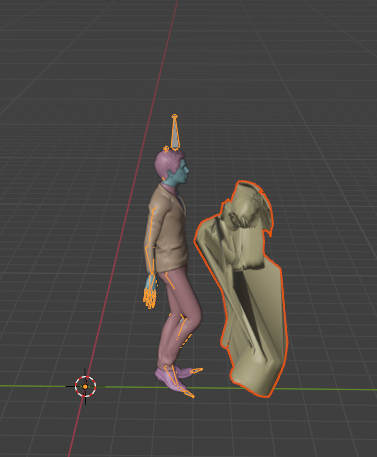
Screenshot 2024-10-28 085238

Basically none of CTRL P Armature parenting works.

I also noticed when I do any of the CTRL P steps it adds another “Coat”
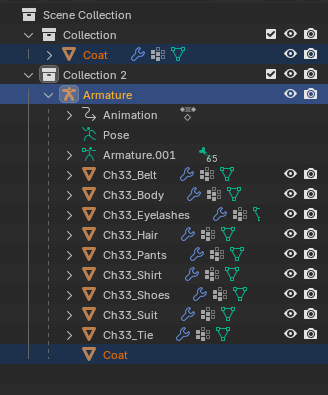
Screenshot 2024-10-28 085259

(while writing this I did end up placing the coat in “Collection 2” and it did not duplicate the coat like in the picture, so not sure why that happened, but when it is in the collection itself it does not… I just wanted everyone to see the full outliner.)

Also… while you are here… this is a walking animation and some tutorials stated i need to add Cloth and pinned groups to the coat, and collision to the body which I will try if I need to, but If you figure out why the above is happening would love to also know in order for it to sway as he is walking etc do I need that also? Or will the weighting resolve that? Topology on the coat is really good with a good amount of subdivision FYI.

I don’t know the theory, but it’s normal behavior in the Outliner so far I’ve seen; but it lacks clearer indication for the user --would require UI improvement.
It works like a Windows Explorer with a conceived alternative feature, in which a file can have ‘Fake Clones’ and hence appear simultaneously in different Folders, without representing real Duplicates/Copies.

The Coat Mesh Object appearing below the hierarchy tree of the Armature Object, appears there because its Parented to it. Note that it doesn’t contain Eye-Visibility icon next to it, nor the Render-Visibility icon. This is because this is a ‘Fake Object’, ‘Fake Duplicate’, or Clone. I suspect it has something to do with Linked Object, but I do not understand sufficient about Linking in Blender to affirm there is any relation to Linking.

The ‘True’ Coat Mesh Object in the Outliner is the one in “Collection”, since it shows the Eye & Camera icons next to itself.

If you want to ‘collapse’ them, you just need to Drag the ‘True’ Coat Mesh Object into the hierarchy tree of the Armature Object (“Armature”). You cannot pull the ‘Fake’ Coat into the “Collection” instead, since you do want to have the Coat Mesh Object Parented to the Armature Mesh Object. So, you can just Move (M) or Drag (LMB-Drag) the original ‘Real’ Coat Mesh Object, directly into the Armature Object’s domain (hierarchy tree); right now, you’re telling Blender you want the Parenting, but you still want to keep the original ‘Real’ Coat Mesh Object localized somewhere else (“Collection”) instead of “Armature”.

That Outliner behavior got me confused for a while; mainly because there is not currently a very clear indication of ‘Fake’, ‘Clone’ or ‘Linkerd’ elements there.
Hope that helps.

PS: As for the Parenting issue in the 3D Viewport Editor, maybe you’re having trouble with the Origins of the involved Objects (make sure they would be matching, in the World Origin usually), or, more likely, Non-Applied Transforms (but Applying them can cause disruption, must test one by one: Apply Location, Apply Rotation, Apply Scale… in principle for the Coat Mesh Object).

I wouldn’t use automatic weight assignment here, I would try transferring weights from the body. I can see it’s made of several objects, so try making duplicates of all of them, join them, then go back to the coat and use data transfer (operator or modifier). Pick the joined body as target, check “vertex groups”, “all”, and use “nearest face interpolated” as the mapping method

Hi, have you tried to parent the coat in rest pose?

I was also looking for online… Could not find it… Would love to have that for the future if you happen to know where there is a tutorial or text about how to do that.

Look here: https://www.youtube.com/watch?v=766q97OHy1E

Thanks everyone for the help… I love this community!!! I took every ones useful information and consolidated it. It is very hard sometimes to give the correct procedure without knowing all the variables. That is why I try to give every step. Also sometimes people don’t think of small things because they are so routine for them, but not so much for others. After doing an even deeper dive and more messing around within Blender…

SOLVED!!!

When you get your armature from Mixamo we obviously already know that it has loaded key-frames. What a lot of these “Pre-Keyed” animations do not have are “Rest Post” or “T-Pose” back to its origin, So when you attach your coat to the armature you will get this…
Screenshot 2024-10-28 085146

Because the origin point of the coat is where the origin of the armature is… BUT the armature is set up never to go back there. Or at least I could not figure out how to get it back there with the Mixamo armature.

Soooooooooo I went into the timeline grabbed all the key-frames from the armature, shifted them up a few frames, then went back to key-frame 1 and did a full armature reset on a free key-frame, so I would not mess up the animation.

Once the armature was back at the origin point I reset the coat origin, did a CTRL A. Then I did coat shift body… Sculpture mode… Weights, Transfer Weights, Back into object mode… Armature and Coat CTRL P Armature with auto weights and it worked perfectly… (I did not need …Cloth and Collision Modifiers which was my second question).

Next step is to learn how to Grab, inflate, Pose etc in sculpt mode to get it looking correct! I am sure I will be back for that one :frowning: