hello all,
firstly, thankyou for taking the time to help out a noob.
secondly, the problem;
i have made a basic character model and have been following a tutorial http://www.blendercookie.com/2010/01/04/rigging-an-alien/, which in itself seems quite good.
maybe its a bit ambitious on my part to follow this but i have ran into a problem and dont have the knowledge at the moment to resolve it.
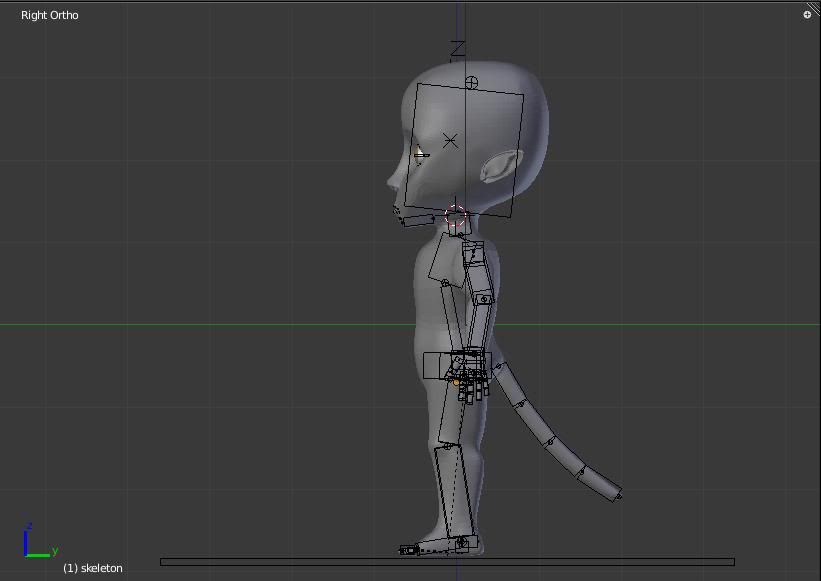
i have followed the tutorial upto now, but when it came to the part about rigging the hand to the wrist, the entire armature stands static in pose mode. I thought at this point i shall backtrack to make sure everything else is still working okay, and now some of the bones have lost their influence. i have uploaded the .blend file if anyone wants to see that as im sure it will make alot more sense than i seem to put into words. im just unsure as to whether i have missed something or its a fault within blender 2.53 as it is still an alpha?
but yeah before i go off on a tangent again, thankyou in advance for any assistance.
Real easy fix - in the armature panel, right above the bone layers, click on ‘pose position’. You had rest position enabled, which forces the armature to remain in it’s rest position and cannot be posed.
Randy
P.S. You can turn down the subsurf to 1 view and 2 for render and in the tool shelf with the mesh in object mode hit smooth shading. It will achieve the look you want while lowering the amount of vertices.
LMFAO ah i love you
thankyou so much haha cant believe it was something that simple.
thankyou for the extra tip also
haha have just done that, and works again beautifully
i do have one other slight problem if you dont mind me being a pain in the backside lol.
it appears the rest position is different to the armature in edit mode, how do i reset it?
Ha, go Randy! Tried to figure it out myself as well! xD
To reset the Armature Pose, select all the bones and press alt+g to reset the location, alt+r to reset the rotation and alt+s to reset the scale. This works for individual bones as well.
thankyou i dunno what i have done then, if i reset the location it takes it about half a unit up and half a unit forward lol? but the arms are still straight instead of being slightly bent lol :S
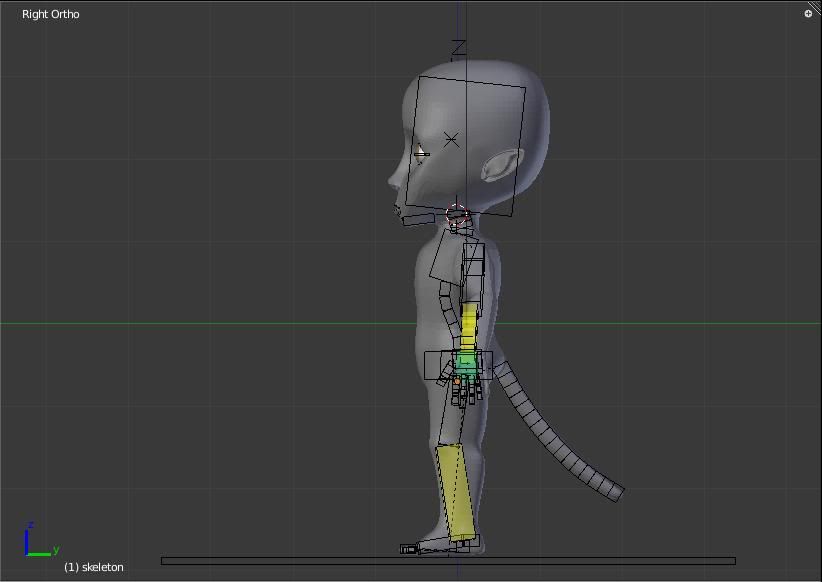
hmmm it should line up with the mesh, but if you look at the arms they are straight instead of following the natural bend. i reset the position with the instructions and it moved the entire armature up and forward so im not sure if i have missed something or just generally fudged it proper lol will try and take some screenies to explain
Ah, I’m guessing you’re resetting the Armature in Object Mode? I’m sorry, I should’ve mentioned you need to select the Bones in Pose Mode, then press alt+g, alt+r. Doing it in Object Mode will reset the entire Armature to it’s Origin.
haha thankyou alas the arms are still straight, i dont think this will be an issue once the mesh is bound to it, just looks strange atm but thankyou again for all your help
Hmm, that’s weird… When I use the file you uploaded and reset the Bones’ position and rotation the arm is bent like it is in Edit Mode. This is what you want right? I attached a quick screeny from Pose Mode:
PS: It does matter how the bones are located, in order for the Armature to bind/ skin well.
lol cant say i have tried that one yet lol. well its always nice to know the help your providing is appreciated
i have found another weird problem, i have tried to set up a bone to control the way the eyes are looking but its treating both as a single object so tis rotating them strangely lol im not sure how to get around it. dont think it helps that im learning my way around 2.5 as well as the first time i have attempted to animate anything lol.
Alright, sorry for my late response, but BA went down yesterday just when I hit Post.
The ‘unbending’ is caused by the IK-chain, The ik.hand.l Bone is farther away from the arm than it’s total (combined) length, making his hand ‘point’ to it. (try moving it back and forth, you can see the arm bending.)
The easiest and probably best way to solve this is by going into Edit Mode and selecting the tip of forearm.l (the one connecting it to hand.l).
Now press Shift+S and select “Cursor to Selection”.
Now, still in Edit Mode, select the ik.hand.l Bone, press Shift+S again, only this time select “Selection to Cursor”.
Repeat this for his right side.
Tab back into Pose mode and boom, you’re done!
Now for the eyes! My first suggestion would be to apply the Mirror Modifier. =P There’s more to it than that though.
Tab into Edit Mode and select only one eye (remember to un-hide the lenses and toggle of ‘Limit Selection to Visible’).
Press ‘P’ to separate and choose ‘Selection’ as the separation method. Now you have two eye Objects, but their Pivot Point is wrong.
Select an eye and press Ctrl+Alt+Shift+C and select “Origin to Geometry”. Repeat this for the other eye.
Select an eye, then shift-select one of the Bones (make sure to select the Bone last) and press Ctrl+P. Choose ‘Parent to Bone’. This will create some interesting eye rolling.
To fix it, go to to Bone panel (with the eyeball.l/r selected).
Under the Transform tab set the W Quaternion rotation to 0. (This can also be found in the property panel you can bring up by pressing ‘N’.)
Repeat for the other eye and I think you’ll be pretty much set to go!
Whew, that was a lot to type. =P Let me know how it went! =)
thankyou lol its ok im just grateful for the help
sorted the arm problem out thankyou very much worked a treat, got the eyes as seperate parts but i havent had chance to complete the rest of the instructions, but i will keep you posted how its coming along
thankyou again for all teh help so far
update: finished rigging together the armature now i think
though may use a different method for the feet and try to add an ik constraint for the elbow to give me a bit more freedom
just another quick question
whats the best way to parent the mesh to the armature? i had a go at automatic weighting but it made a real mess of the mesh, is there a way to edit it afterwards or is there a better method of going about it?


 Doing it in Object Mode will reset the entire Armature to it’s Origin.
