Well, to make it simple: I saw the movie, it was fantastic and I wanted to see if I could do what they did.
For everyone to know - this is my fourth head I’ve modelled so I’m still kinda bad at it…
I’d really like to hear everything you have to say about the work that I’ve done here, the modelling took about two days work but the material took me almost a week before I was pleased with the way it looked.
I’ll give you some renders and the .blend file and hope you therefor will be able to help me as much as you can. If you got any questions or critisism you’re very welcome to share.
It is a more general modelling resource, pay special attention to the ¨poles¨ issue.
Well, the head model looks good, but lacks of details. You should start with the eyes, and start spreading the ringed edge loops a little bit more. You cut those loops too soon. (Look at renderdemon´s female heads)
Finally, there is a technique that adds a lot of realism to the eyes with no effort. Take a look at this video by Jonathan Williamson:
@ YoungApprentice: I don’t really know what you mean with “square” but I can agree about the nose, will check some references and try to get the size and shape right.
@ jpbouza: Thank you for all the links! I really see what you mean with lack of details and the fact is that I have some trouble in that area… I’ve got some really highres pics of the eyes now and will maybe remodel that whole area to get it right, the method shown in the eye-modelling tutorial looks really nice and I’ll probably give it a go. After watching the typology of rendedemons female model I noticed that he’s got a sort of spiral typology that goes from the nose and then around the entire eye. Is that technique used a lot? I havn’t seen that before…
John, yes, that technique is used a lot, it is actually the result of breaking the loops at some part. For instance, if you break the eyelid loop like Jonathan does, you will get the spiral loop topology, as simple as that. Obviously, that spiral loop will have to end at some point, and it will most likely do it with a 5 polygons star, a pole.
The nice thing is that you can decide where to place poles. Generally you would want poles to be in areas that doesn´t move so much.
The topology that Renderdemon uses in those head models is the ¨C¨ topology you will find at the subdivision modelling thread. I think that that kind of topology is really neat, and it is absolutely ideal for obtaining realistic results really easily when rigging.
Well, to each his own, I guess. Although I think that Renderdemon’s work is really good, it seems to be more suited for zBrush work than rigging and animating. The meshes seem to be very “heavy” to me… he has what… probably 2000 polygons in the head alone? Unless you have really great hardware, that’s going to be a b!tch to animate.
I always liked Taron’s method… very simple topology, very few polygons, and then if he needs more he does it through a displacement map.
I followed along with this tutorial… the end result is about 550 polygons for the head (with ear). It deforms nicely, too.
But, of course, there is no one right way of doing anything…
I really like your work so far, I hope to see you continue. My feedback is more on the texture however. The forehead is looking pretty good with the stripes (& density) but below the nose & on the cheeks something feels a bit “off” and I can’t quite pin what it is to say. I also think that while they’re blue, there’s a hint of a teal tone in their color (mix in a little green). The spotted highlights are looking pretty good too but I think there needs to be more of them running up the nose into the forehead. Overall though, I think that’s an excellent start on the texture, the basics are definately there and really not that far off the mark. Nice work, look forward to seeing you progress. Thank you for sharing your work.
Edit: Also should note, teh patterns of the stripes & dots are symetrically (patterned) on their face but not (exact). Meaning, a stripe curving up the left side is also on the right side but not a mirror. They also curve outwards from the nose, not inwards.
Also, a Google image search for ‘avatar’ with ‘Images larger than 2 MP’ selected as an option will give you large reference from the film. I’ve been tempted to do one of these myself seeing as Ton and Lee wont shut up about the film here at the Institute, but have plenty of other side projects in mind first.
For example - a bit fuzzy but a profile shot.
You’re off to a flying start though, keep at it. Can’t give too much actual critique now, supposed to be working.
I think the only problem with your model is that its to smooth.
Cheeks aren’t flat, the pop out. He doesn’t have much of a brow, and I think his head might be to long.
But the textures pretty good.
Hi again, have a little more time now to read and reflect on your thoughts.
@ jpbouza: Ok, thanks. This is intresting since I think that the spiral way of doing this model would probably be better to get that vertical wrinkle on the side of the nose. Will probably try to copy renderdemons typology and get a somewhat similar typology on my model.
Also, thanks for your tips. Will try to get a close look at that C-typology.
@ Quandtum: Thank you for your critisism on the textures, I think that what’s of in the cheek area is the lack of details and the shape of that area is also totally wrong. I’ve tried to mix in a hint of green but maybe it isn’t showing that well, I’m really trying to look at references to get the colors right but everytime I try there’s always something wrong which I can’t figure out…
About the dots I don’t think more of them are needed, I have looked at pictures of Jake’s avatar to see where the dots go and placed them on about the same places. Also if you compare Jake’s avatar to Neytiri you see that he has far less dots than she.
The stripes in the first pictures isn’t mirrored but in my third post as well as this one they are because I havn’t had the time to redo the UV. But I defenitly think I have to redo them.
@ BenDansie: Thank you so much for the link and the ref, I’ve tried to google a lot of pictures but I couldn’t find a profile picture anywhere, thank you also for the search tip.
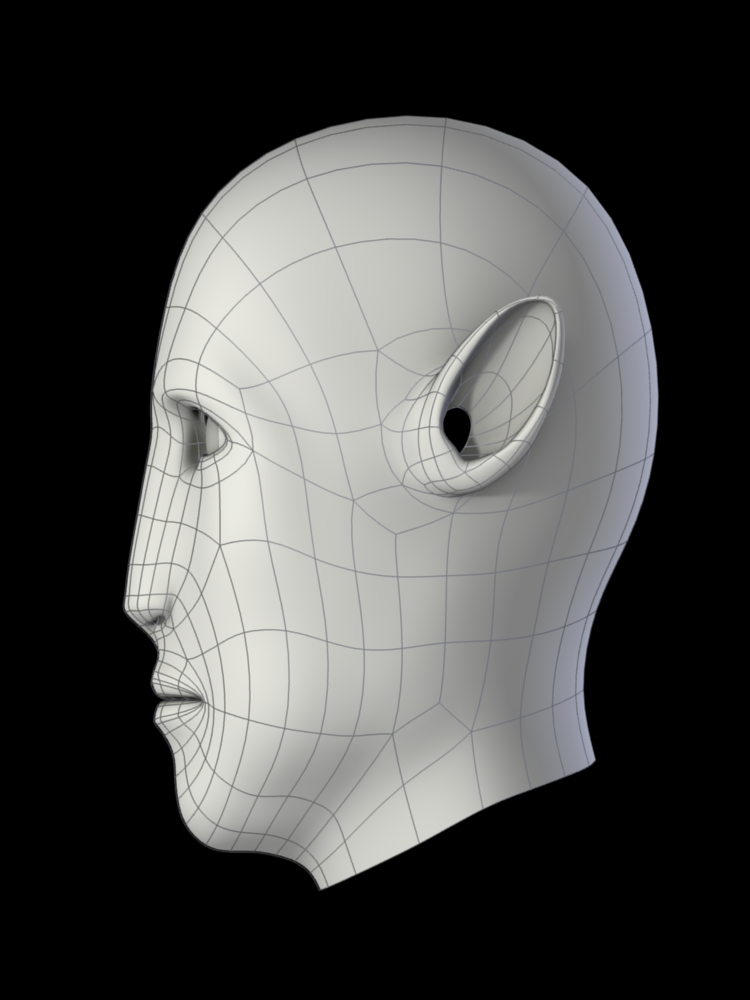
After comparing the side reference to my model I found out that My entire model was COMPLETELY wrong and I made some serious changes as you can see below. I guess I don’t know so much about anatomi as I thought…
@ cire792: Yes I definitley agree, that’s why I’ve done the whole head a workover and hopefully you’ll find this version better. If you’ve got some more crits on the shape, please post.
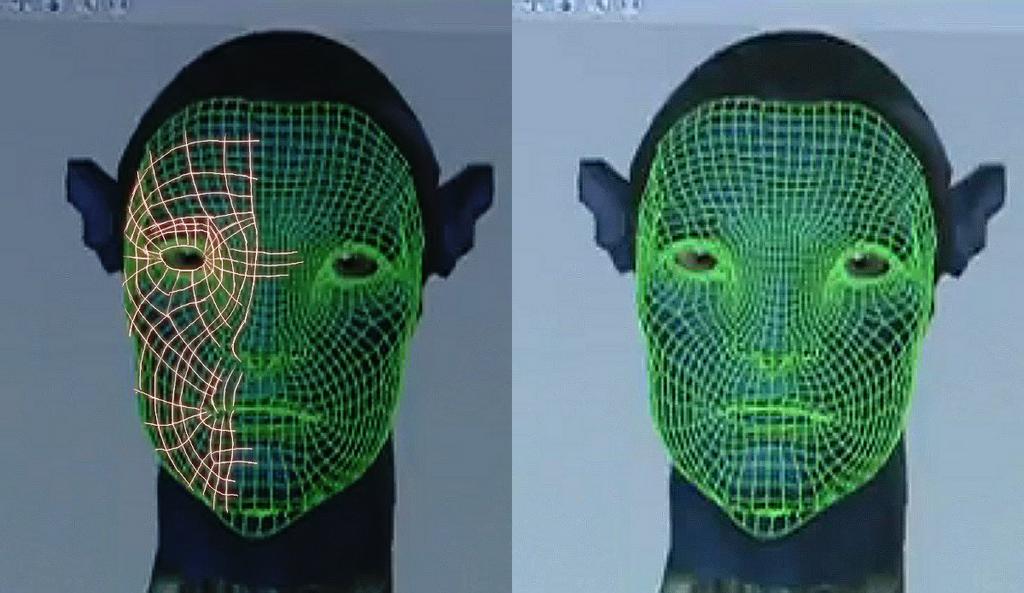
Thank you for the link to the wire, intresting to see how the real model looks like.
And now for the big reveal… “dun dun dun duuuun” I’ve redone his entire shape, I can’t belive that I couldn’t see how badly the previous shape of the model was but I think I’m far closer to the final shape now then I was before. I’ve also darken the tone of the material to get a more realistic result but I don’t think it’s really right…
Blew up the wireframe from the making of featurette and did a bit of a paintover on some of the wires to hopefully make things a little clearer. Click to enlarge.
I think the above image in that thread of reference is possibly going to be the most helpful to you from now on. Take particular notice of the cheeks and how they translate / flow down into the jaw. I know it’s in a pose, not a default face, but it shows off the forms nicely. Then, seeing as they are fairly human in the way the Navi’s cheeks and general face setup goes, feel your own cheeks for a bit. Look at them in the mirror, take note of the various curves. Just an idea. Anatomy can take quite some time, I’m still learning a lot about it too.
@ Leto Atrell and arbiter410: Thank you, but I havn’t done any successful hair yet and even less made dreads in blender so that would be a pain in the ass to do… I did though try to give him hair about a week ago on an early version of his face which you can see below, you think he’s pretty?
@ BenDansie: Thank you yet again for giving me references and tips. Maybe I should do a retopo of the model to achieve at least something similar to the makers wire, it seems to me that they in fact have used a spiral typology around the eyes so I’ll have to go with that.
And yea I’ll definetly have to get the shapes right and make them more expressive to get the character right. Right now I’m having big troubles with the tilt of the cheek as shown in the pic below and also the inward “wrinkles” around the chin but maybe I can achive that if I change the typology…
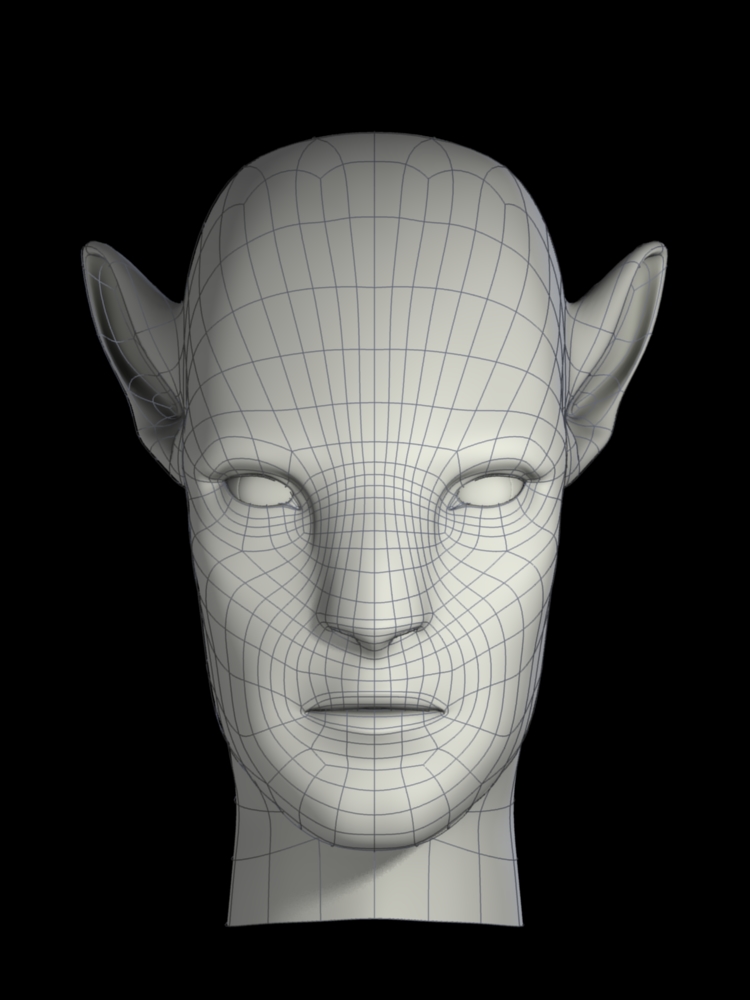
Okay! I’m pretty proud of this update I’ve made this time.
This is my first ever retopo of a character in blender and at least I think I’ve done pretty good. I’ve tried to recreate the typology of the actuall model used in the movie with the links provided by cire792 and BenDansie.
C&C are extremley welcome
------------------------ Old versions --------------------------------------------- New versions -------------------------------------------------- Goal ----------------------


 this is soooo cool :eek:… ill follow this thread


