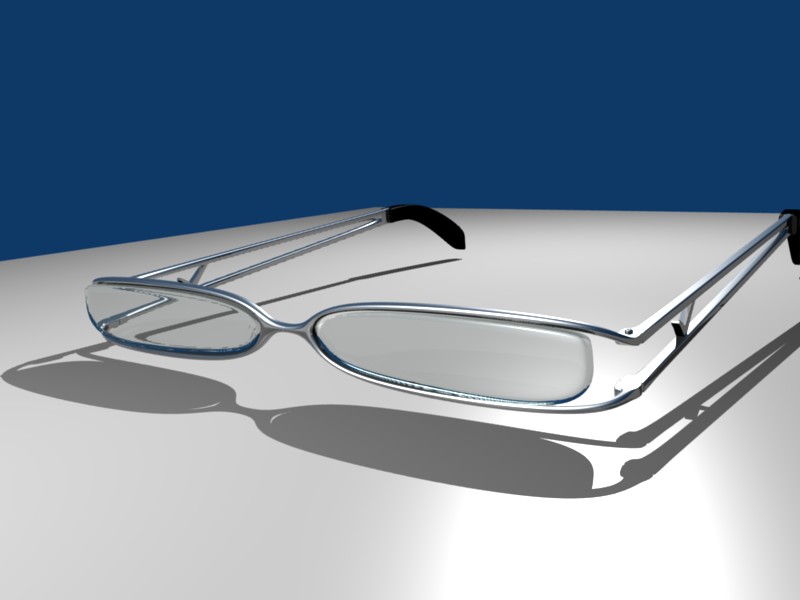
I’ve just reached part Beginning Modeling Final Project chapter of Blender 3D: Noob to Pro. The book says, “Dont’t be an idiot and skip this part.” Since I’m not an idiot I didn’t skip it. Here’s my first model. (Actually the second, the first time I tried modeling my computer mouse which didn’t turn out well). It is my pair of glasses. I’d appreciate any feedback. Please keep in mind that I am an absolute beginner.


hey! you used an ior value for the glass part! good job, non-idiot! they look very stylish.
I would be rather pleased with those even now, one and a half year later. :^)
One thing though, they would probably look better if you kept the lenses within the frame all the way.
What looks better isn’t always accurate. He said these are his glasses…so I’m pretty sure if they filled the whole frame he would have modeled them to do so.
As far as the model itself. You’ve used a couple of things very nicely. You’ve got the mirror modifier in there. You also have IOR and, unlike most newer modelers, you haven’t over done it. Its subtle enough to go unoticed, but noticeable enough to say…wow those are pretty realistic. I’m not sure if you’ve used any of the tables floating around on t he internet…and I dont care. If it took away from the image (eg to distracting) it’d be bad for your image regardless of if it was the right value or not.
At this point, while you continue your “self taught training”, I’d focus on showcasing your focal points. A good background, one that compliments the image rather than over taking it, and a little bit of lighting work. As a pointer…there are very few light sources that are completely white (the default light color in blender). Add in some soft yellow and you’ll up the believability of your image that much more. Hell get creative…don’t be afraid to try some blues or reds or even negative light sources, it will only help you in the longer run. Even if you take your model now and change the background to just an image (as long as it compliments), and you change up the lighting, you’d probably fool ppl into thinkning, hell this isn’t his first time.
Looks good. The Modeling on the lens is messy. But, it renders fine so I guess its good enough. Like PapaSmurf said, the fact that you got a Glass material assigned to the lens, with a bit of color, and IOR is something for new comer.
Oops! :^) Sometimes when I read, the words go in one eye and out the other.
You’re right. The lenses of my glasses don’t fill the frame, so I tried the model look the same. And I think it looks better! Where’s the fun of wearing a pair of glasses with their lenses filling the whole frame. ![]()
Here’s another rendered image with some modified lighting and a new environment. I’m not sure if it looks any better, though. I think I need some sleep! (It’s already around 6:00 AM here). Maybe after that I could think of some tweaks. I know little about lighting now. Any suggestions will be more than welcome.
I’m thinking about giving the model a more natural pose. Maybe I could use armatures to fold the handles easily. Do you think it’s possible? Anyhow, before that I need to finalize the model and apply the mirror modifier.
Thanks for all the comments, by the way.
Attachments

you didn’t really need to use armatures to model the simple hinge joint of the handles. break you model into two parts the frame and the handles put an empty at hinges than parent your handle to the empty. when you rotate your empty the handle should follow along.
Thanks. I’ll try that.
Looks really nice !  You also used great IOR vaule so it looks really realistic. Great job!


Real quality work. Good job.
About lighting: Lamp lamps, Area lamps, Spot lamps and Sun lamps can cast shadows, Hemi lamps do not. So hemis are generally used as fill lamps to lighten up the overly dark black shadows cast by other lamp types. If you use hemis this way, it’s a good idea to turn off specular, so specular highlights from the fill lamps don’t wipe out shadows where you need shadows.
In the world settings, you can add “ambient occlusion” which will add light to parts that are in plain view but not to parts that are near other parts (occluded parts) to mimic the effect of generalized bounce light or sky light. This option adds a lot to your render time, but newer versions have an “approximate ao” option which takes less time, but isn’t as accurate.
Working with lamp set ups: use the outliner to turn off all but one lamp at a time to do test renders, so you can see the individual effects of each lamp. (You may want to tweak the bias settings on the lamp that’s casting shadows, so the ear-pieces don’t look like they are floating due to light leaking around the point of contact.)