I am building a room, the walls are done and I want to make a wallpaper on it.
Since I’ve never done this before, what is the best method?
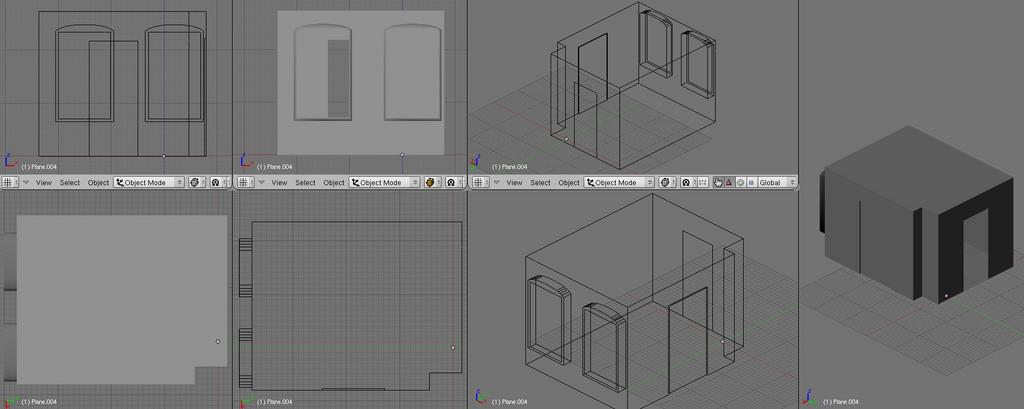
I tried to make seams at the edge of every corner of the room, around the ceiling, door + windows and unwrapped it, but it is nowhere the same scale and bent. Can I unwrap it in some sort of way so that it keeps its original measurements?
Another method I was thinking about is, making it like you do in the real world, (except texturing one single piece of wallpaper) and putting it like one blender unit in front of the wall and do this all around until the room is full of that single pieces (this is maybe a stupid idea, now reading this)
I’ve seen some tutorials about texturing, but they don’t answer my questions.
Are there any tutorials who explain the unwrapping and stuff in detail?
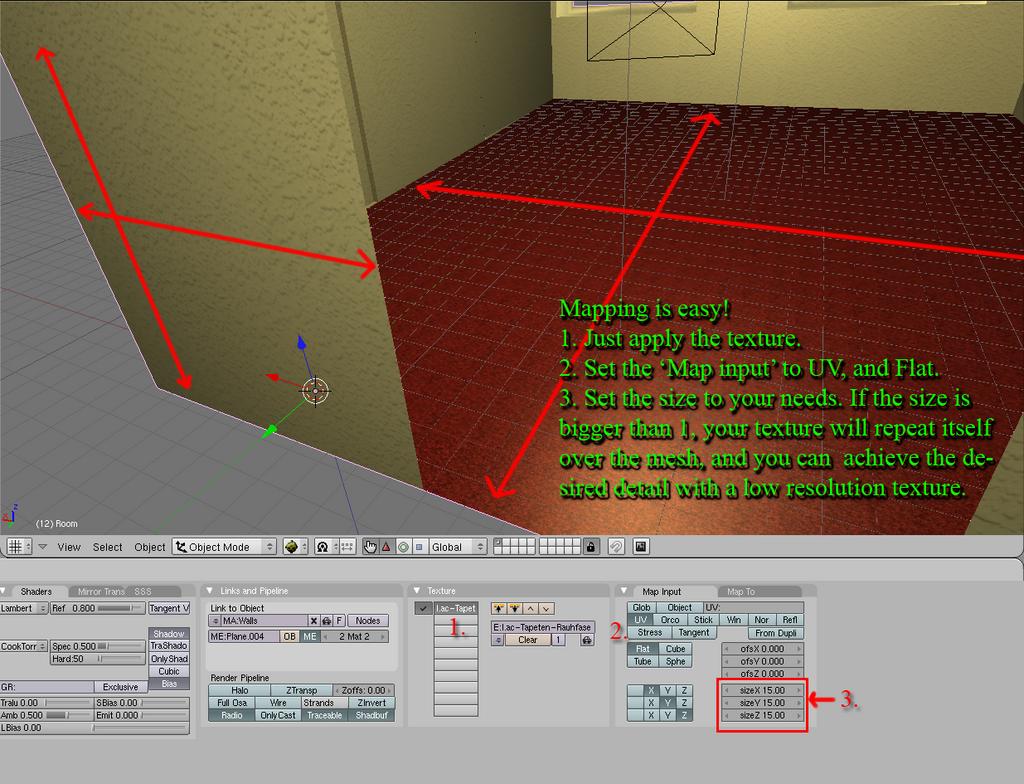
The first method is the best way, it’s hard to avoid uv distortion but adding seams in the right places helps. For example, you may have to split a wall into two pieces, and or tweak the uv’s in the editor by hand.
Thanks for the replies.
No the room isn’t exactly Square. I also want the floor and some parts of the windows don’t have that same texture. When unwrapping, it unwraps everything even if it is not selected, it shows up on the exported tga file. How do I do that? Separating the parts as new objects, which I don’t want to be textured with “wallpaper”, sounds possible, but there must be better way.:no:
Here is a picture
Edit 1
And I wonder, if I use the same texture for bumpmapping, do both textures has to have the same material settings, like shading, mirror and such (if used)?
Edit 2
I tried unwrap project from view, after some time of fitting the size to each other, it seemed to work, althought I think it not fits 100% together. I used a resolution of 2048, maybe that wasn’t enough pixel for the entire room, since it still looks rough. Not the best way yet.
Yeah you need to add seams, for example in edit mode select top and bottom vertex in a corner, press cntrl + E and “Mark Seam”, repeat the process as needed!
hahah :D, just click the specific faces you want the wallpaper on (this method only works on 1 flat wall at a time)
then enter a view where you can see that whole flat plane, then hit U-> prject from view…you should have a square box now
This is the method I used on the 3rd screen shot, only problem is, the size of everything is not 100% right,
which will probably lead to some distortion of the texture here and there maybe. What about the resolution, is 2048 enough for that big areas? The texture is still too large in comparison to the real world, but if If I want it sharpen, I have to raise the resolution, is that a good Idea?
hmmm i believe it will work, but after you project from view you can still size the projection, and change its shape, so try changing the shape and making the image fit in it dont worry, if you change the shape of the wall in the UV texture area, its not going to change your actual wall just the way the texture fits
That’s what I did already, I resized, but did not deform the mesh to make it.:yes:
I know, that it won’t deform my actual wall;)
Are there any good Tutorials about unwrapping?
I just found unwrapping a Sphere on youtube, which is sort of not that helpful.:no:
I also want the floor and some parts of the windows don’t have that same texture.
Use seperate materials for the floor, walls, and ceiling (if neccesary).
And I wonder, if I use the same texture for bumpmapping, do both textures has to have the same material settings, like shading, mirror and such (if used)?
I believe you are using one texture for both color and bump. Actually i do not understand your question
I tried unwrap project from view, after some time of fitting the size to each other, it seemed to work, althought I think it not fits 100% together.
When using project from view, divide your 3d workspace into two windows. Use one viewport to select the walls, and the other to project from view. (Do not zoom in the second viewport, this way your unwrap will stay the same size). Hope you understand
I used a resolution of 2048, maybe that wasn’t enough pixel for the entire room, since it still looks rough. Not the best way yet.
Use tiling textures instead, this way you can have a 512*512 repeating over the walls.
Are there any good Tutorials about unwrapping?
I just found unwrapping a Sphere on youtube, which is sort of not that helpful.
Unfortunately this is a huge gap in the blender documentation. If you provide me with your model, i could make a tutorial
You mean, if I give you this room,
you make a Tutorial how to texture it with wallpaper and carpet?
If it is just the room, no problem, I’ll attach it. Will add textures too.(I have lost the 3rd texture, so just 2):o
Will you return the finished blend for my research?
Use seperate materials for the floor, walls, and ceiling (if neccesary).
This is, what I quite not understand. When unwrapping and then saving 3 of 4 wall meshes, the 4th wall is on the exported tga too.
Use tiling textures instead, this way you can have a 512*512 repeating over the walls.
There is also a gap in my knowledge how to do that right.:o
Making this textured room was already a big step forward for me in Blender.
You mean, if I give you this room,
you make a Tutorial how to texture it with wallpaper and carpet?
Yes, im starting now
Will you return the finished blend for my research?
That was the point of this
There is also a gap in my knowledge how to do that right.:o
Making this textured room was already a big step forward for me in Blender.
Tiling textures, are textures which are modified so that you can repeat them over a surface, without seams, they tile
First part of tutorial, this covers adding new material indices to the mesh, so we can use a seperate material for the floor, and another for the walls and ceiling.
And assigning the indices to the mesh.
I will probably make part two later today. Which will cover assigning textures and unwrapping.
Thank you very much. Got it working. Now I wonder, can I make one side of a cube with this squared self repeating texture and an other side with a not repeating image like my first attemp (in picture no.3 http://blenderartists.org/forum/showthread.php?t=209628&p=1793048&viewfull=1#post1793048 ) which was unwrapped and placed? I made seams around that part (I made it a new material) and unwrapped it, but in the UV/Image Editor I can’t open/select an image.
hey if your wanting wallpaper on the walls, you shouldnt and i say shouldnt uvmap a whole wall face onto your paper, as a professional painter and decorator, wallpaper comes in strips yeh, so for a basic room wall you would get on average 7 strips of paper on that wall.
in this case imperfection is perfection as not even the best wallpaperers get them lined up spot on