Here’s a (uhh, not so…) brief summary of how I do projects like these:
(1) Learn all about libraries and linking. Practice until this is second-nature. Create your sets to-scale. (in other words, decide how many blender-units correspond to one foot or one meter or what-have-you and stick to it.) Create lighting rigs; name your cameras. You will link to these assets from other files. It’s often useful at this point to give the ground-plane a checkerboard texture, one “meter” square.
(2) Determine the dimensions of the objects and characters you’ll use. Create library-files also for these. For now, create simple geometric shapes to-scale; blocky but recognizable. (Later on, you’ll put the real thing in the same library and flip-flop the names, but not yet.)
(3) Plan your movie. A rough storyboard if you can draw; a “beat sheet” of how you think you want it to be.
(4) Start shooting film now! By that I mean, in a blend-file whose base scene is linked to the various libraries, create a series of shot-scenes linked to the base. Each of these should have “Stamp” turned-on with frame numbers, file names, scene names and so-on. Each scene produces a separately-named output file. Use the “OpenGL Render” feature to crank them out. What’s actually in all of the scenes, at the moment, are the rough stand-ins.
Shoot film with reckless abandon: it doesn’t take any time, after all. Block out action through the use of curves on the ground with objects following the curves so that the sequence is repeatable. (Define these in the base scene.) Shoot from different camera angles, and let the actors move-in to the action and then move-out before you yell, “Cut!” Carefully catalog everything you shoot. Create a new scene for each “take.”
Pay careful attention to the positions of the camera, the focal lengths used, everything … because these shots, although they are but wooden-puppets now, will become “a real boy.” Everything is of real size, in the real positions. Everything is “real” except the details. When you replace these (those that you keep…) one-by-one with the real boys, they will match precisely.
(5) Now, using the Sequence Editor or a tool like Final Cut or what-have-you, create a rough-cut of the entire show, now. Use your own imagination as your most powerful tool. Work it until you actually have the final cut. Pull-off a shot list including what file, what scene, and what frame-numbers. With a spreadsheet go back and note which assets appear in each scene and from what angles. Note backdrops and whether the camera moves or not. Declare “Edit Lock.”
(6) As you refine the geometry, create new objects in addition to the stand-ins, then flop the names. Re-shoot the OpenGLs in which the objects appear, then rebuild and re-watch the final cut. Don’t bother to refine anything that (you already know…) will not be seen. Paint the unfinished areas fluorescent orange.
(7) Step-by-step refine the OpenGLs until all the geometry is in place. You still haven’t “rendered” anything. Declare “Geometry Lock.”
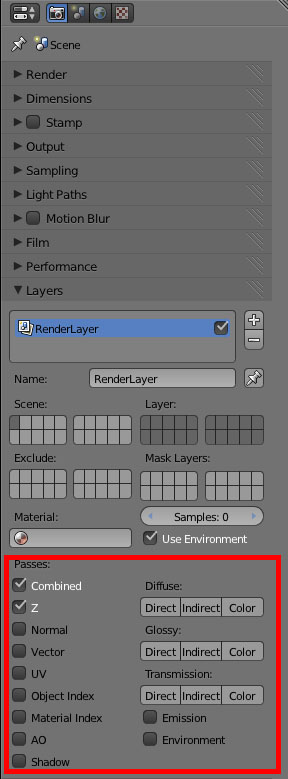
(8) Do a shot breakdown on each shot, using compositing. Use a scene for each part of the “comp,” render to MultiLayer OpenEXR files. Render precisely what you know in-advance you need, plus one second on either side.
(9) All the time, rebuild what used to be your animatic cut and look at it, as it transforms shot-by-shot into a real boy. Step through each new shot, frame…by…frame, looking for fluorescent orange.
(10) Break out the champagne and start working on your Oscar® acceptance speech. 
Keep a “running log” document every single day.