Hi all,
I’m a long time blender user, but I’ve finally decided to join this forum.
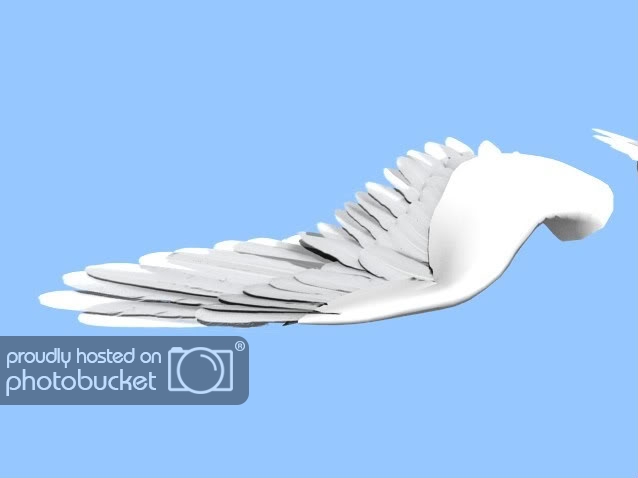
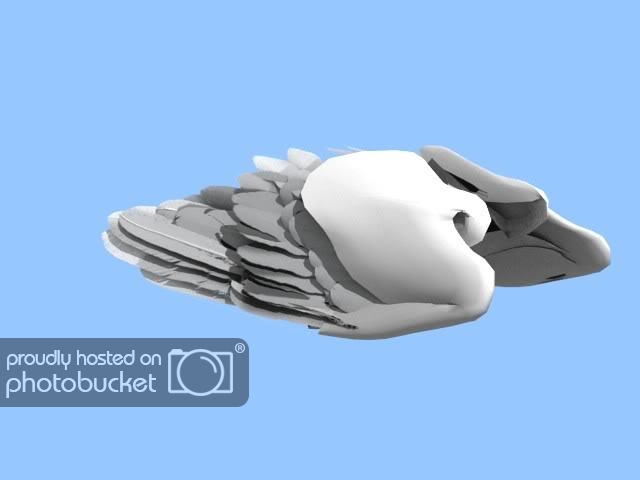
I’ve been working on a semi-realistic bird wing. The rig is made with clever uses of constraints. I’ll post a tutorial sometime. The outer feathers have a soft body to give an air resistance effect
Wow, Just great. I like the movement. I would love to be able to save the YouTube video to my drive to review. The rig looks a bit complex. If you have any other images or .blend files that you are willing to share great, if not, I understand. I have a bird that I have worked on for quite awhile now, and am now going to re-design it based on this post and some others I have seen on other forums, as I have hit a bit of a wall. I have generally worked in Lightwave, but getting the rigging and animation to work as I want has been disappointing and I have been cross training now with Blender as it’s development arc seems very strong, and the animation in BigBuckBunny tells me it’s possible. Keep up the fine work and sharing what you have has been most helpful.
Paul
Wow, great rig! You’ve got some quite realistic-looking deformations going on there. You should adapt it and make a bat/dragon wing with skin flaps as well. Welcome to BA.
How many bones do you actually have to animate in the wing?
Thanks! The rig is probably looks a little scarier than it really is. Its a pain to modify, but once its set up, its pretty straightforward.The wing can be animated really with only the main bones of the arm. However, the bones that control the fanning have been adjusted only slightly to prevent ugly mesh intersections.
I’ve been looking for a tutorial on this subject for a long, but never found one. So after lots of research into bird wing anatomy and physiology, I figured out for myself. I’ll share my technique as soon as I can.
Looks very good indeed. Have you seen the Plumiferos rigs? They are quite similar to yours (well, bird wings are probably always rather similar ;))
Agree with LOTR Junkie, looking forward to what’s coming from you
I too look forward to any sharing that you may choose to provide. I saved off the images on this page for reference, along with all of the other reference images that I have collected, but your rig moves so well, I would love to learn how it is constructed. If you can host the video somewhere so it can be downloaded and saved, that would be great. YouTube posting is nice, but slowing it down and watching it closely would help. I visited your site, excellent work, great stuff.
Paul
I posted a tutorial in the tutorial section about a week ago, but it hasn’t showed up yet, so here is what I posted, for anyone who’s interested:
This tutorial is for rigging a basic bird wing in Blender. This guide is not strict, in that you will have to play around with your rig, due to the wide variety of bird wing shapes.
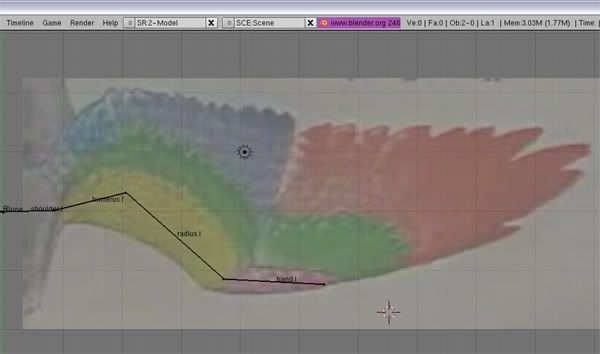
Begin by finding a reference photo for the shape of the wing you will be using. Although this tutorial is based on the wing of a larger bird, its principles can be applied to any bird wing. I’ll be using Buckbeak’s wings in this tutorial.
Reference image:
Position the background image in the top view. I prefer to model the character’s right side, so I have the leading edge at the bottom.
Begin by adding an armature in front view. Enable X-axis mirror in armature editing options. When you are creating the rig, check the mirrored side frequently to make sure everything is being reflected properly.
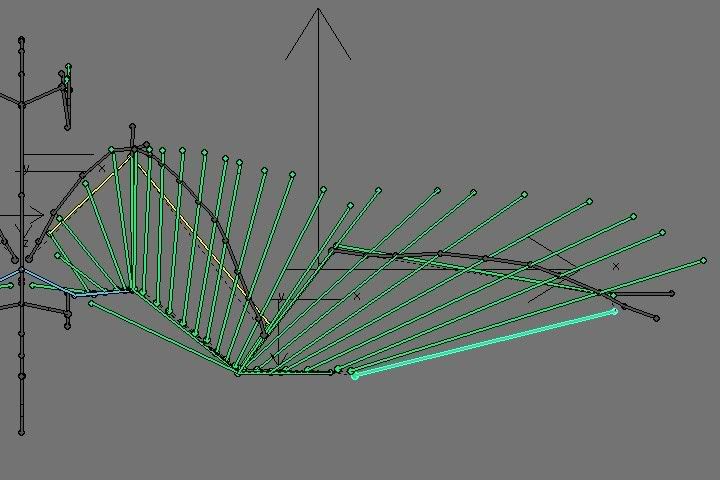
Extrude from the spine to create the shoulder joint, and continue adding the main bones of the arm in top view. The elbow joint should be set in slightly from the leading edge of the wing. Birds have a large ligament that spans from the shoulder to the wrist, creating a triangular region in that area:
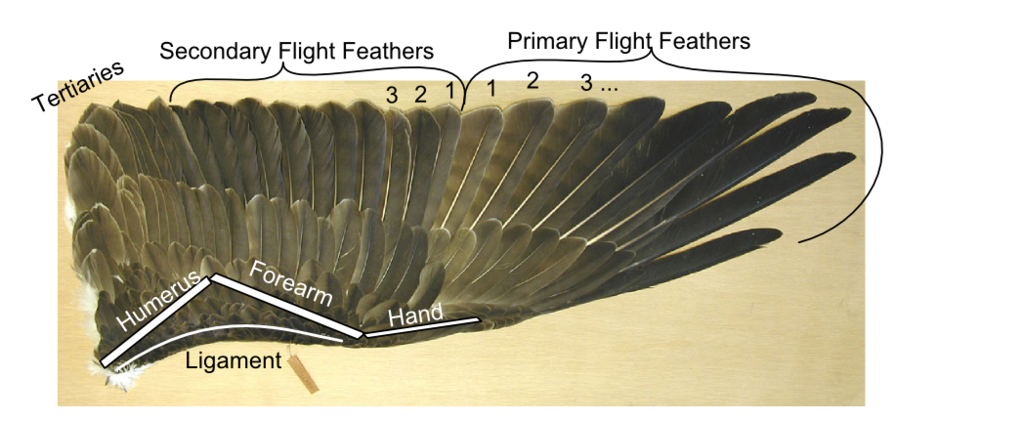
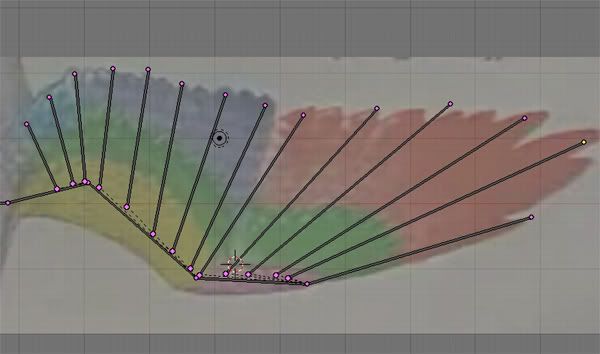
Add a bone for each flight feather. (I have reduced the number in the example to make things easier to explain) The head of each of these bones should lie on or very close to the bone it is attached to. The primary flight feathers are attached to the hand. The secondary flight feathers are attached to the fore arm bone. It is best to make these bones the full length of the feather. It is up to you if you want to model the feathers now or after the rigging is complete:
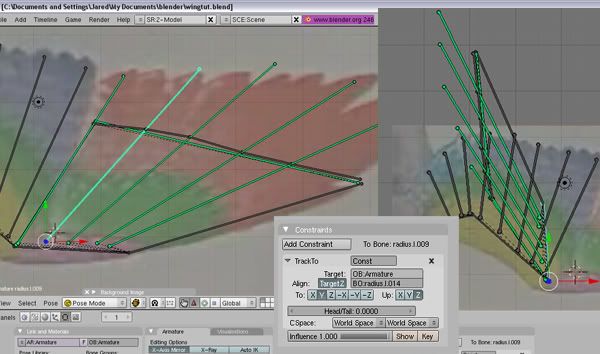
Extrude a bone from the wrist joint. Parent it to the hand bone, but select “keep offset.” This bone should line up with the first primary flight feather. Select the hand, shift select this new bone, and with ctrl+alt+C, add a copy rotation constraint. In the settings, select offset, Z, -, and for Cspace choose local space for both (I haven’t really played with the other choices for this yet). Also, most importantly, slide the influence down to about .25. Now if you rotate the hand bone, this bone will roughly bisect the joint angle it lies between:
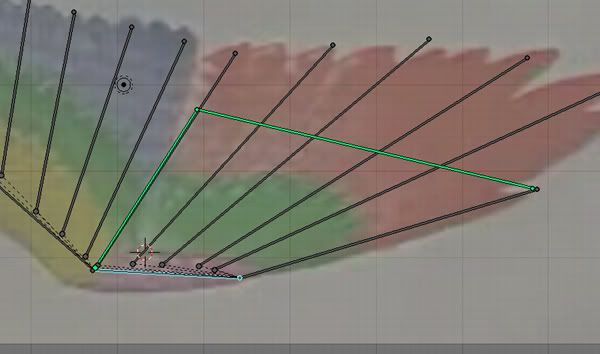
Extrude this bone to the tip of the last primary flight feather. Call it stretch1_L, or similar. Add a ‘stretch to’ constraint to it, so it stretches to the end of the last feather bone, using the new “head/tail” option. In “Vol” options, select none.
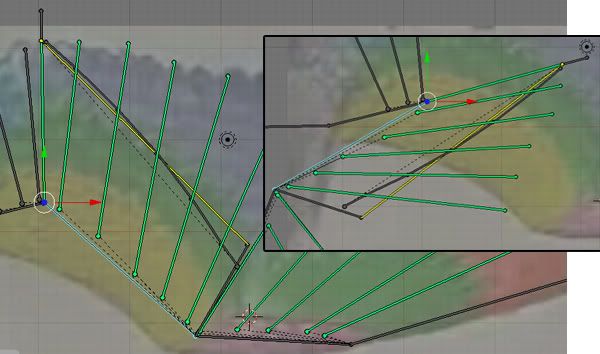
Now, create a chain of bones along the stretch bone, making sure each joint lines up with a primary flight feather. The first joint in the chain should be a child of the stretch bone. It doesn’t really matter which direction the chain goes in. I’ve begun the chain at the first flight feather. Also give the chain a slight curvature in the z-direction (in front view), to make the shape a little more natural.
This part is a little tedious. Track each of the feather bones to the bone in the chain they are aligned to. Make sure you are tracking to the bone whose head its lined up with. In the constraint options for each feather, select “TargetZ.”
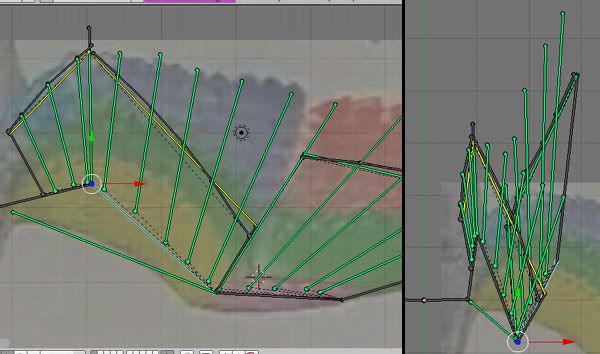
Now test by rotating the hand bone. If you’ve done everything correctly, the feathers should fan closed when the hand is tucked in. The un-rotated position of the hand is about as far as bird’s hand would open:
In edit mode, select the elbow and extrude it to the end of the feather at that location. unconnect it from its parent (do not unparent it though) We’ll call it “elbow feather” Add a copy rotation constraint from this bone to the the forearm. In the settings, tick ‘Z’, local space for both, and give it an influence of about .7. When you rotate the forearm, it should roughly stay halfway between the two bones it is attached to. Extrude another small bone from the elbow feather. This will be an IK handle
Now extrude another bone from the wrist. The length of this bone is a trial and error thing. Extrude this bone to the end of the elbow feather to form a quad shape. Give it an IK constraint to bone off the end elbow feather, and a chain length of 2.
Add a chain of bones along this IK bone as you did for the primary feathers and give a slight z-curvature again. Perform the same tracking constraints for each of the feather bones like before:
Repeat step 9 for the tertiary feathers that come from the upper arm. Alternatively, you can attach the tertiary feathers to the same chain as the secondaries, depending on the control you want, and the shape of the bird wing. Most birds do not have true tertiaries, meaning that no feathers are actually attached to the humerus bone, but rather the end of the elbow.
Give the forearm bone a limit rotation constraint and select “LimitX”
To simulate the ligament in the hand-shoulder region, I have extruded a bone from the hand toward the shoulder and gave it a stretch-to constraint to the shoulder. Turn off volume variation. By assigning careful weight values later, you can simulate how a real bird’s wing folds quite well. I have also done this with the pectoral muscle.
The basic rig is done! It may take some tweaking to get the folding right, but once you do, animating is only a matter of posing the four arm bones. You will probably, however, need to adjust a few of the IK bones in animation to avoid penetration problems after you have attached the feathers, which I will explain in part 2.
Most generous to share the tutorial. I have several efforts that others have made using different software, but the Blender version is accessible (thank you Blender team), relatively clean, moves well, and will push me to get one working. If I can find the time I will try to follow it and share how my version turns out. Don’t hold your breath world, I have client files to “kick out” before play time.
Paul
Hello! I will soon be launching a course on Udemy where I teach how to create a feathered velociraptor. In addition to teaching my entire workflow, I will show you how to create this type of rig. In fact, this is where I learned this technique. It’s still useful today! I don’t know if I can post it here, I believe it’s against Blender artists rules.
 You’ve got some quite realistic-looking deformations going on there. You should adapt it and make a bat/dragon wing with skin flaps as well. Welcome to BA.
 i love playing with complex rigs, but hate makin em
  ah well, looks very neat!