@ Killer – thanks! RE: Photoshop post-pro: I think I’ll try and keep the entire image in Blender, even fine-tuning the final via the compositor as much as possible, just because this is a project to show off Blender a bit, and it’s got good chops Also, as the above shows, I’m aiming at slightly desaturated and understated color, akin to a tinted B&W, rather than actual monochrome.
@ dex – thanks again, glad you like my art. I’m not really working at breakneck speed (though it does get a bit stiff now & then ), I just have the opportunity to get a little crazy about the hours I put into it. My portfolio needs some more good 3D anyway. BTW, ever wonder about the origin of your nick – “dexterity”? (I get trivial when sleep dep sets in…:spin:)
@ Romeo – hey, watch out for sweet young Capulets, dude, they can be real hard on ya… um… where was I… oh yeah, THANKS! :o I don’t feel I’m behind, though, I think maybe that was Ben?
@ yves – started yesterday morning about 7:30 or 8 a.m., it’s now a little past 2 a.m. next day, that’s not atypical. I know… “GET A LIFE!” Well, I had one, it was OK, even great sometimes, but I’m making a lot more art nowadays and that’s a very good thing, so the rest is just on hold.
Welcome to the Comp! Looks like you have your hands full with that one! I see steam, sweat beads and bloody nose in your future! (and then there’s the model!)
There is something bothering me about the pectoral muscles at the moment - might benifit from a little more definition.
Hey, thanks, josh, just what I need, a sound thrashin’
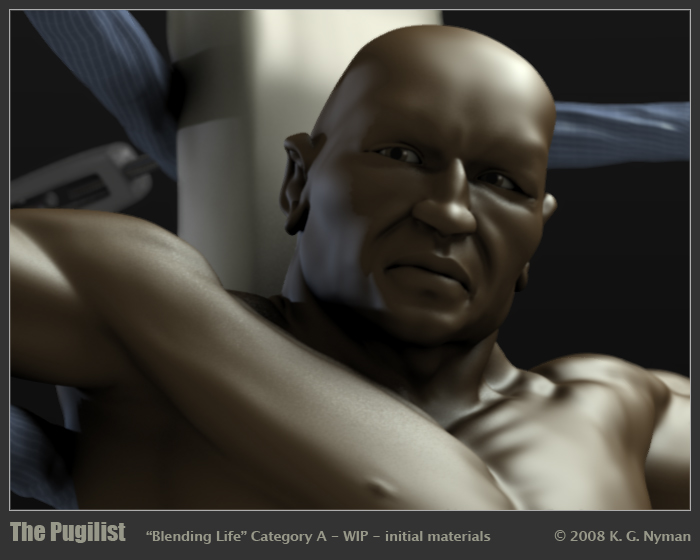
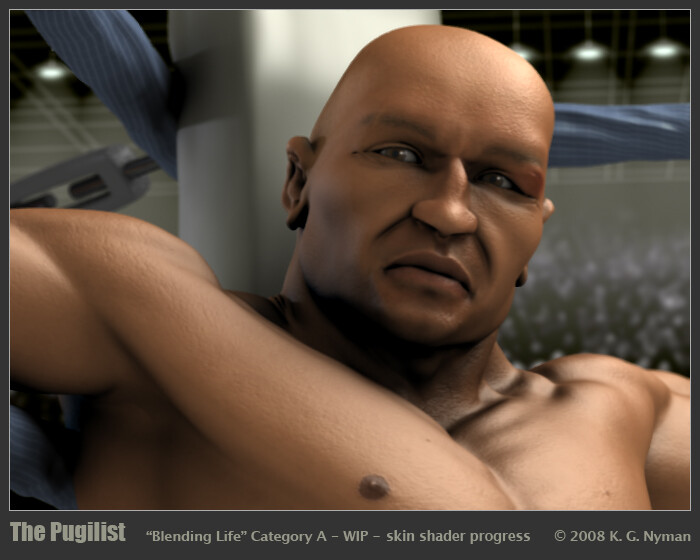
Anyhooz, here’s my current skin progress – I’ve unwrapped the model and started laying in strips and patches of skin from the 3d.sk image Valentyn, using screen caps of the model that sort of match the ref image poses to show me where to snip out patches that match the seams of my UV unwrap. Then it’s just clone and smudge and paint and clone and— you get the idea.
Getting the image texture to work right with the existing material specs and the SSS is a real chore, still too much red in the skin tones, but I like the bump and variegation in color that it provides, very convincing when coupled with the SSS translucency. Thanks for the “loan” of the resources, 3d.sk folks!
Lots more image-hacking ahead so I might’s well get back to it.
Hey you! Stop doing such a great job so fast!
Ok, just kidding, but you make me envious ^^. The pose and expression of your character are really great, and the texture is coming along nicely.
Hah, you don’t fool me…you’ve actually got 7 or 8 people working nights for you on this, right? Some 3D sweatshop somewhere? C’mon, admit it…
Without a doubt, that’s some fine modeling, and kidding aside, you know how to do it fast!
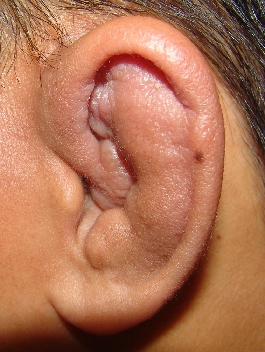
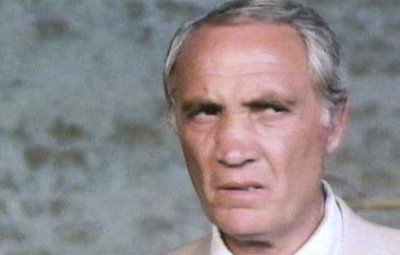
I’ve got a couple suggestions, not crits per se. The “broken nose” look isn’t quite what comes to mind when I look at this guy. Take a look at the former boxer guy I’ve uploaded, and look at the Rodin you ref’d earlier. You’re model’s nose is actually an “outie” where it would be an “innie,” if you see what I mean. (Ignore this if you’re after the artistic effect of it as-is, of course.) Also: I’ve uploaded an image of cauliflower ear - could be an interesting detail to add authenticity and uniqness. Anything, really, that breaks the “perfect person” image would be good for this concept, I’m thinking. Bruises, cuts, anything. Raging-Bull beaten-up, smack-down smashed…etc etc.
Oh, and someone else brought up the pecs…I did a little liquify action on the right armpit - “feels” better to me, although I don’t claim to be the anatomy expert. (Very subtle.)
Thanks for all the comments, people, much appreciated! As far as fast work, I guess this one’s moving a little speedier than most for me, but total number of hours into the modeling isn’t much less than usual, currently I’m doing this stuff on “sweatshop” hours (ha, Eku, good call) but I’m both the driver :ba: and the only slave
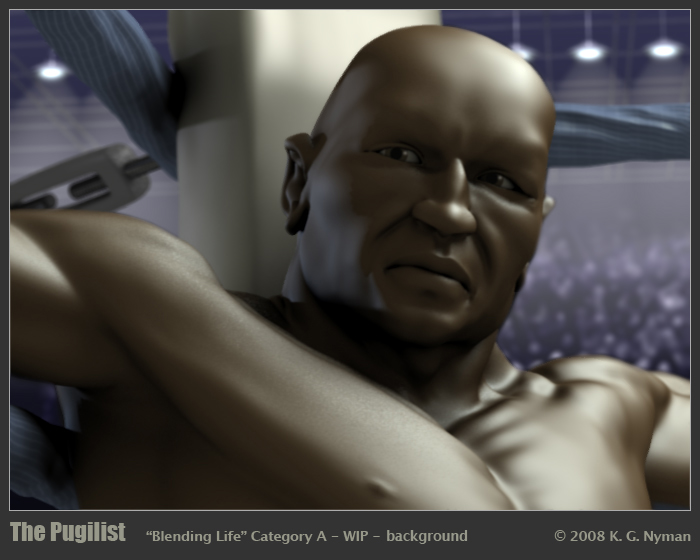
Not much to update, the texturing is just so dang painstaking, trying to build a continuous skin for this guy at photo-real levels by patching together strips from pics that weren’t really taken with this project in mind – I’m doing a lot of repainting, which because of the realism level is very time-consuming. But between test renders (which take way too long) I was able to build the BG:
Just a combination of geometry, haloed spotlights, and billboards, but for various reasons everything is now on separate Render Layers and is being Composited for the render. The figure in this WIP pic is patched in from an earlier render, but all the BG was rendered out at once.
Thanks FreakyDude, and yes, the bicep/tricep area of the FG arm could use some revision. Sometimes you don’t see things like that until you’ve been away from the model a while, or until some friendly neighborhood blenderheads point it out.
Finally! The SSS skin shader test finished rendering – 6 hours or so at this size, rendering just the figure on its own layer. I shudder to think about render time at twice this size, which is my current target. Glad we got lots of time.
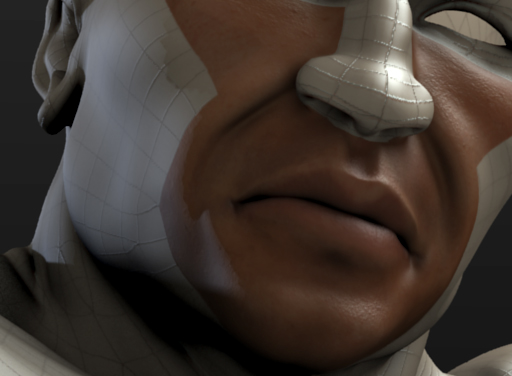
Skin texture’s only done from the neck up, though, and I’m not sure the general hue is final, still looks a bit red, something that the SSS seems to cause somehow. Lighting on the figure isn’t 100% final either, I want to wait until I’ve done the Specular map and added a sweat effect before finalizing it. But I like the surface texture and color variegation the image maps are supplying.
Finally got the skin texture and bump (normal) all painted and a full test render run – 9 hours so far at this size (!) Still using some compositor nodes to tweak the lighting and skin hue but much less than before. After I get the specular mapping done and some hair applied I’ll probably start tweaking the final skin hue, which now is quite a bit lighter than I’d originally planned, but discovering the interactions between RGB shader hues, SSS, and image textures in Col is part of the process. Just too hard to predict exactly.
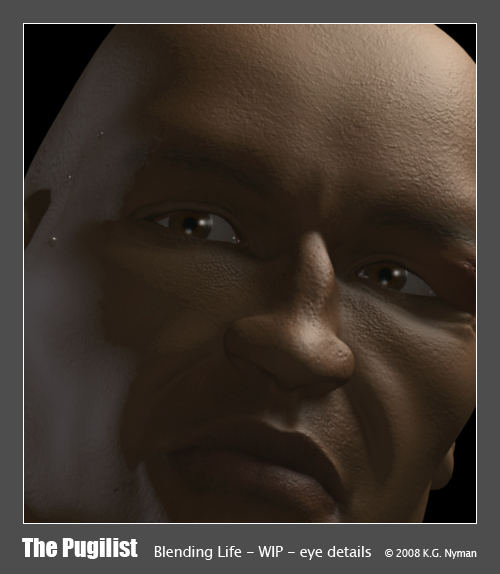
The eyes are near final as well, I mapped a composite made from Jon Miles’ excellent imagery and wrapped it in a RT’d sclera/cornea layer – not much to see at this scale but very natural up close. I’ll be sculpting the RT layer to get other wet effects around the eyes.
I’ve gotten to wondering if the BG is looking too artificial, even as out of focus as it is and should be. Any opinions?
The BG looks fine to me. Maybe blur the corner post and the ropes a tad bit to get the bokeh a bit more believable. Right now it looks like it is two images composited instead of acheiving the DOF with a camera lens.
Great work on the mesh though. The only thing bothering me at this point is that the bump map looks like it is too heavy and very larger for skin. The pores seem huge.
As it is I don’t think the background looks contrasty enough. If you have very bright floodlights in a very dark room you’re going to have a little more glare. that and the background seems really desaturated compared to the foreground which makes them look more disconnected.
Your mesh is fantastic, btw, I really like the character.
The eyes were the focus here, getting the wet look of the tissues and placing the highlights interestingly. No AO or SSS in this test shot since that pushes the render time (especially for this full-size detail) into the stratosphere. I also wanted a close look at the skin surface texture so I can fine-tune the normal map.
I’m starting to attempt a sweaty look to the skin but it’s a real chore. Adjusting the specularity of the base skin helps but can’t carry the whole effect, and the droplets have to be used very carefully or it looks contrived. I’m experimenting with a separate “sweat layer” mesh with some intially promising results but only if I don’t use AO, which I feel is needed. The problem is that the “sweat mesh” totally encloses the “skin mesh,” causing an AO interaction between the two, even when the sweat mesh is fully transparent (Ray Transparency). Does anyone know of a way to exclude a mesh from the AO calculations?
I thought you had gone on holiday to some Carribean island, after not reading updates from you every two hours
My first thought was “the eyes look so real” - even before I read your comment.
Good to see someone out there is pushing the envelope. Keep it up, Chip!!
With regard to the render times, I wish Blender could harness the graphics cards power for rendering.
You can get a triple SLI stack of high end graphics cards for under €1000.