First of all I would like to thank the guys at Montage Studio and 3dSK [EDIT: and of course the judges and Blendernation!] for putting on this competition. I’m sure we all will enjoy this comp - and even if some don’t finish they will surely learn something along the way!
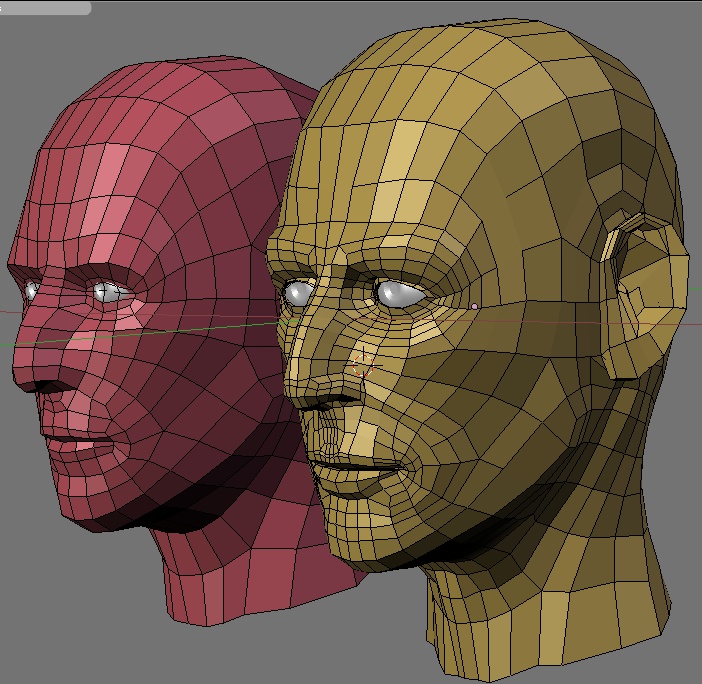
So without further ado I will begin by posting my base mesh which I have created for this comp. This mesh will be used for sculpting out the overall proprtions which I will then retopologize (not sure thats a real word…).
Best of luck to all of you who enter this competition!
I have spent the past hour or so scuplting out the major forms of the model.
In case you can’t tell yet its supposed to be Ben Stiller. (BIG Zoolander Fan… Cough… :yes:)
Anyhow here are the first couple of multres levels-worth of progress.
I would be happy to answer any Q’s you might have about the process so fire away!
This stage is still a long ways from finished. Plenty of problem areas left to sort out before micro details can begin!
Clean basemesh with good topology for sculpting. Like Macku, I also find the face looking stretched. Apart from the aforementioned distance between lips and nose I also think the eyes should be further down. However, one of the great things with sculpting brushes is that it’s very easy to play around with proportions so I’m sure you will get them down just fine.
Macku & Romeo: Thanks for the reply. I agree with you about the stretching (the viewport camera was in perspective mode set at about 50mm so that would add a little distortion at such close range - I was a little too eager to get it up into this thread!).
I have tried to flesh out some of those base shapes and adjust some proportions.
Well after another hour or two of sculpting this evening, here is where the model sits for now:
Please let me know what you think?
(I couldn’t help myself with the pose - its easier to pull off in real life than to model… )
You may notice that nasty 3-pole above the mouth… If I could turn back the clock I would change the base mesh a little to make life easier. In fact I probably will - plenty of time yet! I will wait and see how frustrated I get…
Now he’s more like stiller!
I dont know if it is good idea to make this all fore head wrinkles if your computer can not handle such heavy mesh… I’ve got the same problem with igor ant i think that i’ll create some nice disp by hand to see what happens.
Best of luck!
You certainly didn’t go for an easy facial pose. That’s one shot were Stiller looks not so much like Stiller in general. I think you perhaps should try to model him in a more standard facial pose first and then later use the grab brush to create the facial expression in this shot. Also, although this is mainly preference, I usually wait as long as possible with adding superficial details such as wrinkles so as to make it easier to focus on the broader forms and getting them right. Good progress though, looking forward to seeing the next update!
Thanks for the coments. Ha ha yeah I got a little carried away with the look last night.
Its actually just a bit of tweaking from the base pose (which is the one i will work off for the retopo.
I have added a shot of the base pose below. Next on the list is to retopo this base mesh so I can garner some clean UVs. Then the comes the time consuming stuff…
For those interested I’ve currently spent:
Base Mesh: 30-45mins
First Sculpt Session: ~ 1 hour
Second sculpt Session: ~ 1 Hour
Third Sculpt Session (Blue Steel): 20mins
Hopefully I have more time to devote to this project in the coming week.
I was extremely excited to see the release of Blender 2.48, however whenever I try to turn on the GLSL Shaders and then switch to textured mode Blender crashes…
If anyone could help me out that would be great?
I’m using a toshiba satelite laptop fitted with a ATi RADEON MOBILITY HD 2600 Graphics card (512MB). I had a look on the ATi Website to see if the card supports GLSL? It says it supports OpenGL 2.0… does this mean yes? (this updating drivers stuff is new to me… I can’t get it from ATi anyhow…)
If not then I guess I am doomed to forever live without these great new features (I particularly wanted to try out Endi’s normal painting idea…).
Other than that I haven’t had time to work on my scene (real life getting in the way…)
Good progress, although I think you should do some more work on the overall proportions before you go into more detailing. The area between the nose and upper lip still looks a bit long to me. Also in the reference shot he is slightly leaning downwards with the head which I think has made the jawline on your model slightly off, do you have any better front reference? All in all it’s looking really good!
Ok… So after looking through some of other contestents’ WIP threads last night I decided to get back into my modelling!
I haven’t posted any updates here for 11 days now so I thought I had better keep you all in the loop (I’m always looking for a second opinion!).
Romeo: Thanks for the input. I agree with you about the placement of the mouth and the flow of the jaw. Hopefully I have ironed those out! As for reference pictures there are plenty of Ben on the net… the only problem is getting them where he is a consistent age!
As far as modelling goes I mocked up a quick shirt and jacket to lessen the f"loating head in space effect"…
I have re-worked the facial expression and decided to give the hair do some attention (the model’s hair…not mine) :RocknRoll:
Here is the basic setup:
I created another (seperate) mesh and called it “Hair”. It started off as a simple plane object with a mirror modifier and a subsurf modifier and I “roughly molded” it around the shape of the head trying to keep the faces fairly uniform in size.
Then I applied the new Shrinkwrap (so so sweet) to the hair mesh and set the target as the head model.
The reason I’m doing this is to try and conserve memory by moving the hair mesh to layer two and defining its own renderlayer as well. This is so I can “style” the hair and re-render only the hair layer if I want to (It will also come in handy during the compositing process).
Before I began styling the hair I took a quick screengrab of the setup. Meet Punk Ben!:
Also once I have had a decent go of the hair I will post further progress.
Did I mention this is a fun project? It’s a fun project!
I have been slowly putting together a skin shader and I tried to randomize the pigment colour a little using a cloud texture. (I am yet to paint/incorperate a diffuse and bump map). For those looking closely I had already disconected the cloud texture before taking the screen shot…


 )
)