thanks for the answer.
after investigation I found tiny mesh in the eye-socket
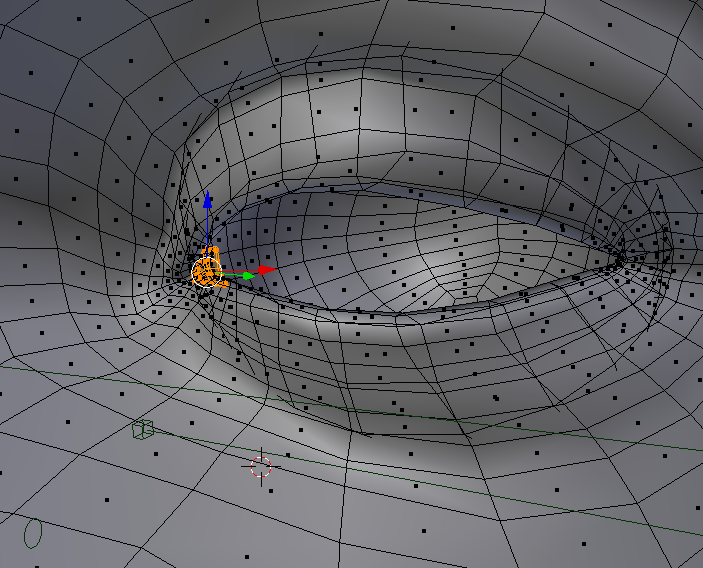
seems that Blender doesn’t like intersected meshes
thanks for the answer.
after investigation I found tiny mesh in the eye-socket
seems that Blender doesn’t like intersected meshes
Juan Pablo, is it possible to load BVH for Blenrig in the future? like MakeWalk addon does
and I wonder how to do the facial mocap withing Blenrig, is there any good practice?
Hi cooler_inc!
Well, all those things should be possible, but to tell you the truth, I haven’t had the time to figureout a nice workflow for that. So, for now, no automated solution.
Very nice rig , as soon as I sort out the deform bones gonna slap this puppy on something, looks really cool. gonna have to sign up for the cloud now. thanks much.
Hi guys! Just wanted to let you know the first chapter of the BlenRig Video Tutorials has been published on the Cloud!
The first tutorial consist of 14 chapters which I’ll try to publish daily (more or less :p). It will be like 1:30 hours of material in which I’ll rig a character from beginning to end.
So, if any of you was waiting to subscribe to the cloud for these tutorials, it’s time you do it! 
Awesome news, thank you so much !!!
Hey jpbouza, khalibloo gave me a suggestion on exporting Rigify which I tried on Blenrig and not only worked but gave 60fps on playback (30fps before). Paraphrasing: “take the deformation bones and bake the animation using visual transforms”.
Not sure if by “visual transforms” he meant “visual keying” but what I did was duplicate some DEF bones (specifically all the green ones, excluding the face and fingers), removed the .001 duplication suffix and added a copy transforms constraint to the twist bones (the ones that clearly didn’t keep their previous constraints), then I baked the animation and switched the low poly mesh to the DEF only armature, and finally I export those two as fbx.
I tried to redo this by baking the original DEF bones but while it does bake “something”, it doesn’t affect anything; the bake was set to apply all visuals/constraints yet the bones still follow the IK (I guess it’s related to how you parented the bones or something).
So, if you were to duplicate all the deformation bones as a separate armature then have them copy all the transforms of the originals, the rig can have it’s animation baked and exported for use elsewhere. I say this as in scripting it because that’s far too tedious to do every time someone wants to have a character ready to export with a rig.
note: the animation has to be baked before export because the fbx export doesn’t bake the constraints as animation.
P.S. I’m gonna see how combining parts from a Rigify rig would work with Blenrig since (afaik) I’d have to manually do complex things to modify the rig.
Hi Edtion!
Yes, when I finish with all the release process and videos, one of my objectives is exporting to game engines. If you remember, I said that I was doing some tests with for an app with Theory Animation, and that worked. Similarly to what you say, I created a second armature with the correct parenting and copy transforms constraints, and it worked perfectly well.
My idea is to get some kind of feedback about namings and conventions from people who use unreal and unity (I may even contact unreal or unity guys), and then I’ll do a game preset that will be included in the BlenRig addon. Motion Capture is also something I have to look into too.
But well, I’ll do all that as soon as I finish with the videos, and I may try to get some funding for that too, so I’ll have do a research of which funding method is the best for BlenRig (like Patreon for instance).
Hello, any idea on game engine export timelines?
PS - Thanks for rig. Learning lot from it.
Still haven’t started my research/development on game engines so I have no answer for that at the moment
Hey,
I’ve been a bit stupid…
I’ve animated about 25 seconds with the new vincent character and blenrig addon, but have been clicking the ignore ‘auto-run disabled’ button at the top every time I’ve opened the file.
When I now click the reload trusted button (for uploading to renderfarm), on opening the file, the animation’s all buggered up.
Is there anything I can do, to preserve the animation I’ve done when i’ve been ignoring this to the file now opening under auto-run.
(without going in manually and re-aligning these three bones for all the animation!
Much appreciated- thanks.
UPDATE: found what it was (not sure why though):
changing the knee poles to not follow follow foot: under blenrig tab: custom properties (when either knee pole is selected
and the head_fk is parented to head_fk_mstr (on layer 13). Select it and disabled the “CopyRotation_NOREP” bone constraint.
The elbows weren’t affected.
Not sure why these worked, but they did!
Thanks for the awesome rig and character btw!
Hi Jim!!
Wow, sorry to hear that, I should have mentioned the ‘auto-run’ thing…
Well, basically what happens is that the script overwrites certain properties of the rig, fk/ik, hinge, etc. So, if you animate without the ‘auto-run’ on, Blender will be adding keyframes to properties which have an address that is not the same as the address of the properties that the script generates. So, basically the rig works in both cases, but the animation of properties will not be compatible.
So, what you should just do is to key all the fk/ik and hinge properties again, and it should be fixed.
Hi all
great rig, thanks a lot Juan Pablo!
I followed the pdf tutorial and everything worked fine so for. But now I’m stuck with the following problem:
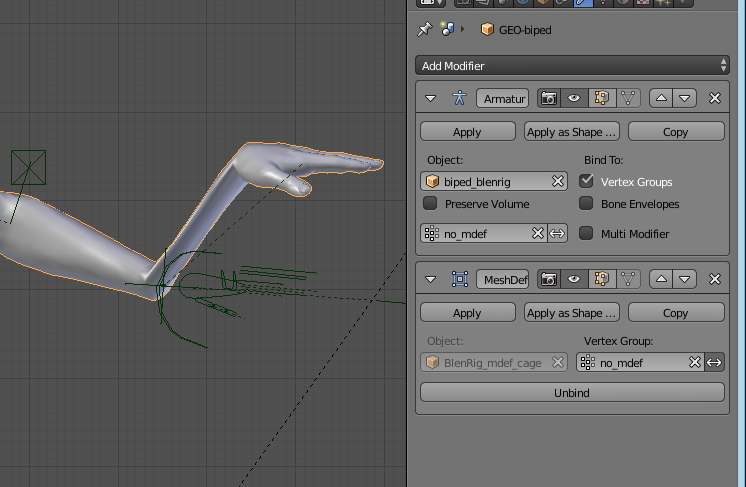
I can’t move the fingers of my model. I parented the mesh of my model with the blenrig armature and added the no_mdef vertex group as described in the pdf tutorial. When i move the wrist controller, the hand does not move and stays where it is (see attached screenshot). Also the controllers for the fingers do not work. I see the fingers of the armature bend but the mesh does not follow.
What could be the problem here?
Thanks a lot for any help!
stabio
Hi Stablo!
Well, I think the issue is that you have to actually paint the model with the deformation bones of the armature. That is not automatic
Well you could apply automatic weights but generally that doesn’t deliver a good result. Do you know how to do weight painting? In case you’re new to this, here at minute 4 I start weight painting the hands:
It’s an old tutorial about the previous blenrig version, but well, I guess it’s good in enough fot this
You should enable the deformation bones layer, i tihink that in the pdf I show that.
Otherwise, you could subscribe to the blender cloud and see my step by step video tutorials, or if you don’t have money, just send me a private message and I can send you some magic links 
Hi Juan Pablo
wow that was a quick reply!
Shame on me. I left out the section 4.4 - REFINING CAGE DEFORMATION because I thought this would only be tweaking of the deform cage. I wanted to do this later on…
I did a quick test and painted some weights for the hand on the models mesh (not the deformation cage). Now the hand moves along with the arm… Thanks a lot! I will paint the whole hand in detail later on.
Thank’s again!
stabio
Cool! 
Hi all, me again…
one thing i forgot to ask… How important is the exact placement of the deform cage and what is the optimal spacing between model and deform cage? As I noticed, the bigger the spacing, the smoother the deforms. Is it wise to use different spacings near joints like knees or elbows?
Thanks and regards
stabio
Hi Stablo!
Yep, exactly as you said it, you can play with different distances in order to get better deformation in certain areas. For instance, more distance is a must for shoulders in order to prevent intersections.
About knees and elbows, I woudn’t say distance is important, but what it is important is that you place the edge loops of the mdef cage correctly, cause the topology of the cage in those areas will help you in deformation. So, yo can check out some characters that I rigged if you want to see how I place things is those places. Nothing strange with it though, but weil, if you more or less align it in a similar way, you won’t have to do weight painting corrections.
Checkout vincent as an example:
Thanks! I will definitely check them out. Still learning a lot…
Regards
stabio