I’m trying to render a lightsaber following the steps in THIS Blender Cookie tutorial. I did this once before and the results were perfect.
But now I’m trying to do it again, and for some reason, I can’t get rid of the outline of the lightsaber’s Mesh. (Obviously, the lightsaber is just supposed to glow and not look like a crisply-defined stick.) I did this exact thing before - I still have the .Blend, even - and it looked fine. I’ve compared my new problem one to my old one and the Blender Cookie version, and I can’t figure out where I’m going wrong.
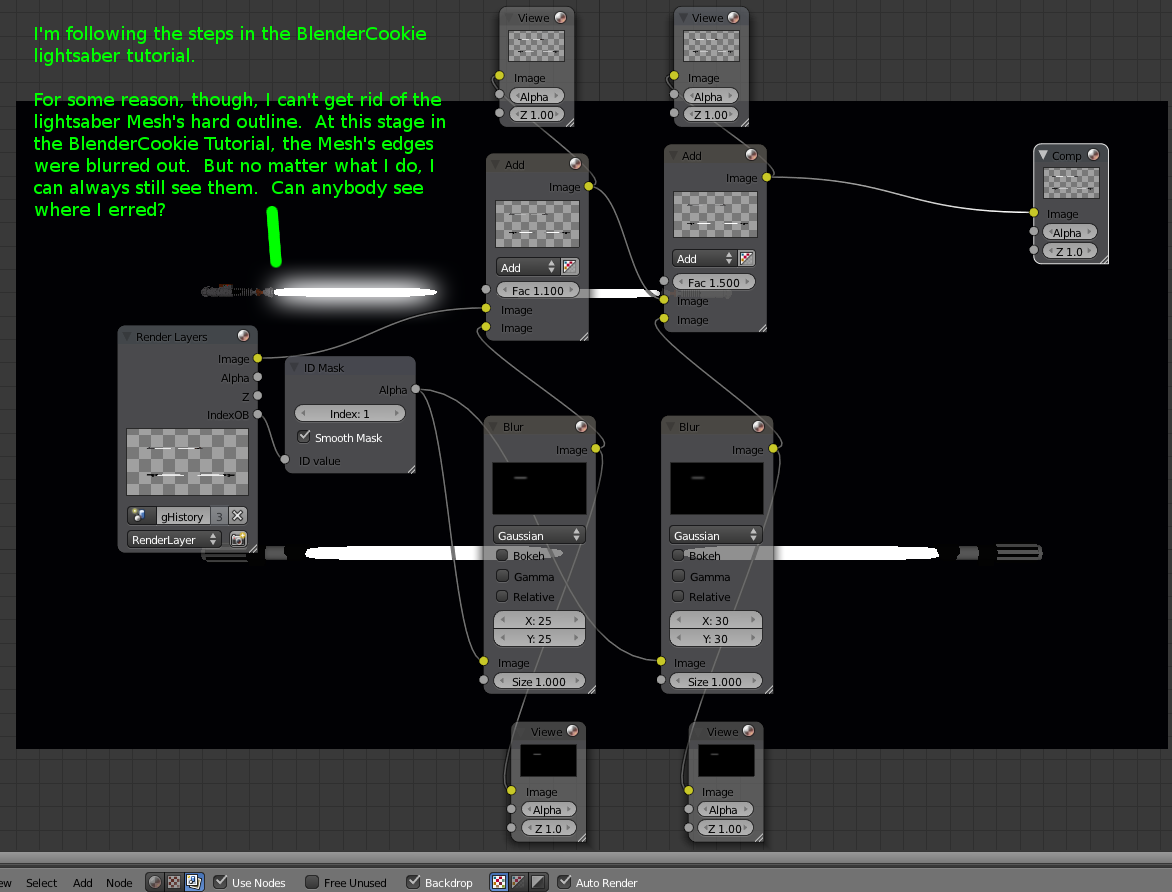
So can somebody good with
(I understand that there are many other techniques of making lightsabers, but I’m using this technique and just want to know why this is suddenly not working properly.)
The .Blend is attached, and this screencap shows the problem, too. Thanks as always.
No, it’s not the aliasing/anti-aliasing. Tried that many times, it doesn’t fix the issue and I also disabled it on my properly working version of this and it didn’t effect things there. You can check the .Blend to find a solution.
I’m grateful for the contribution, but that’s not necessarily what I’m looking for, either, because it seems like you basically just zoomed the camera in such that the blur spreads out beyond the boundaries of the edge. This bleaches things out.
And once again, note that turning off the anti-aliasing doesn’t make any difference whatsoever as far as the problem cited. So, again, the anti-aliasing doesn’t have anything to do with it.
So if somebody could achieve this with the camera angle in the original .Blend (rather than zooming in super tight or otherwise changing the angles) that would solve the challenge.
The animation looks really cool, idh1109. Thanks for the effort.
However, the issue still exists when you pull the camera further back away from it, as shown in the screencap below.
(I understand anti-aliasing, and I simply have that disabled to save render time because it’s not relevant to my animation at this stage. Usually with Blender, I only turn anti-aliasing on for the final renders or when special circumstances warrant it.)
I don’t mean to plead too much, but if anybody could diagnose why this isn’t working in this instance, that would be really, really, really, great. The animation is pretty much just for fun, but this tiny issue is just driving me bonkers.
I can’t look at the .blend right now, I’m already Blender-maxed, but it looks to me like the Blur is just too severe. The values you’re adding back in for the glow never equal the value of the pure white blade, so you’ll always see the edge in contrast. You’re using Add nodes, which means that the area of the blade is always going to have a greater value than the heavily blurred areas unless you add the blur in a number of times and then normalize everything with a Color Ramp. But that would also probably make the glow too bright & much less soft.
As a solution, I suggest you use a Blur node with only a small blur of a few pixels between the base image and the broad glow. This should soften the edge better, because the gradient is less spread out, and there will be more high-level tone around the edge of the blade. You may need to use more than one of these if the contrast between blade & BG is severe.
I tried changing lighten to add. Also I increased the add mix value to max (5.00). You could try adding a filter>Dilate/erode node at the output of the ID mask. This will bulk up the shape of the light saber prior to blur.
I haven’t seen the tut, but I don’t understand why they are using that particular set of nodes.
Instead, I’d use a fog glow, maybe one of those blurs, and a mix.
Run one output from the renderlayer into one input of the mix, and another output from renderlayer into the fog glow, from glow to blur, from blur into the second mix input. Start with zero on the mixer and increase it till you get the balance the way you want between the original image and the effects.
As for the fog glow, (assuming the blade material is an emitter…) I’d use a medium glow maybe, and you’ll also have to tweak the mix on that to get it where you like, as well as the threshold.
At any rate, you’ll have to play with this group but it might help At least doing it this way you’d be able to get rid of the original image of the blade, if that’s what you’re really after. Personally I think it’s pretty as is… Sorry I’m not more famliar with this tutorial. Hope that’s helpful at all…
Don’t skip AA on the blade, as it’s hard to get rid of the staircasing through Blur alone.
The ends of the composited blade look sharper than the rest because of the nature of the blur process, it tends to affect the ends of long thin things more than the rest, thus creating a kind of length shrinkage in the blurred version. A way to avoid this is to use a specially-sized object for the blurred glow effect that is slightly longer than the actual visible blade. This can be on a separate Render Layer and used only for the glow compositing.
For the blade you can use Material tricks to get a look that is somewhat less hokey (and easier to work with!) than a hard-edged blob of pure white. It’s better to use Compositor tricks to create the overall intensity of the glow than trying to reduce the over-exposure of the type of blade you start with in this file.
There were many suggestions given, but I think the two that pushed it over the top were Chipmasque’s advice to make the first Blur Node very small (and also add a third pair, if necessary) and, then, 3PointEdit’s pointer to add a “Dilate Node”.
Between those three things - making the first Blur very small, adding a third pair, and then then Dilate Node - it seemed to go from NEVER working to then ALWAYS working no matter how much I tried to break the bastard up.